RSS Email

3D Paper Pumpkins #fall #crafts

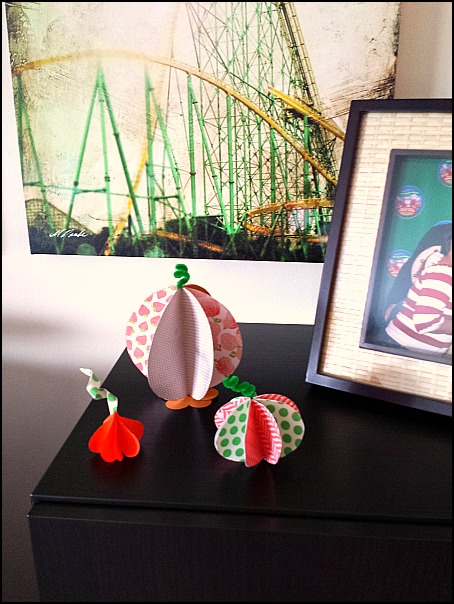
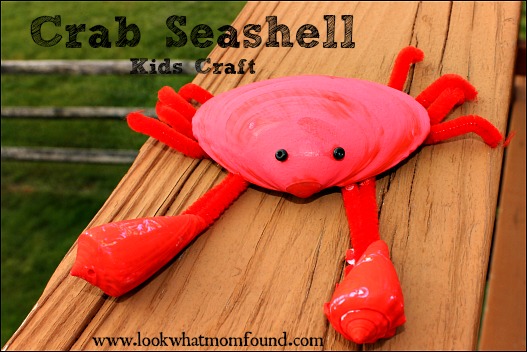
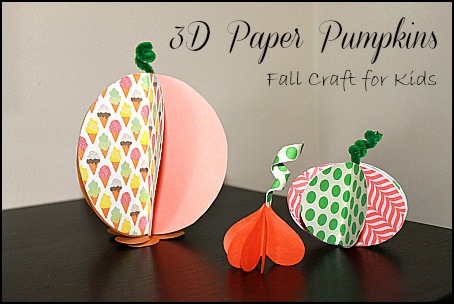
Creating crafts for the holidays is always fun. Giving kids creative opportunities to decorate and personalize anything they can get their hands on. Halloween and Fall is one our favorite times of the year to decorate. Black cats, bats, pumpkins, witches, ghosts and SO MUCH MORE can be used to highlight the season.3D Paper Pumpkins #fall #craft #kids
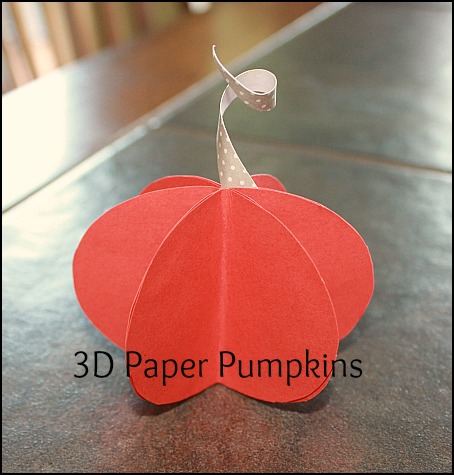
These paper pumpkins can stick around the house till Thanksgiving and they are easy to make using just 2 supplies, glue and paper. Embellishments can be added but definitely aren’t necessary.

3D Paper Pumpkins #fall #craft #kids
Supplies
6-8 paper shapes cut from cardstock or heavy weight paper per pumpkin
school glue
3D Paper Pumpkins #fall #craft #kids

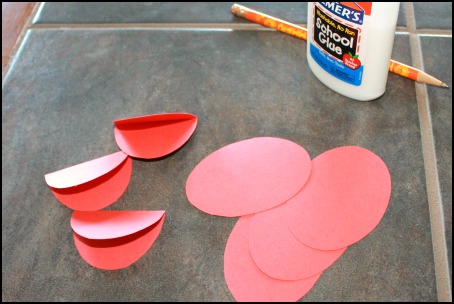
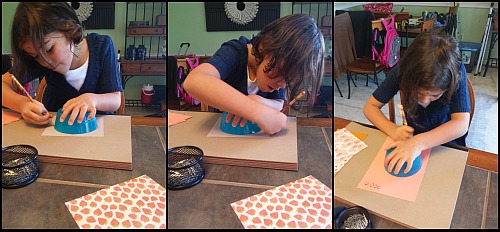
Getting the right paper shapes took some time to figure out. Circles seem like the best option but when put together it didn’t work well.  Trimming off a small clean edge will make them stand up straight or you can build a little base like I did out of scrap paper.

Shae traced bowls, fridge magnets and punched heart shapes on a variety of scrapbook paper and cardstock.  I prefer heavy paper because too much glue will make lightweight paper curl and bend easily. And when there are kids there is always too much glue.

3D Paper Pumpkins #fall #craft #kids

To start your pumpkin fold each shape in half. Using school glue attach the outside half of one shape to the outside half of another shape. Make sure they are lined up evenly.

3D Paper Pumpkins #fall #craft #kids

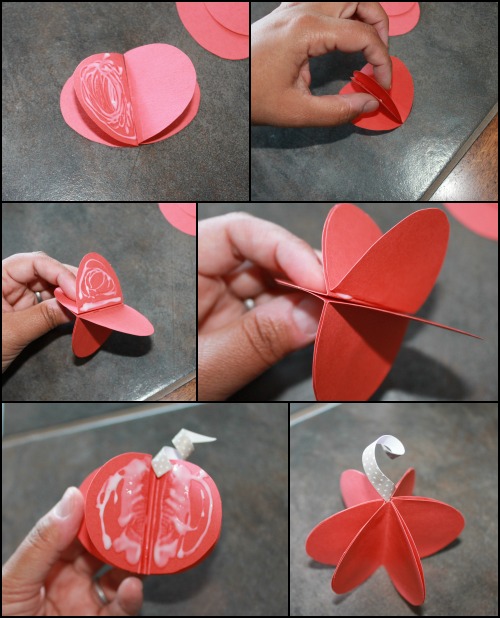
Continue until all the pieces are glued together and you have an accordion looking piece. Now add your pumpkin stem to the middle with a touch of glue. This could be a piece of pipe cleaner, a strip of curled paper, a leaf shape or anything else that comes to mind.

Now it’s time to close up your 3D shape. With a little bending and twisting arrange your pumpkin so the paper is evenly spaced. Set aside to let dry until you find its final display spot.

3D Paper Pumpkins #fall #craft #kids


Mini Food in Clay #kidsinthekitchen

A few months back I worked on a Girls Night Out with ACMoore were I made a Quilled Roses Mini Wreath and a Decorated Notebook. We left that night with a bag full of swag that included some fun kid friendly stuff. This Klutz Make Clay Charms kit. I’ve been holding onto it for just the right time and this week was it.  It was an electronics free day; no tv, no video games, no iPods, no tablets.

Mini Food with Clay #kidsinthekitchen

We did crafts, played games and worked on making mini food items with sculpting clay.  The clay itself wasn’t the special part, the book with the directions on how to make mini cupcakes, s’mores, popsicles and burgers was the best part.  It was so detailed that Shae and Shaun was able to construct these adorable little pieces with very little help from me.

Mini Food with Clay #kidsinthekitchen

Mini Food with Clay #kidsinthekitchen

Anything miniature is so cute but when you pair up a loaded burger and fries together it’s hard not to giggle a little.

Mini Food with Clay #kidsinthekitchen
Did you have fun in the “kitchen” this week? Did you try a new food or a new kid friendly restaurant? Did your littlest ones use their snacks to count to 10? We invite you to share your experiences, photos, stories or recipes that include your #kidsinthekitchen.

Come join me and my co-hosts, Paula at Frosted Fingers and Sara at Sensibly Sara, each week linking up a post, new or old, that feature the theme Kids in the Kitchen. It doesn’t matter what you are doing as long as you are doing it together, enjoying it and learning something along the way.

Don’t have a blog? Share an instagram photo or Facebook update.

Linky Rules, #kidsinthekitchen

#KidsintheKitchen Weekly Linky


Handprint Flower Bouquet #kidsinthekitchen

We have a thing for flowers in this house. It really is one of our favorite craft themes. We’ve made them out of paper, veggies, dried pasta and plastic. Today we are showing you want we put together with random chipboard flower cutouts.

This week my niece Ella visited and I was able to carve out some time where she sat still at the kitchen table to do more than just eat cherry tomatoes by the fistful.  I like to send her home with a little gift for mommy and daddy so my brother and sister-in-law know I don’t plop her down in front of a television all day. I had a bag of chipboard flowers in the closet to use and thought what better kitchen table craft than a handprint bouquet of flowers.

Handprint Flower Bouquet #kidsinthekitchen

Decorating the flowers was the easy part. I gave the girls a huge supply of markers and told them to do whatever they wanted to.

Handprint Flower Bouquet #kidsinthekitchen

When it was time to make the handprints we ran into a little hiccup.  I practiced with the girls how I was going to paint their hands and how they were going to lay them on the paper. We went over this numerous times but 3yo’s are very unpredictable. Once the paint went on her hands all bets were off.  There’s nothing wrong with a couple extra fingers/stems.

Handprint Flower Bouquet #kidsinthekitchen

Did you have fun in the “kitchen” this week? Did you try a new food or a new kid friendly restaurant? Did your littlest ones use their snacks to count to 10? We invite you to share your experiences, photos, stories or recipes that include your #kidsinthekitchen.

Come join me and my co-hosts, Paula at Frosted Fingers and Sara at Sensibly Sara, each week linking up a post, new or old, that feature the theme Kids in the Kitchen. It doesn’t matter what you are doing as long as you are doing it together, enjoying it and learning something along the way.

Don’t have a blog? Share an instagram photo or Facebook update.

Linky Rules, #kidsinthekitchen

#KidsintheKitchen Weekly Linky


Fruit Painted Rocks #craft #kidsinthekitchen

Don’t we all have pretty bowls and vases on our kitchen table filled with fruit, flowers and other lovely centerpieces. On our tables I have a bowl of fresh produce and on the other table I have a tray filled with junk. I’m talking about coupons, sunglasses, notebooks, beads and business cards. It’s the catchall for the room.

I gave Sabreena and Shae a task to make something pretty for the table.  They hunted under our deck for very specific shaped river rocks and made a this bowl of fruit.

The first thing they had to do was wash all the dirt off of the rocks and set them aside to dry. A couple minutes in the sun is all it took.

river rocks

The girls brought out all of the acrylic paints plus some kid friendly washable poster paints, tons of brushes like these ones  and protection for my table. They wrote down lists of all the fruits and veggies they thought they could paint and started mixing colors.

Shae went for her favorite fruits first, strawberries and blueberries. Sabreena went for more elaborate designs like corn an squash. Hours and hours went by and they were still sitting there painting rocks to resemble something completely new and beautiful.

Painting Rocks-Corn #kidsinthekitchen

painting rocks #kidsinthekitchen

Did you have fun in the “kitchen” this week? Did you try a new food or a new kid friendly restaurant? Did your littlest ones use their snacks to count to 10? We invite you to share your experiences, photos, stories or recipes that include your #kidsinthekitchen.

Come join me and my co-hosts, Paula at Frosted Fingers and Sara at Sensibly Sara, each week linking up a post, new or old, that feature the theme Kids in the Kitchen. It doesn’t matter what you are doing as long as you are doing it together, enjoying it and learning something along the way.

Don’t have a blog? Share an instagram photo or Facebook update.

Linky Rules, #kidsinthekitchen

#KidsintheKitchen Weekly Linky

document.write(”);


Popsicle Stick People #kids #craft #KidsintheKitchen

Craft staples in our house include glitter glue, scrapbook paper, buttons of all shapes and sizes and paints. You can also always find popsicle sticks in our house too. We’ve built houses and frames and made shapes using velcro with popsicle sticks in the past.

This week we made Popsicle Stick People using markers, tape and ribbon. I used Pinterest to show Shae for ideas but what she came with was all her own.

I found that using ultra fine tip Sharpies worked best for small details like eyes and hair ribbons. Popsicle Stick People #Kids #Craft
Shae used washi tape and other similar products to dress her dolls and even used ribbon as trim.
Popsicle Stick People #Kids #Craft
She really wanted to make sneakers for her doll’s feet but the sticks were too thing. I might have to look into tongue depressor size sticks next time.

Did you have fun in the “kitchen” this week? Did you try a new food or a new kid friendly restaurant? Did your littlest ones use their snacks to count to 10? We invite you to share your experiences, photos, stories or recipes that include your #kidsinthekitchen.

Come join me and my co-hosts, Paula at Frosted Fingers and Sara at Sensibly Sara, each week linking up a post, new or old, that feature the theme Kids in the Kitchen. It doesn’t matter what you are doing as long as you are doing it together, enjoying it and learning something along the way.

Don’t have a blog? Share an instagram photo or Facebook update.

Linky Rules, #kidsinthekitchen

#KidsintheKitchen Weekly Linky


Making Homemade Play Dough #kidsinthekitchen

I’ve been seeing them for years; different colors, scented, mixed with herbs and flowers. I’m talking about Homemade play dough. I consider myself pretty crafty but this isn’t something ever attempted on my own. I was always intimidated. This week after seeing a couple more gorgeous activities and simple recipes I knew we had to give it a try.

I used the simplest recipe I could find.

1 1/2 cups flour
1/2 cup salt
1/2 cup cool water
Making Homemade Playdough
I added the flour and salt to a bowl and let Shae add the water and mix mix mix. It took her about 10 minutes to get everything incorporated enough to turn out onto the table. She played and rolled and kneaded, creating different shapes and designs. She ended with a strawberry and star. The next step is to bake them and paint them.
Homemade Playdough
Playing with play dough is a great way to let little hands explore. It’s a fantastic medium for endless ideas like jewelry, ornaments, figurines and more. Trust me this process was simple, the cleanup of the table afterwards was way more work.

Did you have fun in the “kitchen” this week? Did you try a new food or a new kid friendly restaurant? Did your littlest ones use their snacks to count to 10? We invite you to share your experiences, photos, stories or recipes that include your #kidsinthekitchen.

Come join me and my co-hosts, Paula at Frosted Fingers and Sara at Sensibly Sara, each week linking up a post, new or old, that feature the theme Kids in the Kitchen. It doesn’t matter what you are doing as long as you are doing it together, enjoying it and learning something along the way.

Don’t have a blog? Share an instagram photo or Facebook update.
Linky Rules, #kidsinthekitchen
#KidsintheKitchen Weekly Linky


Making a Forever Flower #kidsinthekitchen

By now hopefully you realize that #kidsinthekitchen is about more than just letting the kids mix cookie dough or slice strawberries. In our home the kitchen in the backdrop for just about anything we have going on. Homework is done there, conversations about our schedule are discussed there, we eat meals as a family there and ofcourse we prep those meals there.  The kitchen is also the place where we educate, create and play. Crafts and activities are HUGE in our home. They aren’t always blogged about but there is usually something happening each day.

This week we are playing with our food again.  Colored Rice is an incredibly popular medium to stimulate sensory awareness, work on color recognition and work on fine and gross motor skills.  In our house we play with it because it’s pretty and fun to run our fingers through it.

While sitting at the kitchen island this week Shae was admiring the flowers Sabreena gave me for Mother’s Day. Each day I sort through them, throw away the dead ones, change the water and re arrange them.  Shae then decided she wanted to make me flower that would last forever. This is when the colored rice comes in.
Using flowers as inspiration
We pulled out  a piece of heavy cardstock, school glue, colored rice, popsicle stick, markers a couple fabric leaves from previously dismantle fabric flowers. I drew out  flower shape on the card stock and let her create my flower.

The trick to getting a nice layer of rice is to go heavy on the glue. Shae used a paintbrush to fill each petal with lots of glue and then over poured the rice so it would stick in every nook and cranny.
lots of glue for colored rice crafts

lots of rice for colored rice crafts
The clean up was simple, rice is easy to sweep up. This needs to dry overnight at the very least.
Colored Rice Flowers

Did you have fun in the “kitchen” this week? Did you try a new food or a new kid friendly restaurant? Did your littlest ones use their snacks to count to 10? We invite you to share your experiences, photos, stories or recipes that include your #kidsinthekitchen.

Come join me and my co-hosts, Paula at Frosted Fingers and Sara at Sensibly Sara, each week linking up a post, new or old, that feature the theme Kids in the Kitchen. It doesn’t matter what you are doing as long as you are doing it together, enjoying it and learning something along the way.

Don’t have a blog? Share an instagram photo or Facebook update.

Linky Rules, #kidsinthekitchen

#KidsintheKitchen Weekly Linky

Kids in the Kitchen with LookWhatMomFound…and Dad too!

I can’t wait to see the fun you worked on this week.


Sea Shell Crab #kids #craft

Our visit to Ocean City, MD a few weeks ago produced more than just fun memories: we came home with a bucket full of seashells of all different sizes, shapes and colors.
seashells from beach
These shells have been taking up residence in the garage waiting for  a craft or activity to utilize them. Found One!
Sea Shell Crab #kids #craft
Supplies

  • 3 red pipe cleaners
  • 2 small black beads or buttons
  • 1 large scallop or clam shell, cleaned and dried
  • glue (we used school glue and Quik grip adhesive)
  • red poster or acrylic paint & paint brush

Prep your work space to protect against paint and glue

Start with painting your shells. A trick for getting the snail shells completely covered in paint without getting paint all over your hands is to take one of your pipe cleaners  cut it in half then fold each piece in half. Insert the folded end into your shell. This acts as a holder to and the crab legs you’ll later glue to the body shell.
painting sea shells
Once your shells are painted and drying take the remaining 2 pipe cleaners and cut them into equal fourths.  Crabs have 8 legs.

When your shells are dried proceed with gluing the legs and claws to the underside of your scallop/clam shell. This may take another round of drying time depending on the type of adhesive you use.
Crab Seashell kids craft
Once your legs and claws are set go ahead and flip your crab over glue on your eyes.  Beads, buttons, googly eyes or tiny painted shells would work here too.
Crab Sea Shell Kids Craft
You crab now deserves a special place in your home.

Sea Shell Crab #Craft


Paper Bag Tree for Earth Day #kids #craft

The first Earth Day on April 22, 1970, activated 20 million Americans from all walks of life and is widely credited with launching the modern environmental movement. Today you can find green efforts everywhere you turn.  Brands are working towards reducing their carbon footprint, local recycling centers are charged with reducing landfill piles and everyday people are working towards reducing their waste using more renewable resources.

In our home we actively recycle, plant a veggie garden, use less toxic cleaning products and reuse and upcycle items.  Kids Crafts can be done more green too. I try not to buy too many crafting supplies and use what we have or find items that can be recycled.  Paper lunch bags are something we keep in the house but don’t really use since the kids pack lunch boxes with reusable containers.

Making this Paper Bag Tree is a great Earth Day craft because one of the best things you can do on this day is plant a tree.

Supplies

  • lunchsize paper bag
  • green paper for leaves
  • colored tissue paper for flowers
  • glue
  • kid safe scissors (I also usually keep lefty scissors on hand too in case someone comes over that needs them.)
  • heart hole punch, optional

Directions

I drew lines a little more than halfway down the bag so Shae could cut to get her branches.

cutting with kid scissors

Once all the lines were cut, Shae opened up the the base of the bag to make a trunk and started scrunching up the pieces of bag to get her branches.

scrunching up a paper bag

Once the strips of paper have softened up it’s time to twist them into branches.  Be careful not to twist too hard or you’ll rip them.  Take 2-4 strips at a time and gently turn them in your fingers to get a branch-like shape.

twisting branches

Twisting Branches for Paper Bag Tree

Now it’s time to make your leaves and flowers.  Leaves can be hand cut or can be made by cutting a heart shape in half.

Cutting a Heart in Half

Colored tissue paper cut into about 2″ squares in your child’s choice of color is all that is needed for flowers.  Have them pinch them and add a dab of glue to stick them onto their tree along with their leaves.

Tissue Paper Flowers on Tree

Adding Tissue Paper Flowers

Make some final adjustments and twists and your paper bag tree is done.

Paper Bag Tree

This can be modified with brown or green paint to give it more dimension.  Stuffing the bag loosely with a napkin or ad of paper will give it more standing power if you are worried about it falling over. Pre cutting the strips and tissue paper and leaves are simple ways to make this more toddler and preschool age friendly.

What are your plans for Earth Day this year?


Rainbow Crafts aren’t just for St. Patrick’s Day

Despite my maiden name I don’t celebrate St. Patrick’s Day BUT we do love crafting for any and every holiday. Rainbows are one of Shae’s favorite themes to create, besides portraits of her family. Rainbows aren’t just for Spring and St/ Patrick’s Day so I made a Rainbow Pinterest Board just for them.

Here are some ideas I found while playing around on Pinterest this weekend that will be good for any time of the year.

Rainbow Wand – Icing Designs Online


Crepe Paper Rainbows – Get Creative Juice


Stained Glass Rainbows – Mom on Time Out


Rainbow Pencil Cup – Crafty Crafted


Paint Chip Rainbow Garland – The Chocolate Muffin Tree

Source: thechocolatemuffintree.com via Melinda on Pinterest


Toilet Paper Roll Rainbow – Jane of All Trades


I know you crafters out there have your own Rainbow or St. Patrick’s Day Pinterest Boards, please share them so I can follow along for more inspiration.

Come check out all of my Pinterest Boards for crafts, decor, humor, parenting articles and more.

I Disclose