RSS Email

No Dye Decorated Easter Eggs

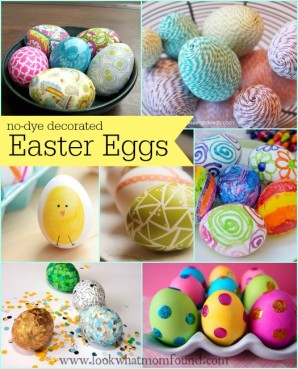
Our family doesn’t put much thought into the characters of holidays and traditions like the Easter Bunny, Tooth Fairy or Elf on the Shelf. BUT I do love the look of decorated Easter eggs, they are just so pretty. Here are some of the cutest No-Dye Decorated Easter Egg designs I’ve found. No -Dye Decorated Easter Eggs

Mom.Me Sharpie Marker Eggs

Kimberley Stoney Glitter  Dot Eggs

Adam & Sons Confetti Dot Eggs

Lovely Indeed Washi Tape Eggs

A Thrifty Mom Melted Crayon Eggs

Landeelu Twine Wrapped Eggs

Pinching Your Pennies Fabric Covered Eggs

There is nothing wrong with dyeing eggs but why not step out of the box and test you creative abilities with options like these.

Some of these crafts can be done with inexpensive plastic or styofoam eggs instead of real eggs so they can be saved and set out each year.


Paper Pinwheels in Mini Flowerpots #craft

Happy Spring! Today marks the day of a new season full of promise and excitement. The green grass and daffodils poking through the snowflakes shows that there are BIG things happening. In our house we looking forward getting outside and enjoying the weather changes and shining sun. In the meantime we’re crafting fun and colorful things like these Paper Pinwheels in Mini Flowerpots.Paper Pinwheels in Flowerpots
This craft is also part of a mini clay pot challenge brought forward by Barb of A Life in Balance.

This is what I came up with.

Supplies

  • mini clay flowerpot
  • beads or marbles
  • Styrofoam ball
  • paper
  • brads
  • skewers
  • glue

Paper Pinwheels Supplies #craft

Directions

I’m a Silhouette Cameo user so my pinwheel shapes are cut out for me but cutting these out yourself is very simple. Using this tutorial is one of the easiest I’ve ever seen and can be modified for any size pinwheel.

Taking your pinwheel shape and pull the ends down and secure with a brad. OR you can follow the directions on the tutorial and use the pin and pencil method to make it spin. My version doesn’t spin in the wind.

Paper Pinwheels in Mini Flowerpots

Paper Pinwheels

My version has you adding a blob of glue to the back of the pinwheel and securing the skewer in place with a scrap of paper on top for a cleaner look.Paper Pinwheels #craft

Paper Pinwheels #craft

Place your styrofoam ball to the clay pot, use glue if wanted. Arrange your pinwheels in your styrofoam ball.styrofoam for pinwheels

Add your beads or marbles to cover the styrofoam. Again using glue if wanted.Adding marbles Pinwheels #craft

Your pinwheel bouquet is ready to display.Paper pinwheels


Fabric Flower Headband for Kids #craft #handmade

Shae is a mix of girly girl and tomboy. She’s got a collection of jewelry and lip glosses stored next to her Xbox games and Skylanders figures. She’s always asking for costumes and new shoes so it’s only natural that I make her hair accessories to wear. She recently got her haircut and I wanted to emphasize the bump in the back so I made her this “hipster” fabric flower headband that wraps around her entire head.

Even better is I didn’t purchase one single thing in order to make it. Saving fabric from outgrown clothing is the best way to create things like this.

First I took a stretchy, shimmery black knit and measured it 8 inches bigger than her head from the base of her head to her forehead. Laying flat it measured about 3″ wide. Scrunched up this was a good fit for her.

With a needle and thread I made bow shape without the huge knot.

Rolled Fabric Flower Headband for Kids #craft

Then I started rolling strips of fabric to create rosettes. These are so simple to make. Essentially you take a strip of fabric, fold it in half (printed side facing out) then twist it. Then you roll in around itself using spots of hot glue to keep it in place. The harder your twist the tighter your flower will be. Don’t stop at fabric though. Ribbons and lace work perfectly too. There are lots of tutorials on YouTube to show you how to make a rolled fabric or ribbon flower.

Rolled Fabric Flower Headband for Kids #craft

I made a few flowers, layered them on a piece of fabric and glued them along with a scrunched up piece of black satin tucked behind a flower for embellishment. Feathers, lace and even leaves would work great here.

Rolled Fabric Flower Headband for Kids #craft

Glue the fabric to the headband, set aside to dry and it’s ready to wear. I wanted to add tiny seed beads but Shae was very impatient and wanted to wear it to school. I’ve done these rolled flowers many many times. They take just a couple minutes to make and are ready to tack on an existing headband, barrette or brooch.
Rolled Fabric Flower Headband for Kids #craft
Use what you have on hand, no need to shop for new fabrics or crystals.


DIY Necklace and Pendant Upcycle #craft #jewelry

I love love love jewelry.  I especially love necklaces.  My earrings are diamond studs Rob got me a few years ago that I never take out. My wedding band stays in place with the occasional fashion ring on the other hand. But necklaces get changed often dependent on my mood. I have some favorites like this Lisa Leonard Lots of Love pendant and necklace. I was shopping last week and rummaging through a clearance section in the craft aisle and found a pendant. I knew it was missing something but knew immediately I could rescue it and upcycle it into something adorable.

DIY Upcycled Necklace #bird #clay

I had a broken silver necklace at home so I knew I could resurrect it into something pretty.DIY Upcycled Necklace #bird #clay


I started by fixing the necklace with a heavy gauge jump ring and then cutting the chain right in the center. Fixing Broken Necklace #bird #clay

Then I added the same heavy gauge jump rings to the pendant and attached it to the necklace. This is an instructional video on how to work with jump rings correctly. Using a heavy/thick ring will lessen the chance of it coming apart while wearing. There is always the soldering option but I’m not there yet.

necklace on pendant

attaching jumprings

The empty nest needed eggs. Blue is a my favorite color so I knew a couple Robin’s eggs would look like they belonged.  Rolling out the clay into the right shape took the longest time;  making sure to tap the ends to get it round but not flat. After getting 2 almost identical eggs  I was ready to bake. It just takes 20 minutes in a 225° oven and they are hard like little pebbles.

I have a glaze that gives the clay a shine after baking but clear nail polish would work just fine.

Using a couple dabs of glue I placed the eggs in the nest and let it set for a couple hours. This glue dries completely clear.

making eggs for necklace

Don’t throw away broken jewelry. Give it a new life with the purchase of a $2 pendant or create your own pendant with buttons, clay, earrings or beads.DIY Upcycled Necklace #bird #clay

 DIY Upcycled Necklace #bird #clay


Burlap and Ribbon Wrapped Vase

Flowers are a common gift for Valentine’s Day so I decided to make a beautiful decorated vase where they can be placed.  Crafting your own vase can be as uncomplicated as you want to make it. I bought NO special supplies for my vase, using just what I had on hand.Burlap and Ribbon Wrapped  Vase

Adding different dimensions and layers makes this vase stand out against simpler decor on a shelf or table.  Using a variety of textures gives it  more  sophistication I think.

Materials Needed

  • Vase
  • fabric, burlap, ribbon of choice
  • flowers, fabric or paper
  • buttons, beads or rhinestones
  • school glue hot glueBurlap and Ribbon Wrapped  Vase

Directions

Thoroughly clean and dry a vase. Mine has been floating around this household for years, it’s one of my favorites because it’s very heavy and has a blue-gray hue. It’s usually filled with marbles and a fake flower.

Measure out your materials and using school glue adhere it to your vase.  I like using  school glue because it allows you to remove the materials if you ever decide to makeover your  vase.  It will simply wash off and you can start over. Layer multiple ribbons or fabric pieces to achieve the look you want.

Burlap and Ribbon Wrapped  Vase

My paper flowers were made using a paper cutter and quilling tool. These are NOT required at all.  I’ve done them before with scissors and rolled them with my hands. Here is a simple tutorial showing you how simple it can be.

Burlap and Ribbon Wrapped  Vase

Arrange your flowers and buttons the way you want then hot glue them directly to your fabric/ribbons.

Burlap and Ribbon Wrapped  Vase

Burlap and Ribbon Wrapped  Vase

Burlap and Ribbon Wrapped  Vase

Burlap and Ribbon Wrapped  Vase

Burlap and Ribbon Wrapped  Vase

Now wait for your flower delivery.


Framed Key to My Heart Valentine’s Craft

Our home decor stays pretty static  most of the year. Halloween and Christmas are the holidays where we decorate but I’m realizing that celebrating even the small ones we’d probably enjoy them more.  I consider Valentine’s Day a “Hallmark” holiday. A holiday hyped up to sell cheesy greeting cards, expensive candy and boring roses. This year I’m starting early with this Framed Key to My Heart art.

Key to My Heart Valentine Craft

I like frames. They cover my walls and shelves filled with photographs of my family and friends but I’m seeing that they make great vessels for crafty art. I can interchange frames to suit the season or holiday.

I had the perfect spot on a table that I knew needed a little something

Materials Needed

Frame, size and color your choice, paint if you need to

Cardstock or scrapbook paper, color and pattern of your choice

Coordinating ribbon, skinny and wide

Embellishments, I used paper & felt heart cut outs

Stamps, markers or printed message

Key, I used a decorative skeleton key

Glue & tape

Directions
Key to My Heart Valentine Craft

Remove the glass from your frame and cut your cardstock to fit the opening. I layered a pattern and a coordinating solid with a valentine’s theme but not overdoing it.

I played with the wording and tried my best to hand write it but my writing is terrible so I taped my cardstock onto a sheet of paper and ran it through the printer after figuring out the right placement.  Go ahead and write or stamp if you prefer.

Key to My Heart Valentine Craft

Play around with the embellishments you choose to use like rhinestones, lace, raffia or buttons.

Key to My Heart Valentine Craft

I used a piece of thin black grosgrain ribbon to hang my key and wider ribbon to seperate the different papers.

I added dimension to my paper hearts with a little ink.  Using a black sharpie and scrap felt I rubbed the edges of the hearts to ink them.

Key to My Heart Valentine Craft

I layered the key over a felt heart for a pop of texture and color and added the entire craft to the frame.

Key to My Heart Valentine Craft

Key to My Heart Valentine Craft


It’s sitting on a small end table where it can be seen for the season.


Valentine Felt Envelope Craft

For Valentine’s Day I like to tuck little notes in the kid’s lunchbox or next to Rob’s night stand.  Doing this gives them a little surprise just letting them know how much I love them. This year I’m taking it a step further by using these Handmade Felt Envelopes to hold my love notes.

Felt Envelope for Valentines Craft

I made these using a sewing machine but a good ole needle and thread would work just fine too. These don’t have to be for just Valentine’s Day either.  I’m thinking pretty blues, greens and pinks for spring time or to even celebrate birthdays and anniversaries.

Felt Envelope for Valentines Craft

Materials Needed

  • Felt
  • button
  • needle & thread or sewing machine
  • glue

Directions

Cut your felt into a long rectangle with a triangle at the top. You can easily go wide to fit sheets of paper but make sure it’s tall enough to fold then also have enough for the fold over flap. I didn’t make mine any particular measurement.

Felt Envelope for Valentines Craft

Use a decorative button so you’ll be able to close your envelope.  Velcro or snaps would work too but buttons work for me.   Use straight pins or safety pins or even binder clips to get your folds in the right spot. Do this before sewing your envelope together.

Choose a contrasting thread and sew the sides and bottom of your envelope shape.  I used a zig zag pattern with my sewing machine but a wide running would look great too if you had to sew by hand. Cute a small hole in your flap for the button hole.

Felt Envelope for Valentines Craft

School glue is the simplest way to adhere your “stamps”.  Sewing these down would look great too. Pink shears would’ve given these stamps an endearing quality but I don’t have a pair.

Felt Envelope for Valentines Craft

Once the glue has dried they are ready to use for notes, candy hearts or favorite valentine chocolates.

Felt Envelope for Valentines Craft

If you want to make these with children just skip the sewing step and go with fabric glue to hold the sides together.  Decorate with glitter glue, buttons or rhinestones to make it a true gift from your child.


Paper Heart Chandelier #craft #heart

With Valentine’s Day just a few short weeks away I’m going to bombard share with you some great Valentine themed crafts & activities for the next 5 days.  These will all be simple enough that anyone can make them. Even with simple adjustments they can be done with the kids. I’m starting off with making this colorful Paper Heart Chandelier.  I’ve been wanting to make one for a long time and finally got around to doing it.

Making this is a charming way to dress up a dinner for two or for the whole family.  Valentine’s Day is the best excuse to shower your loved ones with extra kisses, hugs and symbols of how much they mean.

Paper Heart Chandelier #craft

This heart chandelier is going to end up in Shae’s room. She’s a collector of mementos and notes and trinkets from her family and friends.  Since this isn’t overly pink and red it’ll fit into her room just fine for a long time.

Making a chandelier of your own is very simple, using simple materials.  The most time is spent attaching your hearts to your thread.

Paper Heart Chandelier #craft

Paper Heart Chandelier #craft

Paper Heart Chandelier #craft

Paper Heart Chandelier #craft


Paper Heart Chandelier #craft

Paper Heart Chandelier #craft

Materials Needed

  • embroidery hoop
  • jewelry thread
  • scrapbook paper
  • heart punch
  • school glue
  • paint
  • glue gun
  • finishing ribbon

Directions

Paint your embroidery hoop your preferred color and set aside to dry.

Start punching hearts from your scrapbook paper.  I needed 98 hearts because I was making 7 strands of double sided hearts, one strand with 9 hearts, one with 8 hearts, one with 7 hearts, etc till the shortest strand with 3 hearts.

Starting at the bottom of a long piece of string add a heart with glue and attach the 2nd heart and hold till it bonds.  Move 1-2 inches up and add another heart with glue onto the string and another heart shape.   Repeat until you have all of your strands complete.

Make sure you leave excess string at the top of your strands so they can be attached to your hoop.

Tie your strands in the order you prefer and knot them so they don’t come undone as you finish all of the heart strands.  Arrange them neatly and put the outer ring of the embroidery hoop on tightly. This keeps the strands in place.

Using a pretty ribbon cut 3 or 4 long pieces to act as the hanger.  Figure out where you want your ribbons  and make a small loop around the embroidery hoop and hot glue it closed.  Pull the ribbons together at the top, arrange them so the chandelier is straight, make a loop and hang.

Paper Heart Chandelier #craft

Paper Heart Chandelier #craft

Substitute supplies for things you have on hand. Hearts can be made from wrapping paper, felt, comic strips or book pages.   If invisible jewelry wire isn’t available use yarn or twine. Make the craft work for and your personal preferences.


A Family of Christmas Stockings #PCHoliday

trackable pixelBlog Post Disclosure BannerWay back in the day when  we were just a family of 4 I spent a Christmas finding the “perfect” stockings and stocking hangers to display on our mantel.  I trudged out in the cold, snipped fresh holly branches and weave tiny twinkling lights through them and flaunted the beautiful design I had come up with.  Fast forward to the next 6 years and you’ll see only 3 stockings each Christmas attached to anything that had a flat surface. This year when the note came through that I could pick out new stockings for the whole family from Personal Creations I almost leapt out of my seat.  I knew we’d finally have what I’ve been wanting for a long time, these Ribbon Stockings personalized with our names.

Personalized Christmas Stockings

Personal Creations carries a HUGE selection for just about everyone.  The best part of their choices are most of them can be personalized to reflect a name, initial, special date or even more.  With hundreds of gifts to choose from for any occasion Personal Creations can be your shopping destination throughout the year.

I knew our stocking were on their way so I knew I had to come up with a new idea to hang all five of them. this house does not have the fireplace mantel that we used to have so I knew I had to get creative.  I scoured our makeshift workshop and found something that would work perfectly with some tweaking.

Christmas Stocking Holder DIY

Christmas Stocking Holder DIY

Using a simple unused wood shelf, existing paint & stain and some bought decorations and hardware I came up this Christmas Stocking Holder. The project was very easy. I painted and stained a plain wood shelf till I achieved a color I like and took an old wrench and a hammer to it to add some distressed details.  The words and stickers were less than $10 from the craft store and Rob found these antique brass bolts. I thought there were a unique and better alternative to plain hooks.

Christmas Stocking Holder DIY

The stockings look great hanging up.  Even without a mantel they stand out with this special new home. I’m not forgetting about our new ornament.  Each year I get new ornaments for the kids or family that mark a significant point in the year or commemorate another wonderful year together.  The Family in Bed ornament was adorable and I knew it was a good fit for our family.

Family Ornament

This ornament will stay on the family tree but individual ornaments that the kids received are put right on their own trees. When they are grown up and have families of their own they’ll have a great start for the holidays and great stories and memories to share.

Shop today for your own personalized ornaments and stockings to ensure availability and delivery in time for the holidays. Personal Creations is offering you 20% off all of your purchases through the end of December. Click here to start shopping and the 20% will be applied in your shopping cart.

Follow Personal Creations Blogger Board: Christmas Ideas on Pinterest


Heart Embroidered Map

Creating art and decor pieces for the house has become a little bit of a hobby for me.  Currently I have about 3-4 projects in the works but I want to show you this very personalized heart embroidered map that’s been hanging in our house.

Heart Embroidered Map #decor #craft

This project was very simple.  The only thing I needed to find special was a shadow box but feel free to use a regular frame with or without the glass.

Determine what you want to outline on the map. Is it your honeymoon spot?  The city where you met?  How about multiple hearts for everywhere you’ve traveled together? I chose the area where we live and spend most of our days, the place where we call home.

I found this vintage atlas at the thrift store and knew it was going to be a source of lots of crafts!  I love the coloring, the country flags and the variety of maps included.

Heart Embroidered Map

Materials

  • Straight Pin
  • Hand Sewing Needle
  • Embroidery Thread-color of choice
  • Map-original or photocopy
  • Tape
  • Frame of choiceHeart Embroidered Map

Directions

Make sure your map size fits into your frame or mat.

Decide what shape you want to outline and lightly draw that on the map. I used a heart shape cut out and traced that onto my map.

Heart Embroidered Map

Using a straight pin poke holes along your trace line about 1/4 inches apart. As you come close to corners or curves make your hole a touch closer so your thread can make that shape. If your paper is thin I would suggest adhering it to another sheet of paper or running strips of tape along the back to give it strength.  You don’t want the paper to rip as your are pulling your thread through.

Thread your sewing needle with more thread than you think you’ll need. Pull in through from behind the map and tape the end to the back of your paper/map.

Using a back stitch start filling in your shape with your thread.  This video will show you how to do the back stitch on paper, starting around the 3:30 mark. It’s not hard at all and this kind of stitch will fill your lines rather than leaving spaces leaving people wondering what your shape is. If you prefer a running stitch that is fine too. It’s all about personal preference.

Finish with another piece of tape holding your thread down in the back. Frame and hang.

Heart Embroidered Map


A sentimental variation on this would be tracing a long road trip or relocation with a heart at the final destination.