RSS Email

Decorating Easter Eggs #Fail

Easter is days away and while we don’t do the whole Easter Bunny shtick I thought it would be fun to do something with dyeing eggs. I got my April issue of Family Fun in the mail and in it they had this adorable and simple looking activity for making Easter Egg Hats. I thought, Perfect! Super Cute and not oozing chocolate bunnies and marshmallow chicks.
Decorating Easter Eggs #Fail
The first step was simple, dye the eggs. I had everything, even had neon dye. I love the colors.
Decorating Easter Eggs #Fail
The next day I pulled out all of my craft supplies and a few random things that I thought we would need and set out to get these little hats made.
Decorating Easter Eggs #Fail
At first I was excited as I thought about the supplies I needed and how to get the right shapes. The first egg made was a princess. I couldn’t figure out how to make the cone. I started with a triangle but it just wasn’t coming out right. So I made a cone then trimmed to a flat bottom. Shae decorated the cone with sticky jewels and ribbon, viola, a princess. I placed it on the egg, it fell off. I put it back on, it fell off again. This went on and on; so I glued it.
Decorating Easter Eggs #Fail
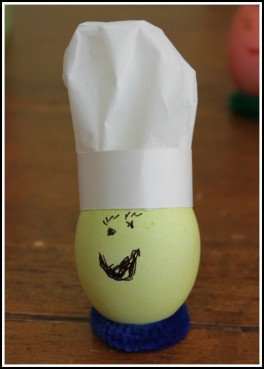
The next one was chef, he was my favorite! A simple strip of paper and a tissue was all it took. Again trimmed to fit. Again glued in place. I let Shae draw his face with a Sharpie, cute.
Decorating Easter Eggs #Fail
The Rockstar was a royal pain. I had to Krazy Glue his Mohawk on and hold it in place to get the right look. Cutting a tiny star from sticker foam was just a stupid idea.
Decorating Easter Eggs #Fail
King and Easter Bunny were simpler to do and I liked the outcome even with King’s obvious skin condition. At this point Shae was thoroughly annoyed that she couldn’t do more. I figured she’d be able to help more but there was a lot of waiting, while glue dried.
Decorating Easter Eggs #Fail
bunny easter egg, Decorating Easter Eggs #Fail
The Spring Bonnet was almost the death of me. I literally wanted to throw it across the room but knew I was the one that would have to clean up the soft yolky mess. Her hat was a disaster; it wouldn’t stay on no matter how much glue I used. I set them all up like a wacky little family, took a picture and had lunch.
Decorating Easter Eggs #Fail

That issue of Family Fun already made it into the recycling bin.


HairBow Holder Tutorial

I’ve always love crafting but it’s been on hold for a while, especially since moving to this house  This weekend I got some inspiration after looking at crafting tutorials over at MomDot.  Shae’s barrettes and other hair stuff have been shoved in a little box for too long. I used that inspiration and came up with a hairbow holder design that I think is perfect for not just Shae and her room but for all the stuff she has.

Supplies & Tools

  • Glue gun & Staple gun
  • Wrapped canvas-whatever size you choose
  • Material of your choice
  • Optional material to add padding/weight ( I used an old white curtain)
  • Ribbons of your choice, various lengths
  • Coordinating fabric for pocket (optional)
  • Buttons or other trim for cute details
  • Velcro

diy-hairbow-tutorial-handmadeMeasure your under fabric 1 inch wider & longer on each side than your canvas.  Starting at the top middle, secure this fabric just over back edges with staples or glue gun.  Next secure bottom middle, pulling tight, then proceed to sides and finish adhering all the way around. I used the blue gun for this step since it wouldn’t be seen.

Now with your finishing material do the same process, only this time fold under edges and staple about 4 inches apart.  This gives a really nice look on the back. Be sure to pull the material tight and make sure the patter (if there is any) is straight.

The pocket is great place to store brushes, combs and mirror. Measure a coordinating piece of fabric and secure with staples or hot glue.  I wanted a deep pocket for Shae’s leave in conditioner so I finagled the material to have a bottom. This was done by leaving myself with extra material on that side of the project.  No secrets just a little tucking, folding and pulling. I did take it a step further and ironed out my fabric and added an interfacing this made my flimsy cotton material more stiff, able to withstand the constant in and out of supplies.

Next, layout your ribbons where you want them and secure them tightly to the back with your glue gun or staple gun.  I did 4 ribbons straight across.  This gave me plenty of space for clips, pins and headbands.

For the loop use an 8′ piece of coordinating ribbon, looped underneath and secure with a piece of Velcro that has been glued onto the ribbon. Secure the ribbon to the top of the wrapped canvas. this holds elaborate pony holders and elastic headbands.

I finished the look with a little ribbon detail and a button.  This is hanging on the wall now, high enough that she can’t reach it now but not too high that when she can do her hair, everything is going to be handy.

You can see from the pics that Shae has a ton of clips and there is still plenty of room for more stuff. I hope you try it out, don’t be afraid to alter the instructions, swap materials and use your imagination. If you do try make one I’d love to see it.