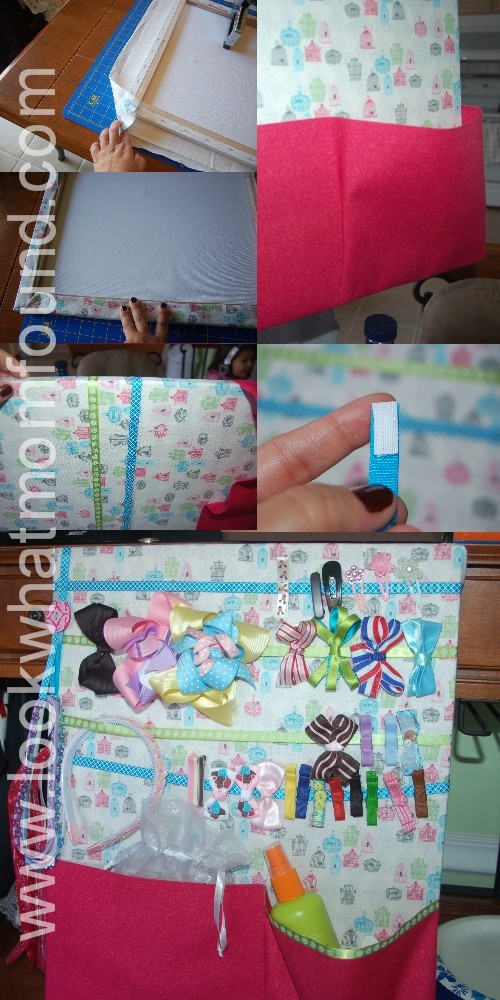
I’ve always love crafting but it’s been on hold for a while, especially since moving to this house This weekend I got some inspiration after looking at crafting tutorials over at MomDot. Shae’s barrettes and other hair stuff have been shoved in a little box for too long. I used that inspiration and came up with a hairbow holder design that I think is perfect for not just Shae and her room but for all the stuff she has.
Supplies & Tools
- Glue gun & Staple gun
- Wrapped canvas-whatever size you choose
- Material of your choice
- Optional material to add padding/weight ( I used an old white curtain)
- Ribbons of your choice, various lengths
- Coordinating fabric for pocket (optional)
- Buttons or other trim for cute details
- Velcro
 Measure your under fabric 1 inch wider & longer on each side than your canvas. Starting at the top middle, secure this fabric just over back edges with staples or glue gun. Next secure bottom middle, pulling tight, then proceed to sides and finish adhering all the way around. I used the blue gun for this step since it wouldn’t be seen.
Now with your finishing material do the same process, only this time fold under edges and staple about 4 inches apart. This gives a really nice look on the back. Be sure to pull the material tight and make sure the patter (if there is any) is straight.
The pocket is great place to store brushes, combs and mirror. Measure a coordinating piece of fabric and secure with staples or hot glue. I wanted a deep pocket for Shae’s leave in conditioner so I finagled the material to have a bottom. This was done by leaving myself with extra material on that side of the project. No secrets just a little tucking, folding and pulling. I did take it a step further and ironed out my fabric and added an interfacing this made my flimsy cotton material more stiff, able to withstand the constant in and out of supplies.
Next, layout your ribbons where you want them and secure them tightly to the back with your glue gun or staple gun. I did 4 ribbons straight across. This gave me plenty of space for clips, pins and headbands.
For the loop use an 8′ piece of coordinating ribbon, looped underneath and secure with a piece of Velcro that has been glued onto the ribbon. Secure the ribbon to the top of the wrapped canvas. this holds elaborate pony holders and elastic headbands.
I finished the look with a little ribbon detail and a button. This is hanging on the wall now, high enough that she can’t reach it now but not too high that when she can do her hair, everything is going to be handy.
You can see from the pics that Shae has a ton of clips and there is still plenty of room for more stuff. I hope you try it out, don’t be afraid to alter the instructions, swap materials and use your imagination. If you do try make one I’d love to see it.


