RSS Email

Headband Holder DIY Tutorial

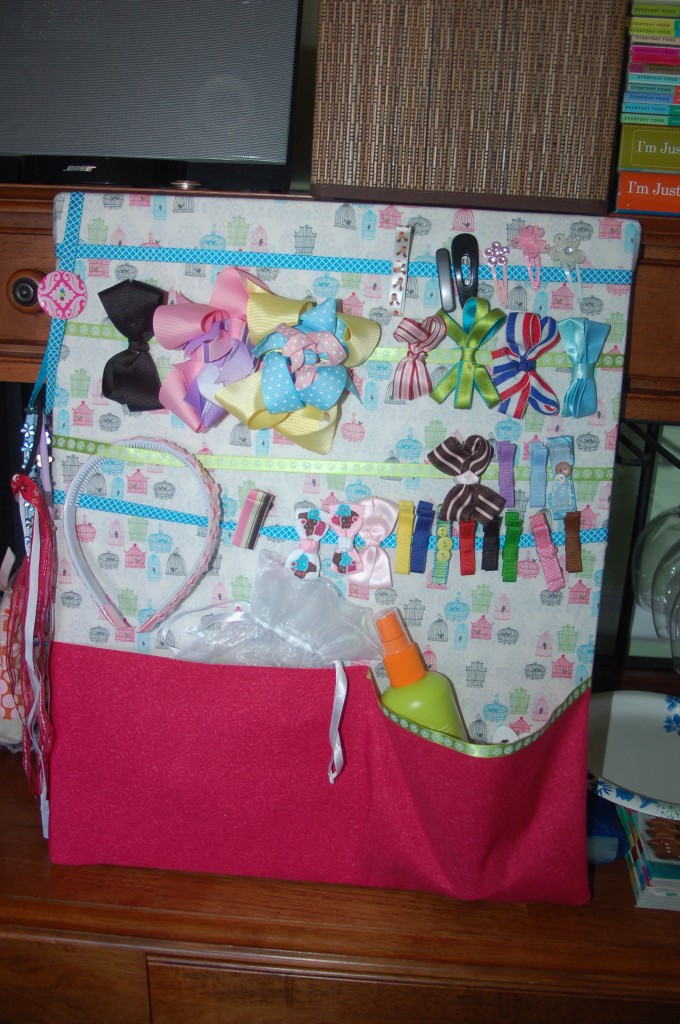
Shae is half girly girl half a miniature Shaun. She spends so much time with her big brother that the line of dainty and sweet is often crossed into to that of a tomboy. But when she wants to hold onto her girliness she slathers on the pink and flowers and sashays through daily life. Her headband collection has been exploding lately. Mainly because I keep making them but I only make them because she wears them. Since headbands don’t fit perfectly on Shae’s DIY hairbow holder I figured it was best to make a headband holder equally as cute.

headband holder tutorial diy

Supplies Needed
empty Oatmeal canister (small or large)
inner fabric ( i used fleece)
outer prettier fabric
1/2″ wide grosgrain ribbon (contrasting color works best)
Large artificial flowers and leaves, disassembled
hot glue

headband holder supplies craft

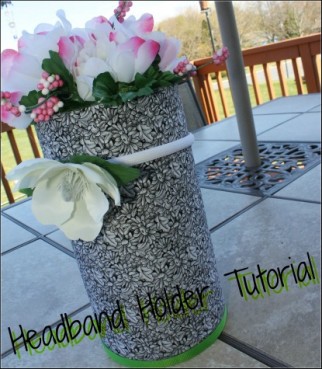
Start your project by measuring out a base fabric to plump up your oatmeal canister to give the headbands something to grip. I had black fleece on hand, I used that. I measured and cut so the fleece to fit just perfectly around and top to bottom. Glue the fabric to the container pulling firm but not over stretching it. Let the glue dry for a few minutes.

Next measure and cut your outer fabric so that it covers exactly the top and bottom and once all the way around the canister. Apply hot glue in small sections on your starting seam and ending seam. Pull fabric so it’s smooth and free of wrinkles and creases.

headband holder collage instructions

Use your grosgrain cover the outer edge of the canister lid. Turn the canister upside down so the ribboned lid is on the bottom.

Using glue proceed to cover the now top of your holder with leaves and flowers.

headband holder craft tutorial
Allow the entire project to cool and set for a few minutes then go ahead and add headbands.

I Disclose


TShirt Tote Bag #ExpressYourself #CBias

I was recently asked to come up with a craft for the #ExpressYourself campaign using Elmers Painters Paint Markers and fabric. The fabric part got me stumped. I thought I’d make Shae a cute shirt, draw a flower or fun saying on it but what’s so original and creative about that. Then it hit me, go DIY with it. I stood in the middle of my living room at a pile of laundry and I got the idea of making a t-shirt tote bag.

I’ve seen tutorials before and figured this would be easy. I got the kids in the car and headed to Walmart to find the Elmers Painters Paint Markers. It actually took me a little while to find them and I got worried that they didn’t carry them but finally found them with the acrylic paints and stencils.
walmart craft aisle #expressyourself elmers #collectivebias
I chose the Sherbet collection in Medium Point. I wasn’t exactly sure what I was going to do to the bag but figured medium point was a safe option.  Instead of purchasing a box of set colors all with the same point you can always buy individuals.  Priced @ $1.97 each at your local Walmart it’s a cheap craft supply when you only need one to two for a specific project.  My Walmart didn’t have a ton of bright color choices.  I almost bought the silver and gold Painters Paint Markers but figured I would wait to see how my project came out.  I’ll be getting more colors next visit to Walmart.
walmart painters paint markers #expressyourself elmers #collectivebias
Setting up my project took longer than the actual crafting but wait till you see what I came up with.
I scoured Rob’s t-shirt drawer and found an earthy green tee that he never wore. I grabbed my sewing machine and other tools and set out to get it done early in the morning.  The bag itself literally took minutes. Simply sewing shut the bottom of an inside out tee, cutting off the sleeves and making a larger opening was all it took to get a great bag. The trick here was to give it a unique and fun design with the Elmers Painters Paint Markers.

tshirt tote bag tutorial diy step by step craft project

I figured since the bag already had a “green” feel to it being a neutral color and a recycled/reused item I’d stick with the crunchy theme and go for a tree. I drew out a couple trees on paper to get the right look and size and them totally free-handed it on the bag.

elmers painters paint markers drawing shirt craft

elmers painters paint markers flower craft

A large brown tree with pink and purple flowers on a handmade upcycled tote bag is my final project.

handmade tote from t shirt upcycled recycled craftThese markers were so easy to use I let my 4 year old make her own upcycled tote bag but an old tank top sewn shut on the bottom. She copied mommy’s design and drew a tree with flowers.

painted tote kids craft

As she did her craft I did a quick second craft for myself; a decorated vase. This is the perfect size for thumbtacks, paperclips or even buttons.  It only took minutes and was simple.

painted jar craft project

Elmers Painters Paint Markers can be found at your local Walmart and other retail locations.  At about $10 for a pack of 5 it’s a small investment for tools that can be used for almost any project you may have.  As you can see from above these Painters Paint Markers easily go on fabric and glass but can also be used on wood, plastics, ceramics and more.  They are now a staple in my craft supplies closet since they are a cleaner and easier option than paintbrushes and tubs of paint.  Stay connected with Elmers and all of their other crafty supplies and projects on Facebook and Twitter.

“I am a member of the Collective Bias™ Social Fabric® Community. This shop has been compensated as part of a social shopper insights study for Collective Bias™. #CBias #SocialFabric”


Decorating Easter Eggs #Fail

Easter is days away and while we don’t do the whole Easter Bunny shtick I thought it would be fun to do something with dyeing eggs. I got my April issue of Family Fun in the mail and in it they had this adorable and simple looking activity for making Easter Egg Hats. I thought, Perfect! Super Cute and not oozing chocolate bunnies and marshmallow chicks.
Decorating Easter Eggs #Fail
The first step was simple, dye the eggs. I had everything, even had neon dye. I love the colors.
Decorating Easter Eggs #Fail
The next day I pulled out all of my craft supplies and a few random things that I thought we would need and set out to get these little hats made.
Decorating Easter Eggs #Fail
At first I was excited as I thought about the supplies I needed and how to get the right shapes. The first egg made was a princess. I couldn’t figure out how to make the cone. I started with a triangle but it just wasn’t coming out right. So I made a cone then trimmed to a flat bottom. Shae decorated the cone with sticky jewels and ribbon, viola, a princess. I placed it on the egg, it fell off. I put it back on, it fell off again. This went on and on; so I glued it.
Decorating Easter Eggs #Fail
The next one was chef, he was my favorite! A simple strip of paper and a tissue was all it took. Again trimmed to fit. Again glued in place. I let Shae draw his face with a Sharpie, cute.
Decorating Easter Eggs #Fail
The Rockstar was a royal pain. I had to Krazy Glue his Mohawk on and hold it in place to get the right look. Cutting a tiny star from sticker foam was just a stupid idea.
Decorating Easter Eggs #Fail
King and Easter Bunny were simpler to do and I liked the outcome even with King’s obvious skin condition. At this point Shae was thoroughly annoyed that she couldn’t do more. I figured she’d be able to help more but there was a lot of waiting, while glue dried.
Decorating Easter Eggs #Fail
bunny easter egg, Decorating Easter Eggs #Fail
The Spring Bonnet was almost the death of me. I literally wanted to throw it across the room but knew I was the one that would have to clean up the soft yolky mess. Her hat was a disaster; it wouldn’t stay on no matter how much glue I used. I set them all up like a wacky little family, took a picture and had lunch.
Decorating Easter Eggs #Fail

That issue of Family Fun already made it into the recycling bin.


HairBow Holder Tutorial

I’ve always love crafting but it’s been on hold for a while, especially since moving to this house  This weekend I got some inspiration after looking at crafting tutorials over at MomDot.  Shae’s barrettes and other hair stuff have been shoved in a little box for too long. I used that inspiration and came up with a hairbow holder design that I think is perfect for not just Shae and her room but for all the stuff she has.

Supplies & Tools

  • Glue gun & Staple gun
  • Wrapped canvas-whatever size you choose
  • Material of your choice
  • Optional material to add padding/weight ( I used an old white curtain)
  • Ribbons of your choice, various lengths
  • Coordinating fabric for pocket (optional)
  • Buttons or other trim for cute details
  • Velcro

diy-hairbow-tutorial-handmadeMeasure your under fabric 1 inch wider & longer on each side than your canvas.  Starting at the top middle, secure this fabric just over back edges with staples or glue gun.  Next secure bottom middle, pulling tight, then proceed to sides and finish adhering all the way around. I used the blue gun for this step since it wouldn’t be seen.

Now with your finishing material do the same process, only this time fold under edges and staple about 4 inches apart.  This gives a really nice look on the back. Be sure to pull the material tight and make sure the patter (if there is any) is straight.

The pocket is great place to store brushes, combs and mirror. Measure a coordinating piece of fabric and secure with staples or hot glue.  I wanted a deep pocket for Shae’s leave in conditioner so I finagled the material to have a bottom. This was done by leaving myself with extra material on that side of the project.  No secrets just a little tucking, folding and pulling. I did take it a step further and ironed out my fabric and added an interfacing this made my flimsy cotton material more stiff, able to withstand the constant in and out of supplies.

Next, layout your ribbons where you want them and secure them tightly to the back with your glue gun or staple gun.  I did 4 ribbons straight across.  This gave me plenty of space for clips, pins and headbands.

For the loop use an 8′ piece of coordinating ribbon, looped underneath and secure with a piece of Velcro that has been glued onto the ribbon. Secure the ribbon to the top of the wrapped canvas. this holds elaborate pony holders and elastic headbands.

I finished the look with a little ribbon detail and a button.  This is hanging on the wall now, high enough that she can’t reach it now but not too high that when she can do her hair, everything is going to be handy.

You can see from the pics that Shae has a ton of clips and there is still plenty of room for more stuff. I hope you try it out, don’t be afraid to alter the instructions, swap materials and use your imagination. If you do try make one I’d love to see it.


Winner Chosen…YouCanMakeThis.com Review and Giveaway

I would love to get “The Ruffler…Unruffled!” I can’t figure out how to use mine at all. the name pillow looks like something that my daughter would love!!!

mudpiesandmaryjanes(at)gmail(dot)com

I have a fondness for all things handmade. Some of my most cherish possessions are a hand crocheted blanket from my grandmother, a fridge magnet Sabreena made in pre-k and a macaroni necklace from Shaun. I consider myself a bit crafty, I’ve made my fair share of gifts and simple clothing but YouCanMakeThis.com has boosted my craftiness tremendously. With their easy to read, easy to follow ebooks anyone can create gorgeous pieces like a pro.

I was generously sent the Personalized Name Pillow eBook. At first I was a little overwhelmed at the 22 page document. After reading it I realized most of the pages were the letters for personalization and the instructions weren’t really that long. All the details were spelled out clearly; I never had to second guess what I was doing or think that I might have missed a step. It took me a couple weeks to even get started because I thought I had all the materials so I suggest taking the materials needed page with you to the store. Overall it took a few hours total from start to finish to complete my pillow. Unfortunately I can’t show my pillow because it is a gift for someone who reads my site but it is adorable. I didn’t buy any fabric; I used scraps I had on hand so it has a very shabby chic look.

If you want to delve into handmade gifts and clothing and crafting YouCanMakeThis.com needs to be your first stop. I plan on purchasing a handbag eBook and a couple baby items, one can never give too many baby gifts.


I was pleasantly surprised at the ease of making my pillow and praise YouCanMakeThis.com for supplying such a fantastic service.

Do you want your own Personalized Name Pillow eBook? YouCanMakeThis.com is giving 2 LookWhatMomFound readers a copy for themselves.

Visit YouCanMakeThis.com and sign up for one of their fabulous, informative newsletters, then come back and tell me another project you would love to try.

EXTRA ENTRIES:
To receive these extra opportunities for entries, you must fulfill the first REQUIRED entry above and please be sure I have a way to contact you.

  • Follow me on Twitter and Tweet this giveaway DAILY for an additional entry each day, copy and paste this message: YouCanMakeThis personalized name pillow ebook giveaway @lkwhtmomfound http://bit.ly/PBeqE
  • Leave a relevant comment on a non-giveaway Review or Article; let me know which post you commented on
  • Tell me who you would make the Personalized Name Pillows for
  • Grab my LookWhatMomFound button or add LookWhatMomFound to your blogroll, leave site link
  • Blog about this giveaway with link to LookWhatMomFound and YouCanMakeThis.com, for 3 extra entries
  • Follow this blog
  • Become a fan of LookWhatMomFound on Facebook
  • Subscribe to LookWhatMomFound via email, see sidebar

Your entries must follow the rules or they won’t be eligible for prizes. This contest ends 11:59 pm, Friday, June 19, 2009. Winners will be announced on this post and emailed and have 48 hours to claim prize. This contest is open to US residents only.