RSS Email

Decoupage Makeover Wall Art #upcycle #bird

This project came about because we were forced to change the entire look of a room.

Decoupage Art on Wood  #diy #upcycle

What started out as a mini project of new end tables turned into a whole bedroom makeover. I had these grand plans of doing an Ikea Hack of mini dressers but like usual with Ikea, the plans didn’t go our way. But then these adorable cabinets appeared in another display and immediately became our new end tables.

Ikea Enamel End Table
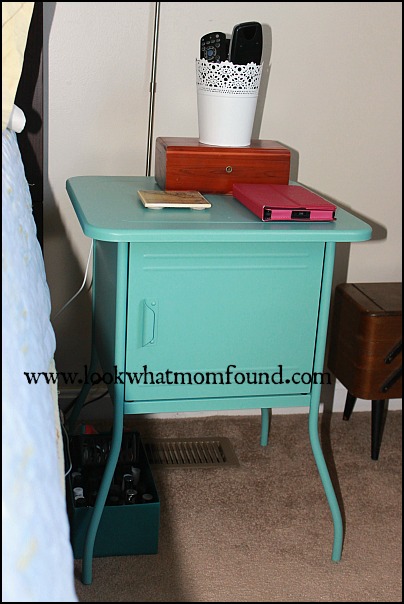
What we didn’t think through was the rest of the room. Our furniture didn’t match our new cute end tables or our bed. The drapes were horrendous and the bedding was too dark and heavy overall. The next couple of days we spent shopping for new dressers, rearranging art and photos and thinking up new design elements for the room.

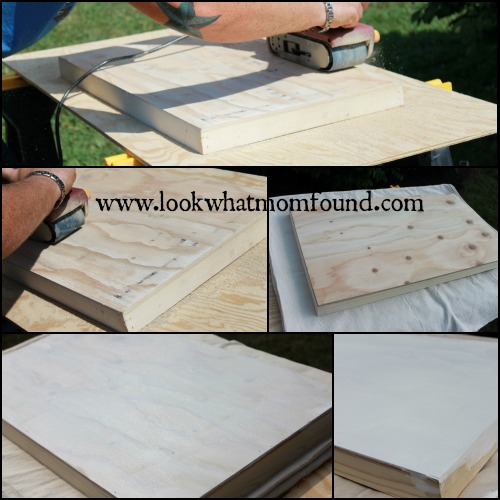
I found this odd art piece at the Goodwill outlet.  It had a good shape and even though I knew the eye chart design wasn’t my style I liked it. It cost just a couple dollars so the investment was a easy YES.

Wooded Eye Chart #upcycle

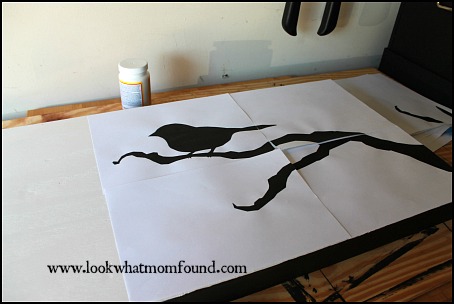
It lingered in the garage for a couple of weeks while I thought about how to upcycle it and that’s when I knew it should be used for the bedroom makeover for it. I settled on a simple bird silhouette found on Google images.

To start Rob sanded the eye chart off and left me with a smooth finish. It was just a simple box someone had made and nailed together but it was very sturdy and straight.  Next he painted the top with a couple light coats of white and the outside edges a chalky black. The same color as my paper wreath covered shutters.

Sanding and Painting #decoupage #art #upcycle

Then it was time to decoupage the image onto the wood. Arranging the image was the hardest part. I purposely overlapped some of the pages and left space between others. I was not going for a perfectly smooth finish.

Layered Leather Look Decoupaged Bird

Layered Leather Look Decoupaged Bird

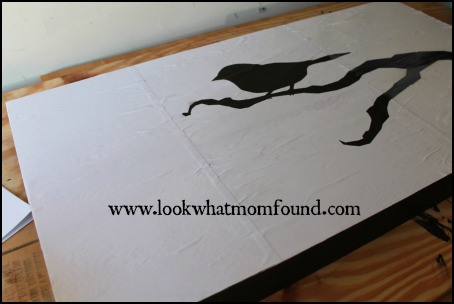
I applied 3 thin layers of decoupage medium (letting them each dry inbetween) then went for a unique step by adding color. As you can see it just took a couple drops in a small amount of decoupage and a couple stirs for an uneven blend. Using a dry brush method I gently applied the tint randomly over the art. I again let each color dry completely.

tinting decoupage #upcycle #art

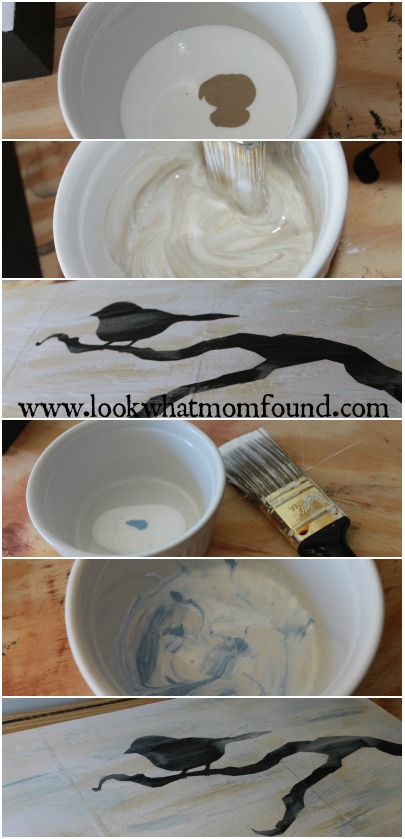
One final layer of decoupage then a polyurethane finish and it went on the wall. I love the texture and layered colors. It reminds me of leather.

Decoupaged Bird on a Branch #art #upcycle

Decoupage Bedroom #Art #upcycle

There’s still work to be done in the bedroom but this really is a lovely handmade touch. Best of all this cost me less than $10 for the entire project.


Painted Rocks Craft for Kids

I was doing some gardening the other day and Shae was helping by pulling weeds and putting the rocks back under the deck that slide down into the grass. She kept showing me the colors and shapes of the rocks and I knew this could aid in a fun craft. I had her pick out 6 smooth rocks and we washed them and let them dry in the sun for a few minutes.

Materials needed

smooth rocks, any size, cleaned and dried
acrylic paints
brushes
googly eyes, glitter, buttons, etc (optional)

Set up a place to start, protect your work surface. Set out a bowl of water to clean brushes and a plate or palette with assorted paint colors. We used the 2oz bottles found at most craft stores.
This is where you can either let the kids paint free-form or give guidance to create something specific.

painted-rocks-kids-craft-ladybug

this rock gets a structured paintjob

painted-rock-ladybug kids craft

painting on the head

Lady Bug Painted Rock Kids Craft

adding the dots to the ladybug

Lady Bug Painted Rock Kids Craft

adding the finishing touch

Lady Bug Painted Rock Kids Craft

ladybug rock

painted-rock-craft

this is rob, see the mustache

painted-rocks

painted rocks on a plate

No matter what is created just have fun.  My craft boost is mostly inspired by GummyLump’s #300CraftsforKids Campaign.  Check out all the ideas that have been posted all year.


I Disclose


Behr Premium Plus Ultra Paint

When we moved into our house this past July Sabreena took the room that was on the 1st floor that might have been an office in the past. When we moved in the landlord did not paint or anything. He didn’t even attempt to pull the nails, screws or patch any of the holes that were in the wall. Even though we are renters leaving the room as is was not an option. Thankfully Behr paint stepped in and gave us paint to repaint Sabreena’s room.

After going to the Home Depot Sabreena decided on the following colors for her room; Yellow Brick Road for the walls, Lemon Grass for the bookcase and cubby door and Ultra Pure White for the doors and trim. Behr was kind and sent us two gallons Yellow Brick Road in Premium Plus Ultra Interior Eggshell Enamel , one gallon Lemon Grass in Premium Plus Ultra Interior Eggshell Enamel and two gallons Ultra Pure White Premium Plus Ultra Semi-Gloss Enamel. What I like about the Premium Plus Ultra line from Behr is that it is paint and primer in one which means less painting for me and better paint coverage in the room.

Melinda and I have painted a few rooms/houses in our day and have always used Behr paint but this was the first time we used the Premium Plus Ultra.  We painted a black cubby with the Ultra Pure White and it took three coats of paint.  I am not an expert so I am not sure if this is normal but once the three coats were on it looked awesome and no black was showing through.  If given the opportunity again I would definetly use the Behr Premium Plus Ultra line of paint.

If you are about to start your own paint project be sure to check out the Behr Premium Plus Ultra line of paint at your local Home Depot. Also, be sure to check out Behr Paint on Twitter.

This is a sponsored post but the opinions and descriptions presented belong solely to LookWhatMomFound…and Dad too! Your experiences and reactions may differ from ours.


ScotchBlueTM & YOU Renovation Rescue Crew contest with Amy Matthews

Is your family room the last place your family wants to hang? Is your bedroom not the romantic getaway you’ve always envisioned? Does your kitchen have good bones but lack the space to entertain more than two? Enter the ScotchBlueTM & YOU Renovation Rescue Crew contest, where one lucky grand-prize winner will receive a room makeover valued up to $15,000 and the exclusive opportunity to work with Amy Matthews on an episode of DIY Network’s Sweat Equity.

Amy Matthews is a real deal licensed contractor bringing renovation realities to homeowners on her hit shows Sweat Equity, This New House, Bathroom Renovations and Blog Cabin. “Painting continues to be the most popular DIY project because it makes such a big impact on a small budget,” says Amy Matthews. “A gallon of paint to create a unique design treatment can do wonders for a tired space with just $100 or less, a little planning and some know-how.”

Inspiring Design Ideas using ScotchBlue Painter’s Tape

  • For an invigorating look, create accent wall frames and a chair rail that will instantly transform a space. Using project plans found at ScotchBlue.com, creating a personal oasis is as simple as choosing colors to suite personal tastes. Try a tropical splash of color with the 2010 Color of the Year, Pantone Turquoise (PMS 15-5519), to create a luminous, island-inspired getaway.
  • Tweens and teenagers are notorious for wanting to display their own sense of style – and their bedrooms shouldn’t be an exception. Create a fun, personalized headboard by applying ScotchBlue Painter’s Tape to form their initial directly above the bed. Then paint over it with their favorite color, let dry and remove the tape.
  • For a wild idea, paint zebra stripes on a board for a cool piece of artwork. Paint a base color on a board and let dry. Then lay down the tape in diagonal stripes. With a utility or precision knife, cut off the edges of the tape in a random, wavy pattern. Remove the cut edges and paint over the entire board to seal the edges of the tape. After it’s had time to dry, paint once again with your accent color. Allow that coat to dry and remove the tape.

To enter the ScotchBlueTM & YOU Renovation Rescue Crew contest, visit www.ScotchBlueandYou.com beginning now. Entries will be accepted through December 29, 2010.

This is a sponsored post but the opinions and descriptions presented belong solely to LookWhatMomFound…and Dad too! Your experiences and reactions may differ from ours. We will be doing our own mini makeover of Sabreena’s bedroom in September so check back for the results.


Having No Health Insurance Stinks

Since losing my job in November 2009 Melinda, me and the kids haven’t had health or dental insurance and have been pretty lucky so far. Recently we were able to get the kids dental and medical insurance but Melinda and I are still without. Being a contractor is good in some ways but bad in others like no heath insurance benefits.

One day last week one of my teeth started bothering me to the point where every time I ate or drank hot or cold liquids a shooting pain went from my tooth to my head. It became so bad a few times I almost blacked out from the pain so finally yesterday I had all I could take and went to the dentist. I was hoping all it would be was a cavity and need a filling but in the back of my head something told me this was going to be a major deal and I was right. After an x-ray and exam my worst fear came true. I need a root canal. Part of my fear is the root canal itself and the other is the financial damage this root canal is going to cause. The total cost of this root canal is $1,050 and I was in total shock when he told me that. This is the first time in my life that I have been without insurance so I have never seen numbers that large when going to the dentist. The crappy thing is I am sort of in a real pickle because I need to get the tooth fixed but on the other hand I don’t have the $1,025.

I am considering having the tooth pulled because it is 3 from the back and not visible but I am reading horror stories about the pain and nasty after effects a pulled tooth causes. It also would only cost about $300 to have it pulled which is huge price difference from a root canal.

So I am not sure what to do. I did have the dentist alleviate the pain by drilling a hole in the tooth and digging out the nerve so now I can drink with no pain and can eat using the right side of my mouth. I am scheduled to go back this Monday to either have the root canal finished or have the tooth pulled. I really don’t know what to do but I need to figure it out over the next 5 days. Having no health or dental insurance sucks!


Sabreena’s room needs a fresh coat of paint from Glidden

This is a Sponsored Post written by me on behalf of Glidden. All opinions are 100% mine.
We were lucky enough to move into this house and be greeted with pretty decent paint choices. The kitchen is bright green, the bathrooms are deep red and the rest of the house is a warm sand color. Well that is except for Sabreena’s room. Her room hasn’t ever been touched with a paintbrush it seems.

Here’s her chance to paint her room the way she wants. We did a quick pass through of the Glidden paint selections at our local Home Depot to get some inspiration. Dazzling Daffodil is looking like the winner! With some bright white trim and doors this color is really going to brighten up per room and be a great addition to her colorful accents, bedding and decorations.

We used the Room Painter to see how the color looks in an entire room, so far so good. Our visit to Glidden.com reminded us to snag a couple color testers in order to really get a feel for how the color was going to look. Along with the Ready-To-Go Paint Testers we will take a look at their XL paint chips in case her original color choice doesn’t work with the lighting.

These Ready-To-Go Paint Testers are also perfect for touch-ups for scuffed walls, repositioned decor or marker mistakes.
For your next home painting project visit Glidden for inspiration and a real test of the color choices that are available to you.


Sorry I Have Not Been Around!!!!

I wanted to write a quick post to apologize for my absence from our blog as well as yours. I have not written a post in about a week and I have not visited other blogs either. Thank goodness for Melinda or else our blog would be in bad shape right now.

I have been absent due to our move and my constant need to get something done. Every single day I have been doing something even if I pack one or two boxes. We have been making some great progress and it started last weekend with Melinda and I getting the whole basement painted which took about 7.5 hours.

During the week we packed up most of Shae and Shaun’s room and Thursday we taped Shaun and Shae’s room along with the hallway and stairwell so Melinda and I can paint again this weekend. The good thing is the kids went to my in laws last night for the weekend so Melinda and I can paint and not have to worry about the kids.

So I am sorry I haven’t been around but I am hoping to stop by your blog soon and get back into a routine of writing. I will soooooooooo happy once this move is over!

Have A Great Weekend!!!!