RSS Email

Decorating a Boy’s Room

Boys room

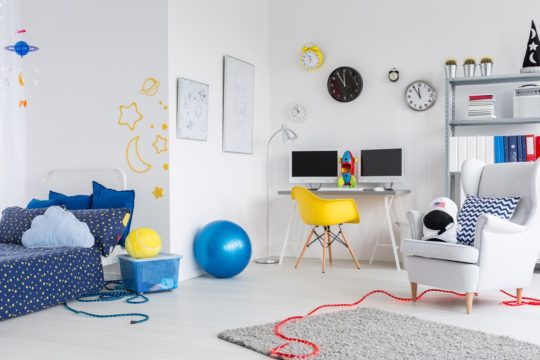
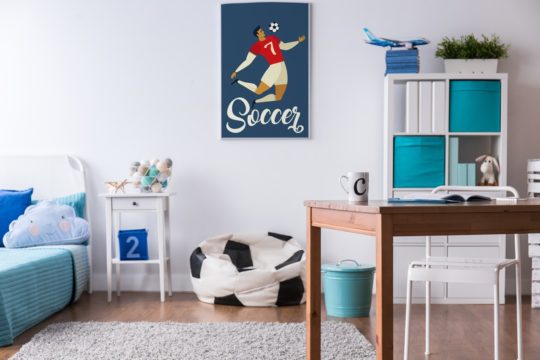
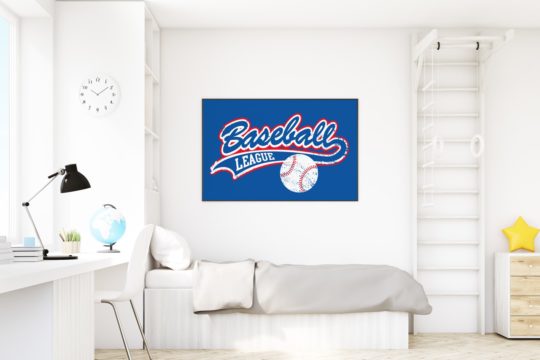
In order to create an original arrangement for a boy’s room, you need a lot of creativity and knowledge about children’s needs and development. The interior will have to serve several different functions. It should be both educational and entertaining. Essential design elements for a boy’s room include multi-purpose furniture and decorations such as a sports poster. However, you should also be careful not to overdecorate the space. Here’s some helpful advice on how to arrange a child’s bedroom.

Boy’s room arrangement 101

room arrangement

You’ll find more sport-inspired posters here: https://myloview.com/posters/by-category/sport/

When decorating a space of this kind, make sure to follow a few basic decorative rules. They will make your child feel more comfortable in their room and improve their overall well-being. In addition, they will also help your little one focus and have a positive impact on their cognitive abilities. According to these rules, a perfect boy’s room should be:

  • ergonomic (the desk should be of appropriate height and size and the distance from your child’s eye to the computer screen should be between 20 to 40 inches),
  • convenient (use multi-purpose, minimalistic furniture, as it allows you to quickly refresh the room or easily rearrange it to create more space),
  • clean (choose those types of flooring, paint, and wallpaper which can be easily cleaned),
  • safe (if the room features an entresol or gym equipment, make sure that there are soft panels on the walls and a wall-to-wall carpet or cushioned flooring),
  • comfortable (the floor should be soft and pleasant to touch and should act as an insulator; complement the design with furniture and accessories made of natural materials, such as wood and wool.)

A child’s room usually includes several distinct areas. If the interior is very spacious, you can physically divide it using partition walls. Otherwise, you may want to differentiate particular areas devoted to playing, studying, and sleeping using colors.

A blaze of saturated colors or soft pastel hues (?) – ideal colors for a boy’s room

Room color

If the interior is already full of fantastic decorations and accessories such as a sports event poster, a rope swing, or model planes, the design needs to be complemented with appropriate colors. Consider using the 70%x20%x10% rule. 70% of the space should be dedicated to a dominating color, 20% to a supplementary color, and 10% to a contrastive color. Beige and gray are incredible candidates for the dominating color (white isn’t the best idea, since it gets dirty easily.) The supplementary color should also be rather soft. Consider pastel hues of green, light blue, or purple. As far as the contrastive color is concerned, you can’t go wrong with navy blue or maroon.

The perfect choice of color often depends on the child’s age. For younger boys, it’s better to use softer, pastel hues. Teenagers will definitely find stronger, expressive colors more appealing and maybe even wish to have their ceiling painted as well. If you want the room to look neat and modern, decorate the walls with a geometric wallpaper or wall murals depicting your child’s favorite cartoon characters. Remember not to go overboard with the decor. The color scheme should be limited to 3 or 4 colors.

Quintessential accessories for a boy’s room

Room accessories

If you want to help your child develop their cognitive skills, there are a few types of accessories that you should consider:

  • labyrinth wall murals which improve concentration and may also include other educational games,
  • illuminated alphabet boards, featuring letters that can be rearranged to form words,
  • hobby-related decorations, such as a sports poster.

If you want to encourage your child to spend more time outside, it might be a good idea to introduce elements such as a baseball glove, a basketball, or rollerblades into the arrangement. Put these items on display so that they’re easily accessible. Participating in sports activities has a beneficial effect on our health but also satisfies other needs such as the need to be part of a group or to be accepted.


9 Best DIY Party Food Ideas For Kids

party

It’s a lovely feeling to have a bunch of excited kids running around our backyard; having the time of their lives. Tired, they soon come rushing through the doors, expecting some delicious snacks and drinks. Yet, we always serve them the same thing: pizzas and coke. Kids love a little variety; they want their food to look colorful and pretty. Making these creative and cute snacks are easier than we imagine, and are guaranteed to make the little ones squeal with delight! Given below are the 9 best DIY party food ideas for kids.

1. CAKE POPS

cake pops

Cake pops are cute and delicious; making them the perfect snack to serve at a party! Crumble a prepared chocolate cake in a bowl until it resembles fine crumbs. Add in the chocolate frosting until the cake is moist. Roll the mixture into a tight ball and insert a stick about half way into it. The kids can help you dip the ball into melted chocolate (white or black) and decorate it with sprinkles! Place the cake pops in a glass, and place them in the freezer for about 20 minutes. Enjoy!


2. Mini Corn Dogs

shake

INGREDIENTS:
(For 12 Corn Dogs)
• 6 Hot Dogs
• ½ cup All-purpose flour
• 2 tsp baking powder
• ½ cup cornmeal
• 2 tbsp sugar
• ½ cup milk
• Salt & Pepper
• Vegetable Oil (for frying)
• 12 Lollipop sticks

INSTRUCTIONS:

Slice each hot dog into half and insert the lollipop sticks about half way into them. You can use wooden skewers as well. In a bowl, combine all the batter ingredients and whisk. Pour the batter into a long glass/ Mason jar. Dip each hot dog into the batter so that it completely covers the hot dog. Pour enough vegetable oil into a deep frying pan and heat the oil. Carefully place the hot dogs into the frying pan. Fry until golden brown for about 2 or 3 minutes. Drain the excess oil. You can fry about two or three at a time. Serve immediately, with ketchup/ mustard.

3. Donuts & Milk

shake

Donuts and milk make a classy pair; especially since it is so difficult to get the kids to drink their milk! Serve the milk in these cute milk bottles/Mason jar and pair it with colorful straws. Top it with a scrumptious donut to get the kids super excited!

4. Lego Head Marshmallow Pops

sticks

INGREDIENTS:

• Mini Marshmallows
• Regular Marshmallows
• Yellow Candy Melts
• Lollipop sticks
• Chocolate chips (for face details)

INSTRUCTIONS:

Cut the mini marshmallows in half horizontally and attach them to the regular marshmallows using melted yellow candy melts. Dip the lollipop stick in the melted candy melts and insert it into the bottom of the regular marshmallow. Dunk the heads in the melted yellow chocolate melts. Once the Lego Heads have dried, you can use chocolate chips for the eyes, or use edible food markers. These are absolutely adorable, and are bound to get the kids wanting for more!

5. Jello Sailboat

mocktail

INGREDIENTS:

• 1 box blue raspberry Jello
• Mandarine oranges or Clementines
• Long toothpicks
• White card stock

INSTRUCTIONS:

Prepare the Jello, by following the instructions on the box, in small clear cups or glasses by filling the cups to the top. Cut small 1 1/2″ tall triangular sail shapes out of card stock and attach to the ends of long toothpicks with glue or clear tape. Once the Jello has set, peel your Clementines and separate them into segments (one segment per Jello cup).Insert the toothpick sails through the top of the clementine pieces, and into the middle of your Jello cups. Enjoy!

6. Fairy Bread

rolls

INGREDIENTS: (Serves 8)

• 8 slices white bread, with crusts trimmed
• ¼ cup margarine, softened.
• ¼ cup multi colored sprinkles
• 2 tbsp sugar

INSTRUCTIONS:

Mix the margarine and sugar together. Using a rolling pin, roll the square bread pieces until they are thin. Place a thin layer of the margarine-sugar mixture on top of the bread. Get the kids to add rainbow sprinkles on top of it. Finally, roll the bread gently into a tight spiral shape. It’s as easy as that, and is so delicious! The kids are bound to love this treat!

7. Strawberry Nutella Mini Pancake Kabobs

sticks

INGREDIENTS: ( FOR 8 KABOBS)

• 1 small bottle Bisquick™ Shake ‘n Pour™ pancake mix
• 1 small jar Nutella™
• Fresh strawberries (sliced
into ½ inch thick slices)
• 2 large firm bananas, peeled and sliced into 1/2 inch thick rounds
• 4 wooden skewers broken in half to make 8 small kabobs

INSTRUCTIONS:

1. Prepare the pancake batter according to package directions and pour small dabs of batter onto a hot, lightly greased griddle for 1 -1/2 inch diameter pancakes (about 3/4 tablespoon of batter per mini pancake).
2. Cook the mini pancakes for about a minute on each side or until slightly browned.
3. Spread some Nutella™ on each of the pancake bites and layer the ingredients onto the kabob sticks. Serve immediately and enjoy!

8. Rasberry 7UP® Punch

mocktail

INGREDIENTS: (SERVES 6 TO 8)
• 2 L 7UP® or Diet 7UP®
• ½ gallon Raspberry Sherbet
• 2 Tbs lime juice
• 2 Tbs lemon juice

INSTRUCTIONS:

1. In a blender or food processor, mix together the sherbet and half the bottle of 7UP®, with the lemon and lime juice.
2. Stir in remaining 7UP®, and serve cold! Trust me; every kid at your party will love this slushy, refreshing drink!

9. Milk & Cereal Popsicles
ice cream

INGREDIENTS: (Yield varies according to size of mold: approximately 6 popsicles)
• 1 med/large banana (or 2 small)
• 1 Cup Greek yogurt
• 1/2 Cup strawberry milk / Chocolate Milk / White Milk
• 1/2 Cup dry cereal ( Fruit Loops, Cheerios, Cocoa Puffs, Captain Crunch )

INSTRUCTIONS:

1. In your blender, mix the banana on medium until mashed and smooth (approximately 1 minute).
2. Slowly add in yogurt and milk. Continue mixing until blended. Add the cereal and stir by hand to avoid crushing it.
3. Pour into Popsicle molds. Freeze for 8 hours, until solid.


Creative Parenting to Raise Creative Children

baby
If you ever observe a lone child, you will notice they are always busy! Think about it, how easily we adults bore of things. We need movies and restaurants and drives to quench the thirst of our bored minds. But children? Leave them alone at home and they find unimaginable ways of using the most mundane things to engage their minds!

Keeping my 2 year old nephew busy is one of our primary tasks on any given day. It is a basic necessity of life for those of us at home who starve for just some time to lie down and relax. We adults tire out at the drop of a hat, but kids! They are driven by their curiosity! So one not-so-fine day, to our horror, we realized we hadn’t planned on how we would be engaging him. There had been a plan to get him play dough since he seems to always be interested in making artistic experiments. But among all the other adult priorities, it had been forgotten. So while we sat dreading the onslaught of “Don’t sleep, play with me!” and “Be my horse” or “get me another toy”, this little person found a packet of fruity chewies. After making promises of not eating them, he opened each one carefully, examined them with caution and after lots of trial and errors, and an hour later, he was ready with his creation: he had moulded them into a tiny bottle! I would never have imagined there was anything to do with them other than eat!

My proud sister says he has made “paintings” that are worthy of being framed and displayed at home! On asking how he learned to make them, she said she had just given him paints and a paper and his boundaries. He had taken care of the rest!

We are all born with talents and the greatest gift a man can have: imagination. But as we grow older, we train our minds to learn the ways of life. And where there’s a predefined path to follow, how can the mind find the liberty to pave its own way? Children however, have all the imagination, talent and curiosity in the world at their disposal….enough to let them find their own way…if given a chance!

As parents, what must we do to ensure we are not stunting our child’s creative growth? Let’s find out!
Let Go! As parents we think we must be involved in our child’s life. But remember, getting involved often translates into dos and don’ts for them, and that’s exactly what we want to avoid. Sometimes let them be, let them do their thing and be content in watching from afar to make sure they are safe. Give them the space to grow outside our self-made boundaries!

Enough with the ‘No’! Remember when we were kids and wanted to grow up every time we heard a NO? And then we grew up and realized we ended up saying NO to ourselves most of the time! Don’t make the same mistake with your kids. Childhood is the best time for them to experiment, learn and understand their passions! Yes they may make a fuss about enrolling in a dance class today and declare a week later that they didn’t want to do it anymore! Yes, they can ruin your floors and walls trying to make creations that make no sense! But atleast…they give it a try and make a choice! Say ‘yes’ more often, especially when all they want to do is try something new. Let them dabble in a numerous things, get their hands (and yours sometimes) dirty! You have nothing to lose, but they learn important lessons of life at each step!

Observe! Learn to notice your child’s interests and orientations! Sometimes children have inborn inclinations towards particular arts or sports. Some love to sing, some draw, some love to watch you cook! Support them in their interests whenever you can and to whatever extent possible. You might be setting them on the path of their future careers for all you know!

Answer! Children can often have an endless list of questions to be answered, and this can get frustrating! Yet, answer them when you can…Their curiosity defines the kind of person they become, so make sure you don’t thwart their attempts to find out.

It’s all about the fun! Kids learn through fun! Whatever their interests, make sure you further them in fun ways and increase the passion, not forcibly send them off to a grumpy strict class that only ends up nipping the whole thing in the bud! Get in the mud with them whenever you find time, learn with them, do things in their crazy way.. imagine their happiness when they can get to share their thoughts with you. You might be surprised as to why you never thought of it yourself!

It isn’t all about the future! Very often, parents tend to push children towards activities that they think would contribute to their future. So most end up giving great significance to their performance in academics. Which isn’t wrong, if you also encourage them to make time for other activities. It is most important for children to have all-round personality development. If not a skill to earn with, atleast let your child pick up something as a hobby to relax with for life.

Don’t make them fulfill your dreams! Yes, you wanted to become a dancer. But your daughter has a beautiful voice. They may be made from you, but learn to recognize their differences. Children often end up trying to please their parents so they can be proud of them. Show them you can be proud of them even when they excel in fields of their choice. Show them It is alright to be different.

Don’t make them live your fears! You might be scared of swimming but let your child decide if it’s an activity they would like to do or not. Don’t burden them with your preconceived notions and phobias. Trust that they can decide for themselves!

Push when needed! Some children need an added push to try things. They don’t like to draw, water scares them so no swimming, they look funny when they dance….excuses like these can exhaust you especially when other children seem to want to do these things. Don’t give up. Sometimes you need to push children to try new things. Once they develop a taste they start enjoying it. Let them attend a couple or more sessions before giving in to their NO!
Praise, yet be a critic! A child draws his confidence from the confidence of his parents. Show them that you love what they are doing and that you think they are good at it, initially. But also, as they grow, try to give them honest feedbacks. Only then can they improve.

Always Be Around! Lastly, always be around! Let them have the faith that no matter what they try next, they have you to fall back upon!

The dictionary defines creativity as “The use of imagination or original ideas to create something”. Original ideas. So don’t dream for your child to grow into an X or a Y. Don’t even dream for him to grow into a YOU. Dream for him to grow into the best version of himself, with his ideas, his ambitions and his hardwork! And that’s only possible if you let him be him right from day one. Make sure your little baby’s safe, make sure he’s happy. The other bit about learning and creating? They take care of it themselves!


DIY Crafts for Your Kids

colors
Kids love paint and glue! When schools are out for the summer, kids can get bored easily. Children these days are glued to the television or iPad all day long! These DIY crafts are a great way to bond with your little ones, and to bring out the artist in them! Try out these five easy and fun projects to keep your kids busy all summer long!

1. Life size pizza

Materials required:

• Glue gun
• Scissors
• Paintbrush
• Colored paper( Brown, Red, Green, Black) and cardboard
• Tooth brush
• Paint (Red, White, Black, Brown)

Directions:

• Cut a large triangular shape out of cardboard, so that it looks like a slice of pizza. Cover it with brown color paper. Roll the bottom of the triangle to make it look like the crust, and glue it in place.
• To make the pizza sauce, mix some oregano and paprika with dark red paint. Paint your cardboard triangle ‘pizza base’ with your ‘pizza sauce’.
• To make pepperoni, splatter white, black and brown paint on red paper using a toothbrush. When the paint dries, cut out big circles for your pepperoni.
• You can make other toppings like green peppers, black olives and mushrooms by using colored paper.
• Stick the toppings onto the pizza slice by using a glue gun, and leave it to dry.

2. Tie & Dye T-Shirts

Materials required:

• Bucket of hot water
• Fabric dye(1 color)
• Rubber gloves
• Plain white t-shirt
• Scissors
• String

Directions:

• Tie a long piece of the string on the bottom corner of the t-shirt tightly.
• Crumple the t-shirt and wrap the string tightly around the t-shirt as you crumple it. Tie a knot after you are done.
• Pour the dye in a bucket of hot water. After wearing your gloves, slowly dip the shirt into the dye for a minute.
• Take out the t-shirt and leave it to set for half an hour before cutting the string.

3. Stuffed Snake

Materials required:

• An old tie
• Two buttons
• Fabric Paint
• Red Colored Paper
• Glue gun
• Cotton

Directions:

• Use the glue gun to seal the small end of the tie. Leave it to dry for 2-3 hours.
• Stuff the other end of the necktie with cotton. You can use a stick or a pencil to stuff it all the way down to the end.
• Glue the bigger end shut and leave it to dry for another 2-3 hours.
• Glue the buttons onto the bigger end by using a glue gun. These are the eyes for the snake. Cut out a forked tongue and glue it to the tip of the bigger end to give it a complete look!

4. Pencil holder

Materials required:

• A set of crayons
• Glue gun
• An old can

Directions:

• Carefully glue the crayons together around the old can by using a glue gun.
• Leave it to dry overnight.
• You can use this as a pencil holder, or gift it to someone special!

5. Stick-Art!

Materials required:

• Ice cream sticks
• Pencil
• Glue gun
• Ruler
• Colored sharpies
• Small magnets
• Sandpaper

Directions:

• Draw a line 4 cm from the end of the ice cream stick and break it.
• Rub the broken end with sandpaper until it is smooth.
• Draw any design onto the stick by using a pencil, and then color it with the sharpies.
• By using a glue gun, attach the small magnets to the back of the sticks to make refrigerator magnets!


10 Ideas to Decorate Your Kid’s Room

Playroom

Kids’ rooms are supposed to be all bright and vivid – that is the first thought that will come into any parents’ minds. Here are some kids bedroom ideas to it magical, inspiring place for them. Read along the following tips and trick to find more:

  • Instead of covering the walls with wall hanging that you have bought from outside, you can use painting created by your child, frame them and use them in their bedroom. This shows that you are actually proud of them and it will turn the kids into much more confident individuals. You can buy frames of different sizes and arrange them to create a gallery on the wall.
  • You can paint the wall with colorful geometrical shapes or you can paint images of animals. Use stencils to get a proper shape. Make sure you don’t just stick to blue for boys and pink for girls, add more colors than the conventional ones that everyone uses.
  • You can use some of your kid’s old t-shirts, by cutting them and using them for a headboard. You can also stitch them up into pillow covers. It is a great way to showcase their personality.
  • You can turn your kid’s favorite cartoon character into a graphic wall art near the bed.
  • If your daughter wants to be a pretty ballerina you could paint a ballerina with hangers to hang her clothes or you could use your son’s skateboards to create a custom skateboard clock, which will add fun and excitement to the room.
  • If you are painting a nursery, go for chic and timeless colors that will keep the room atmosphere peaceful and calm. A coral turquoise combination is a cute and classic choice.
  • You can add cute storage bins to the room where the kids can keep their blankets, shoes, toys and books.
  • The most important part of the room is the reading desk. The reading nook should be pretty, not very distracting, but a place that is comfortable for them while they are doing their homework and studying for their tests.
  • Some kids are big fans of sports cars and famous music bands. Add some posters, maybe on the bedroom door.
  • You may want to try out those colored wash tapes and stick them to the wall to add a fun design to the room.


How Rhymes and Songs can Help Little Children Grow

Child development

One of my cousins has a 2 year old boy. She told me that children are very observant and can learn things very quickly. Small children are natural copycats. Preschoolers learn a lot by watching what we do and then trying it themselves — whether it’s positive or negative. So it is very necessary for us to watch what we do.

Studies have proven that if a child starts school with a certain set of skills and habits, a behavior to learn more will enable them to take at most advantage of everything that the school and its environment has to provide to the child. Some skills come naturally to the child, while some need to be infested through an environment that promotes learning.

What I’ve observed in the younger age group of 2-5 years is that songs and rhymes are very helpful in teaching and entertaining these tiny toddlers. The most important reason for parents to use music and rhymes to engage with their little children is that it provides an opportunity for both of them to bond and enjoy. Above all, it is an experience of fun and learning.

With the help of my cousin, I have chosen 5 videos that can be shown to a preschooler which include counting, role play, storytelling, with plenty of actions and movement, all invaluable tools for learning. The list is as follows:

(1) ABCD’s (https://www.youtube.com/watch?v=ETLTkjSix5g )
(2) Five little ducks ( https://www.youtube.com/watch?v=Tmoebx4gbs4 )
(3) Old MacDonald had a farm (https://www.youtube.com/watch?v=9EQjDEpzSU8 )
(4) The Wheels on The Bus ( https://www.youtube.com/watch?v=zbiFZKt5irI )
(5) Twinkle Twinkle little Star ( https://www.youtube.com/watch?v=Py-J_LvPLnI )

In the fourth video, “The Wheels on the Bus”, the girl who is singing the song keeps asking questions. When the kid watches the video multiple times, he grows used to the questions posed by the girl in the video, and may even start answering to them. Even if he doesn’t answer to the questions, he may simply begin to sing along or clap to the tune. Every time my cousin’s son watches the video, he starts jumping and laughing. This is the reason why “The Wheels on the Bus” is on every playgroup’s favorite list; the lively actions never fail to get everyone joining in!

Another aspect of these videos which is to be considered is the color of the video. Color has a powerful affect on the mood and behavior of the child. It is therefore, very important for us to consider the dominant color of the video before showing it to the child. Bright colors such as red, yellow, blue, green, pink and white can attract the kid’s attention and also promote a welcoming feeling. For ex. the color of the bus in the first video is bright, same is it with the animals and dress of the girl.

Children are more fascinated by those videos which they can relate to- videos which show things they see and hear every day. The video “The Wheels on the Bus”, shows a bus, its doors, its wheels, the driver, the passengers, etc. It talks about what sounds each of these elements make.

Talking and listening are extremely valuable for school success, and parents have countless opportunities to develop their child’s language skills. It is therefore very important for parents to be very careful about choosing the right kind of videos for their children and also showing these videos in the correct sequence, so it is simple for the child to learn and absorb the content.


The Kid Friendly Festive Paper Wreath

wreath

When I was a kid, one of my top favorite things about the holidays was getting to make crafts in school. Maybe the most fun holiday craft to make in class and at least as popular as the handprint turkey was the paper Christmas wreath! Making a paper Christmas wreath is your child’s crafting rite of passage. What are Christmas decorations without a paper wreath?!

The Paper Christmas Wreath Pt. 1

Materials Needed:

 Scrapbook paper, green, maroon, gold

Cardboard cake circle

Buttons, red and white

Ribbon

Tape

Tacky glue

Packet of glue sticks

Rubber gloves, optional

Directions:

Step 1: Fold sheets of scrapbook paper into cones. Tape. For smaller cones, cut the paper in half using your scissors.

Step 2: Using the red buttons for the wreath’s berries, have your children superglue the buttons to the paper cones. If you’re worried about them super gluing their fingers and hands together, make them wear gloves!

Step 3: Hot glue the tips of the larger cones around the perimeter of the cake circle. This step will need to be completed by you, mom, so that the kiddies don’t burn their little fingers!

Step 4: Continue gluing the cones to the cake circle. Remember, the larger cones should be glued on the outside of the circle, with the medium to small cones glued towards the inside.

Step 5: Tie the ribbon at the top of the wreath. TA-DA! Your kids have made their own paper wreath! Let’s continue learning about more ways to spin the classic paper wreath design with more Christmas crafts for kids!


The Paper Christmas Wreath Pt. 2

Materials Needed:

Construction paper, dark green, light green and red

Elmer’s Glue

Pencil

Glitter, red and green

Ribbon

Scissors

Directions:

Step 1: Have your child trace their hand 20 times on the construction paper — 10 times on the dark green paper, and 10 on the light green construction paper.

Step 2: Cut out the handprints. Using the Elmer’s Glue, draw squiggles on the handprints. Sprinkle with green glitter. Set aside and let dry.

Step 3: Draw small circles on the red construction paper. Cut out. Cover in glue and sprinkle with glitter. Set aside and let dry.

Step 4: Layer the hands at the palms in a circle and glue together. Glue the red circles on the hands in groups of three. Set aside and let dry.

Step 5: Tie a ribbon at the top of the wreath for hanging.


The Paper Christmas Wreath Pt. 3

Materials Needed:

Paper plate

Pom-poms, red

Green acrylic paint

Paint brush

Elmer’s Glue

Glitter, green

Ribbon

Pencil

Scissors

Pie plate

Directions:

Step 1: Trace a circle in the middle of the paper plate with your pencil and cut it out with your scissors. Put aside. The part of the paper plate you will be using for this project is the waved edge of the plate.

Step 2: Paint the plate green. To create a more interesting composition, you can paint each indentation or rise in the plate a different shade of green. Set aside and let dry.

Step 3: Trace curlicues and tendrils along the dried plate with the glue. Sprinkle with green glitter. Upend on the plate on the pie plate to remove excess glitter. Set aside and let dry.

Step 4: Glue the red pom-pom in groups of three on the wreath to mimic holly berries. Set aside and dry.

Step 5: Tie the top of the paper wreath with a ribbon for hanging the wreath and hang on your door, above the fireplace or on your children’s doors!

There’s no better way to get in the Christmas spirit than by crafting with your kids!


Turkey in Disguise Thanksgiving Kids Craft

You know that holiday in between Halloween and Christmas?  It doesn’t get the hype that the others get.  Thanksgiving is an important day in our history so we’re going to make a point to give it the attention it deserves.  We’re starting with  a cute kids craft, Turkey in Disguise.Turkey in Disguise Thanksgiving Kids Craft

When I told Shae exactly what we were supposed to do she laughed.  The idea was to hide or dress up the turkey so he doesn’t get eaten for Thanksgiving dinner.  This seems to be a popular idea for kids each year in the classroom. I’m on my 3rd child and I’ve never heard of it. Trish from Momdot brought it up as an idea to get a bunch of bloggers crafting together.

Shae come up with a Butler. He’s in his tux serving up a glass of lemonade (after I told her a glass of wine or a beer isn’t appropriate for a kid’s craft).

Trish even has a simple turkey template to use. I ended up making my own because I couldn’t get my printer to work but it was easy.

Download and Print the template from Trisha of Momdot.

Help your child figure out how best to disguise their Turkey. It could be a costume, a new personality or even hidden in another picture if your child is feeling extra artistic.

Shae used a combination of sticker foam, cardstock, sharpie and pencil.  She practiced drawing her tuxedo and adding details like buttons, pockets, a tray holding a glass and a wing.

When it came time to put it all together she was master of her own domain. No matter what advice or input I gave her she made her Turkey her way. Turkey in Disguise Thanksgiving Kids Craft

How would your child disguise their Turkey?  Come back and share what you’ve created.


DIY Refrigerator Letter Magnets #kidsinthekitchen

My kids are older so we’ve passed the stage of singing letter magnets on the fridge. We still have lots of magnets but we’ve upgraded to ones that have memories, are handmade, and do double duty (like powerful rare earth magnets that hold everything from the school menu to a half-open bag of rice! Those “classic” primary color letters don’t really fit our style anymore. What does a crafty mom and crafty kid too then, they DIY Refrigerator Letter Magnets.DIY Refrigerator Letter Magnets

We wanted to make them so it would allow us to leave little notes to each other. Making  them small allowed us to make many of them, a couple alphabets worth.

Refrigerator Letter Magnets

  • 1/2″-3/4″ clear glass, flat gems (found in floral arranging section)
  • old magazines, junk mail, brochures
  • clear drying school glue
  • super glue or hot glue
  • scissors
  • disc magnets 1/2″-3/4″

Leaf through old magazine, seek out bright and fun headlines and titles. Determine if they’ll fit behind your marble by simply placing the gem on top and making sure you can see the letter, number or symbol clearly.

Apply clear drying school glue to the back of the marble, press firmly to the letter/page. Let completely dry for up to 1-2 hours.

When the glue has completely dried carefully cut/trim paper away from glass gem so paper does not stick out from behind gem. Using hot glue/super glue attach the magnet and to glass gem, pressing firmly.

Magnets will be ready to use in 10 minutes.

*****Keep careful watch using hot glue or super glue around children.DIY Refrigerator Letter Magnets DIY Refrigerator Letter Magnets

DIY Refrigerator Letter Magnets
Come join me and my co-hosts, Paula at Frosted Fingers, Sara at Sensibly Sara, Kate of Busy Bee Kate & Jeannette of Eco Incognito each week linking up a post, new or old, that feature the theme Kids in the Kitchen. It doesn’t matter what you are doing as long as you are doing it together, enjoying it and learning something along the way.

You’ll find these and many more ideas for healthful and unique food fun on the #KidsintheKitchen Pinterest Board.

Follow Melinda Babiak’s board #KidsintheKitchen on Pinterest.

Linky Rules, #kidsinthekitchen

#KidsintheKitchen Weekly Linky


DIY Mancala Board #kidsinthekitchen

Having kids of varying ages there aren’t too many things that they all have interest in. Board games is tops on that list though. Games is something they can always agree on. Sabreena remembered playing a game in elementary school called Mancala. I’ve never played it but have heard of it. She looked in the fridge on day and said save that egg carton when it’s empty, I have a project for it. DIY Mancala Board #kidsinthekitchen #recycledcrafts Using an 18-count egg carton Sabreena fashioned her own Mancala board and grabbed some glass gems from my craft cabinet. Within 1 hour of her big idea she and Shae were playing. Like I said I didn’t know how to play the game but apparently Shae did and they went through about 4 games before dinnertime. This is now a nightly ritual, one I don’t mind at all. I’m gonna bring all the quiet games into the living room so we can have nightly intellectual games instead of tv and video game time. Materials and Directions

    • 18-count egg carton
    • strong glue such as E6000
    • pen knife or other sharp knife
    • Tissue paper & mod podge (or washi or duct tape)

Using the knife slice one long row of egg cups from the carton. DIY Mancala Board #kidsinthekitchen #recycledcrafts Cut 2 sections of 2 cups to use as the “store” and cut out the dividers of those 2 pieces. Glue the store cups on the ends of the remaining carton, set aside to dry for several minutes. Seal up the holes in the “store” cups with paper or tape. DIY Mancala Board #kidsinthekitchen #recycledcrafts The girls used colorful tissue paper and mod podge. This just made the game board a little more festive.DIY Mancala Board #kidsinthekitchen #recycledcrafts Your game is ready to play with marbles, rocks, seeds, beads or in our case glass gems.DIY Mancala Board #kidsinthekitchen #recycledcrafts Mancala is the word for this type of “sowing” game. There are many versions of it around the world from many cultures. This is the version my girls play. One day I’ll invest in a beautiful wood board that will last a long time but for now I’ll relish in the ingenuity of my smart girls to create their own fun. Come join me and my co-hosts, Paula at Frosted Fingers, Sara at Sensibly Sara, Kate of Busy Bee Kate & Jeannette of EcoIncognito each week linking up a post, new or old, that feature the theme Kids in the Kitchen. It doesn’t matter what you are doing as long as you are doing it together, enjoying it and learning something along the way.

You’ll find these and many more ideas for healthful and unique food fun on the #KidsintheKitchen Pinterest Board.

Follow Melinda Babiak’s board #KidsintheKitchen on Pinterest.
Linky Rules, #kidsinthekitchen

#KidsintheKitchen Weekly Linky