RSS Email

Pediped Footwear for Kids

At six years old, Shae has lots of opinions about what she wears. She doesn’t always get final say but I like to hear what she thinks about certain styles, patterns and colors. Her view on comfort is one I listen to all the time. Pediped Footwear have been one of my favorites for Shae since she was little because they’ve been a shoe I could count on.

She’s always on the move, always has been and I’m not about to stop her. She’s a girl with many interests and personalities and her fashion is an extension of those differences. Somedays you’ll find her decked out in glitter and tulle and then just as quickly changing her outfit into jeans and sneakers for a climb up a tree. We look for brands and companies that work with her changing character.
Pediped Footwear for Kids
Since she wears Big Girl sizes now it’s sometimes hard to find styles that are pretty without being too trendy or grown up like the styles I’ve seen with heels and wedges. Pediped shoes are constructed to support your child’s foot and offer cushion as they walk, run, play and climb.Pediped Footwear for Kids

Whether you are outfitting a toddler just learning to take their first few steps or an elementary school student performing in the school play trust Pediped to keep their feet comfortable and stylish.


Spring Portraits with the Kids

Last week we had gorgeous weather. Winter had finally left and spring was here. Since the winter had left is with so much cold, snow and misery I thought a fresh set of Spring Portraits was in order. We headed to our friends horse farm about 20 minutes away.  It was awesome. The horses themselves were friendly like dogs. They would trot over for some petting and nuzzles. As you can see Shaun took to them really well. ME, I’m scared of them. No real reason why, maybe its the big teeth.

Spring Portraits at the Horse FarmSpring Portraits at the Horse Farm

Anyway, the farm was the perfect backdrop for the pictures. The kids cooperated, the weather was magnificent and horse poop smell wasn’t bad at all.

Spring Portraits at the Horse Farm

Spring Portraits at the Horse Farm

Spring Portraits at the Horse Farm

And My High School Graduate. In just 5 weeks she’ll be walking across the stage getting her diploma. She’s worked hard for it.


Jelly Bean Tree Kids Craft #KidsintheKitchen

With spring comes Easter and with Easter comes the influx of sweet, brightly colored candies. Jellybeans are a staple for this season and what better way to use them (besides eating them) is making crafts like this Jelly Bean Tree.Jelly Bean Tree Craft for Kids #KidsintheKitchen

I made a different kind of Jelly Bean Tree(coming next week) but Shae wanted to make her own. Using the same jelly beans leftover from my project I thought this was a good project for her. While it wasn’t HARD it took a little more maneuvering than I initially figured. The trick is to use a thick tacky glue, NOT HOT GLUE. You don’t want to be stuck holding the jelly beans in place for a long time.

The Quick Grip adhesive from Beacon works really good for projects that use beads, candies, buttons, etc. I wish it came in a different container, a squeeze bottle would be beneficial. (not sponsored)

Materials
styrofoam balls
vase, mini flowerpot
strong adhesive
jelly beans
lollipop stick or skewer
cotton balls
decorative filler/cover, like grass or moss

Directions
Using a dab of glue, stick a styrofoam ball into the bottom of your flower pot and let set.
With another dab of glue slide a larger styrofoam ball onto the stick then into the base.Jelly Bean Tree Craft for Kids #KidsintheKitchen 
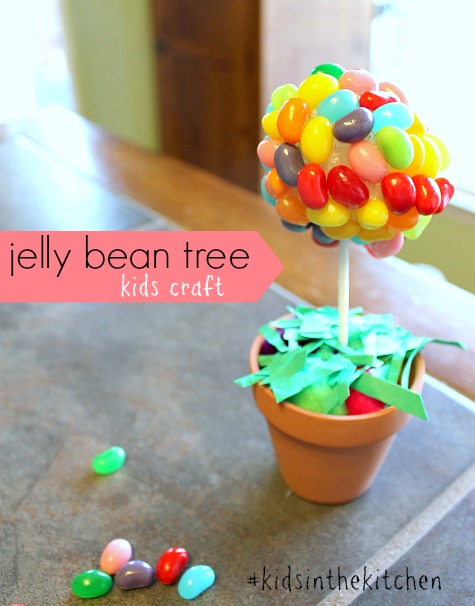
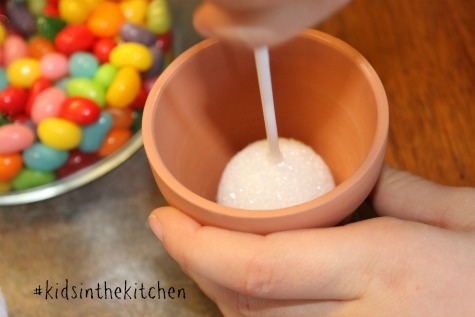
Distribute the glue onto the styrofoam ball in sections. We did lines at first then just filled in spaces. Be sure to hold the jellybeans in place for a few moments so they get a good grip.

Jelly Bean Tree Craft for Kids #KidsintheKitchen

(This is where a good glue is important. School Glue might work but I don’t think it dries fast enough to make this a project suitable for kids)

As one side of the ball was getting heavy we supported the stick with pompoms (or cotton balls). these can be removed at the end but Shae ended up keeping them and making them part of her arrangement.

At one point the one of our ball was filled with jellybeans making it a bit top heavy so I placed it in my hand so Shae could add the last of the jelly beans.Jelly Bean Tree Craft for Kids #KidsintheKitchen 
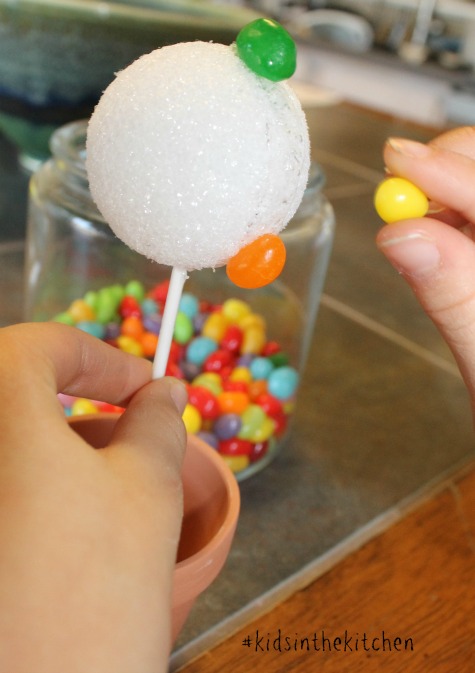
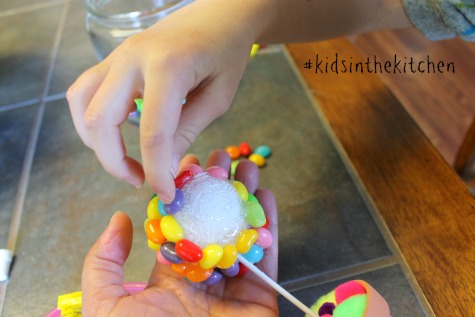
Once your ball is covered in jelly beans and set sprinkle the top of your flowerpot with “grass”. We used crumpled up, cut up scrap paper. Now it’s sitting on my shelf in the kitchen.

Jelly Bean Tree Craft for Kids #KidsintheKitchen
Come join me and my co-hosts, Sarah of Play to Learn with Sarah, Paula at Frosted Fingers and Sara at Sensibly Sara, each week linking up a post, new or old, that feature the theme Kids in the Kitchen. It doesn’t matter what you are doing as long as you are doing it together, enjoying it and learning something along the way.

You’ll find so many more ideas on the #KidsintheKitchen Pinterest Board.

Follow Melinda Babiak’s board #KidsintheKitchen on Pinterest.

Linky Rules, #kidsinthekitchen

#KidsintheKitchen Weekly Linky


Paper Bag Birds Nest #kidsinthekitchen

The weather has finally changed for the better. No snow for almost 2 weeks now, that might be longest run we’ve had for the last 4-5 months. We’re noticing the birds making nests in the trees so why make our own Paper Bag Birds Nest to celebrate the great weather we’re experiencing and the new feathered friends taking over the neighborhood.
DIY Paper Bag Birds Nest #craftsforkids #kidsinthekitchen #easter
A simple lunch bag and some jelly beans makes an adorable little nest.

Supplies
paper bag
school glue or glue stick (shae used both)
jelly beans

Directions
Cut open your paper bag so it lays flat. From it cut 4 circles, 2 of them about 4 or 5″ across and 2 of them 3″ across.

Cut the larger circles into a spiral.

DIY Paper Bag Birds Nest #craftsforkids #kidsinthekitchen #easter

Starting from the middle of the spiral create a flat-ish base and wrap the spiral of paper around the OUTSIDE of itself. Add drops of glue as you go to keep it in place.
DIY Paper Bag Birds Nest #craftsforkids #kidsinthekitchen #easter
Crumple your spiral before wrapping for a more rustic look.

Glue your smaller circle on the bottom of your nest. This gives it more support and closes up any holes so the “eggs” don’t fall through.

Set aside your nest to dry for 20-30 minutes then add eggs. DIY Paper Bag Birds Nest #craftsforkids #kidsinthekitchen #easter
These would be cute placecards for the Easter dinner.

To make this more permanent go ahead and glue your jelly beans into the nest or make eggs from clay.

DIY Paper Bag Birds Nest #craftsforkids #kidsinthekitchen #easter
Come join me and my co-hosts, Sarah of Play to Learn with Sarah, Paula at Frosted Fingers and Sara at Sensibly Sara, each week linking up a post, new or old, that feature the theme Kids in the Kitchen. It doesn’t matter what you are doing as long as you are doing it together, enjoying it and learning something along the way.

You’ll find so many more ideas on the #KidsintheKitchen Pinterest Board.

Follow Melinda Babiak’s board #KidsintheKitchen on Pinterest.

Linky Rules, #kidsinthekitchen

#KidsintheKitchen Weekly Linky


Butterfly Clothes Pin Fridge Magnet #kids #diy #craft

Everyday Shae comes home from school and empties her backpack of a stack of papers. Among these papers are art projects and drawings that she cherishes with every fiber of her being. She’s 6 so every single crayon stroke is important to her. I’ve often turned my kitchen walls into a mini art gallery but there is something about the refrigerator that beckons a masterpiece. That’s why these Butterfly Clothespin Magnets are so handy to have.

ClothesPin Fridge Magnet #kids #diy #craft 
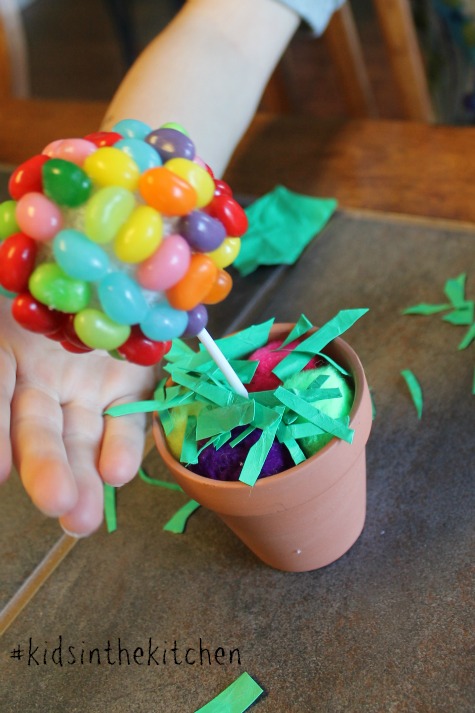
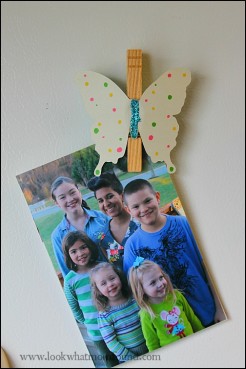
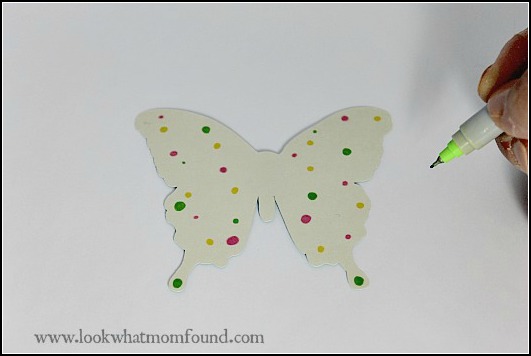
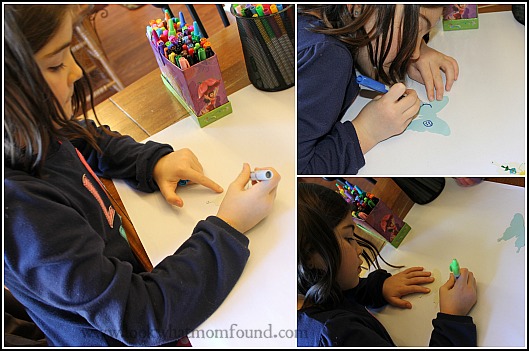
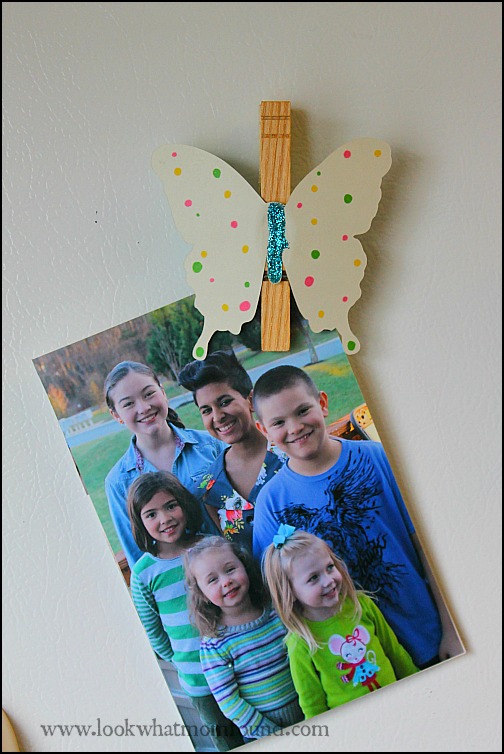
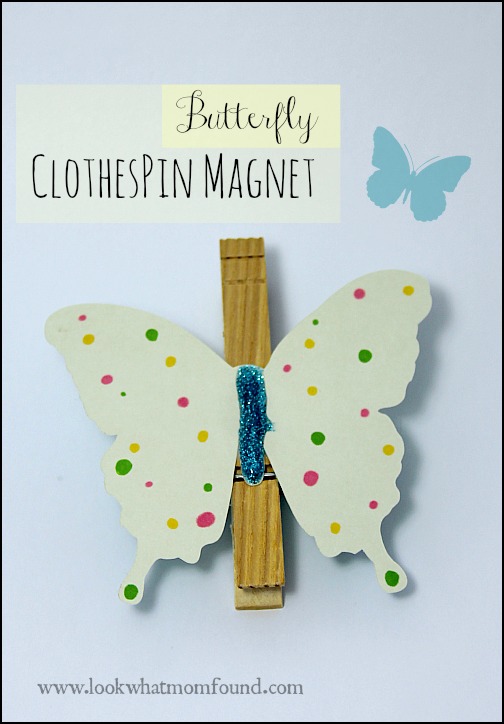
Making these fridge magnets can be done by any child, any age. The materials used can vary from foam sheets to wooden shapes to molded clay.

ClothesPin Fridge Magnet #kids #diy #craft

Materials
Cardstock butterfly
Fine point markers
Glitter glue, glitter, sequins, stickers, etc
Clothes pins
Glue (something strong enough to keep magnet attached to clothespin)
Button magnets

ClothesPin Fridge Magnet #kids #diy #craft

Directions
Give your children creative license when decorating their shape. These magnets are to hold not just notes and photos but their artwork. If using glitter glue allow time to dry fully before handling.ClothesPin Fridge Magnet #kids #diy #craft

ClothesPin Fridge Magnet #kids #diy #craft
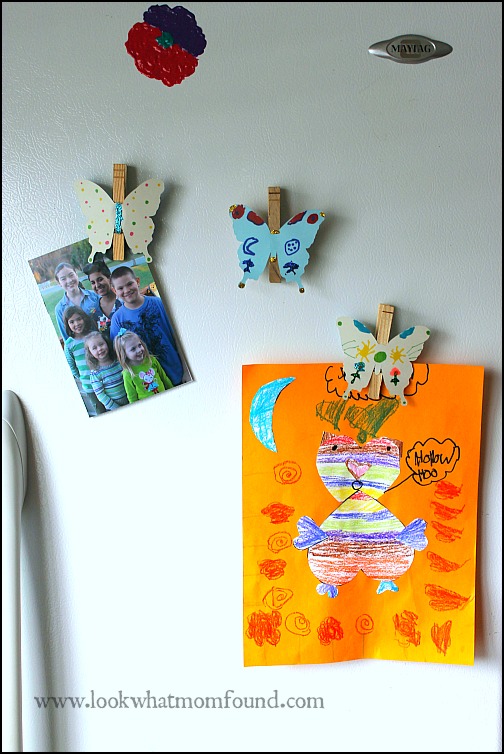
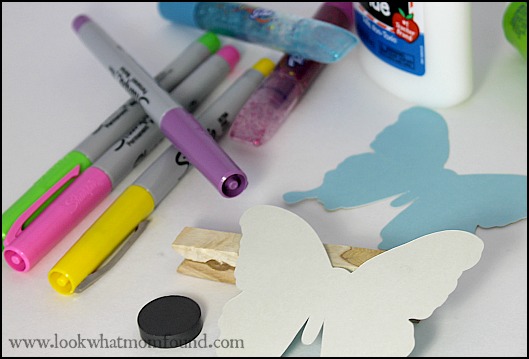
Using a strong adhesive attach the magnet to the lower half of the clothes pin. Set aside to dry.
ClothesPin Fridge Magnet #kids #diy #craft
Glue the shape onto the clothespin so the opening is at the bottom. This works best when displaying sheets of paper.
ClothesPin Fridge Magnet #kids #diy #craft
Save the chip clips for the chips & pretzels and make multiple fridge magnets to exhibit the many pieces of artwork your children are creating at school and at home.


Snow Day Unplugged Boredom Buster Indoor Activities

Mother Nature isn’t pulling any punches this year. Snow, rain, sleet, hail and earthquakes are happening all over the country these days, at levels that we’ve never seen before. Schools and activities are being cancelled. Parents are home from work. Conditions are so hazardous that there are no kids playing outside.

What’s a family to do? Get creative that’s what. These indoor activities will keep kids of all ages occupied, entertained and cabin fever free while staying unplugged.
Snow Day Unplugged Boredom Buster Activities & Games

Paper Roadway from Rusty & Rosy

Using paper, cars and  bit of imagination your children can build an entire city in the living room.Paper Roadway Indoor Activity

Circus Clown Flip Book by LookWhatMomFound…and Dad too!

Don’t stop at clowns.  Expand on this Flip Book idea with animals, peoples, occupations and other themes. Using an old notebook and scissors works perfectly for this craft.

Circus Clown Flip Book #unplugged #indooractivity #snowday

Paper Climbers from Housing a Forest

Introduce a little bit of physics and science into the fun with these DIY paper climbers.  Kids can personalize with the designs and characters of choice.Paper Climers #physics #science #educational

Marshmallow Shooters from Come Together Kids

Begin the battle with mini marshmallows or pompoms with this DIY shooter made from materials found around the home.

Marshmallow Shooter

Indoor Putt Putt from The Craft Train

While this activity definitely needs some adult participation to set up, the fun can be had my kids only giving mom and dad time to themselves.Indoor Golf

Bathtub Fishing by The Artsy Mom

We all have some bathtub toys tucked away so why not put them to use and create a game where kids can fish for letters, colors and toys.

Bathtub Fishing

Whether you try one of these activities or come up with your own stay safe, stay warm and enjoy yourself.


Wish Jar for Kids #craft

Shae has a wild imagination. She sits at the kitchen table and draws amazingly odd pictures of pretend creatures. She talks about a future living in Greenland with 10 children married to her classmate Max.  I love this about her. I love that she can turn a dark and dreary day into one full of magic and wonder.

Making a Glitter Wish Jar for Kids #craft
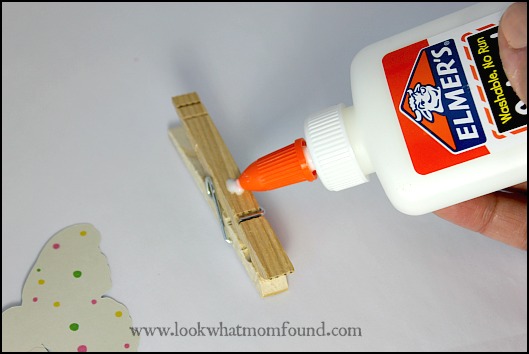
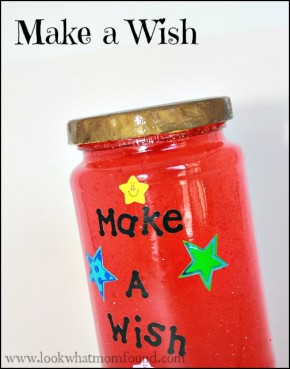
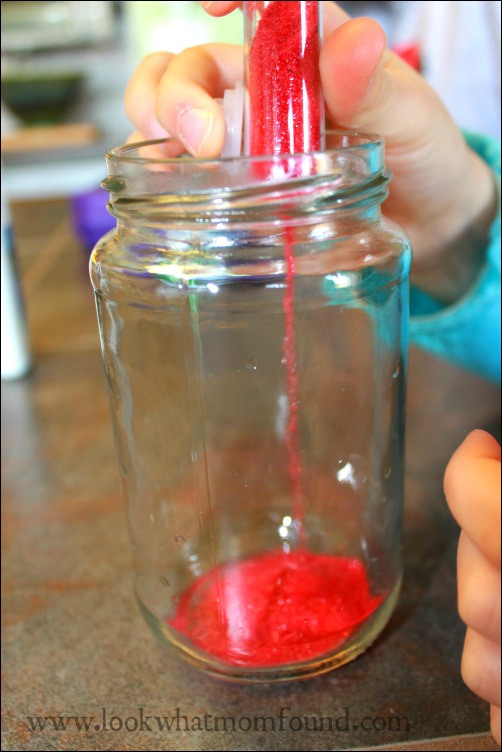
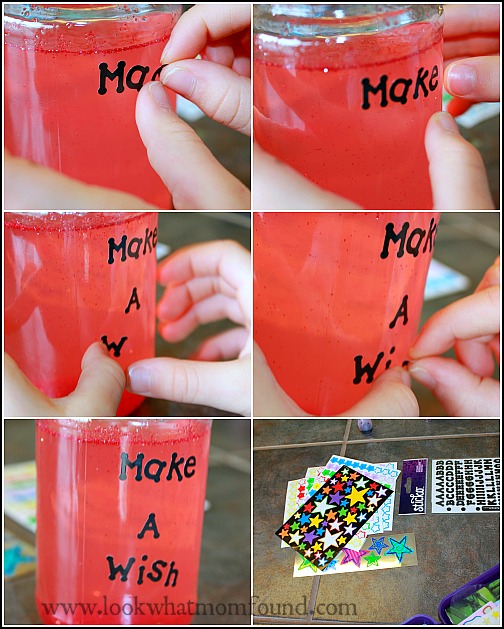
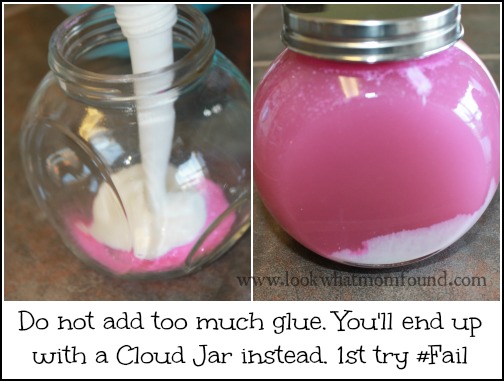
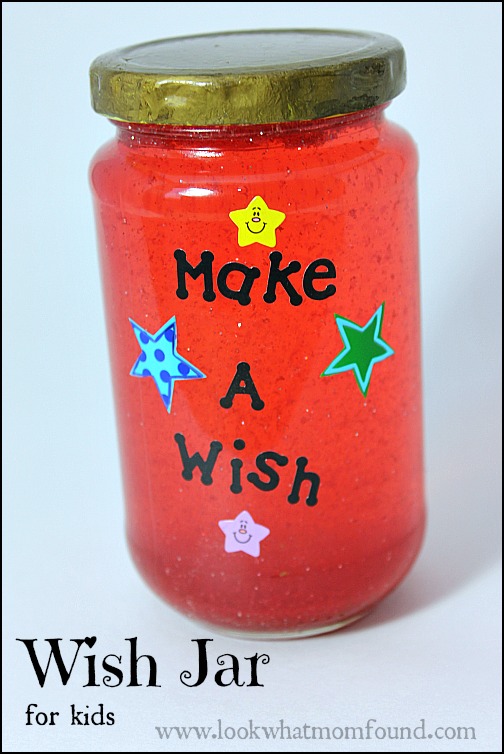
Because of this we thought it would be the best idea ever to make her own Wish Jar. This lets her make wishes anytime she wants for whatever her little heart desires.

Supplies

    • Clear jar with tight fitting lid
    • Fine glitter
    • Food Coloring
    • School Glue
    • Warm water
    • Permanent Glue (I used Beacons Glass, Metal & More)Making a Glitter Wish Jar for Kids #craft


Directions
Start with a super clean jar and lid.  Add in 2-3 tsp of our desired colored glitter. We choose a fine red and then a large cut silver for a touch of sparkle.

Making a Glitter Wish Jar for Kids #craft

Fill not quite to the top your warm water along with your food color. Only add 1-2 drops at a time. Stir to see the final color.

Pour in 2 tsp of school glue. Stir again to help glue melt into water.

Making a Glitter Wish Jar for Kids #craft

Add strong glue to the lid and close tightly.

Let you child decorate their jar & lid and shake away!

Making a Glitter Wish Jar for Kids #craft

Making a Glitter Wish Jar for Kids #craft

Just a couple words of wisdom when making your own Glitter Wish Jar.

  • Do not add too much glue
  • Do not add HOT water. It will cause pressure when putting on the lid.
  • Do not use hot glue or Krazy glue on the lid, they set up too fast to get your lip properly closed.

Try a
How NOT to make a glitter wish jar


Budsies Custom Stuffed Animal

My girls are creative and artistic and imaginative.  Even though there are 12 years between them they can sit for hours with a stack of papers and markers and work on obscure projects that only they understand.  I’ve shared before their goofy and inspired drawings but was able to take them to a new level with Budsies Custom Plush.

art-plush-drawing-stuffed-animal-purchase-2

Budsies is a unique service that brings life to your child’s artwork. Send them a drawing and they will create it into a high quality plush that will be cherished forever.

On Christmas day I presented Sabreena and Shae with their own Budsies. Confusion, excitement and then smiles is how things went after the gifts were opened.  The details are amazing, as well as the construction.  I don’t have to worry about the dangling legs or pompoms falling off because the sewing is strong enough to withstand little fingers and becoming a regular bedtime buddy.

Budsies Custom Stuffed Animal Plush

Budsies Custom Stuffed Animal

The idea of Budsies was born out of an idea to bring a little sister’s drawing to life to last a lifetime. It’s easy to create a Busies of your own child. Submit a drawing online or even from your smartphone via text message and you’re child’s new friend will be on its way 6-8 weeks later.

Every November, Budsies manufactures a duplicate Budsie for each one ordered.  These are then donated to children in need over the winter holidays.

Right now Budsies are on holiday special pricing for $49. Steep but this is a gift that comes from the heart.


Making Chicken and Cheese Taquitos #kidsinthekitchen

I know teaching my son to cook and be self sufficient in the kitchen is so very important but it’s hard to do when he doesn’t want to learn. Shaun is 10 and uninterested in doing things for himself. He’s much rather spend his time playing video games and other boy stuff. Making these Chicken and Cheese Taquitos was a lesson in chopping, patience and listening to details.

Using leftover roasted chicken, veggies, and artisan cheese with some seasoning, we made a surprisingly tasty lunch. Consider checking artisan cheese online to get the right cheesy flavor while preparing the taquitos.

I would’ve preferred smaller corn tortillas but we used what we had on hand, burrito sized flour.

Making Taquitos #kidsinthekitchen

Shaun chopped up a couple cups of cooked chicken while Sabreena finely chopped red peppers. We added frozen corn, a cup of frozen corn and then spiced it up. I had the kids sniff each herb/spice and tell me what it reminded them of. Oregano smells like pizza and cumin smells like tacos.

Making Taquitos #kidsinthekitchen 
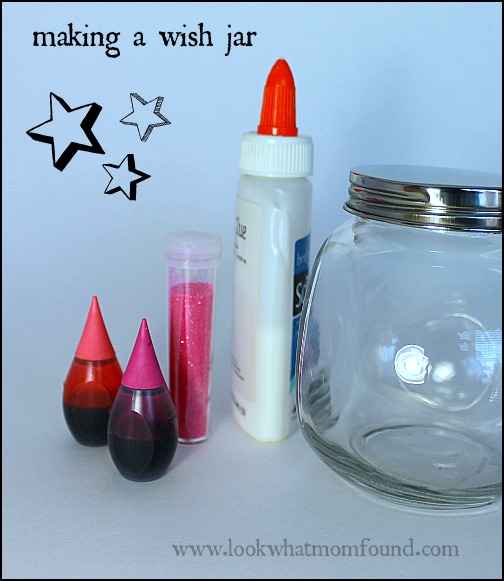
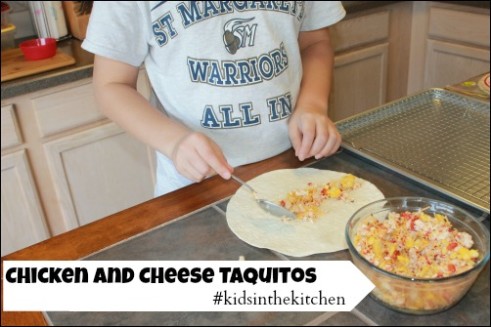
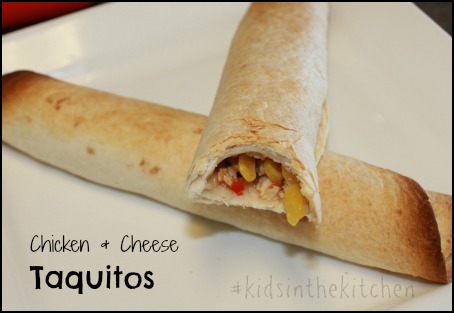
The details and patience part of this task came when it was time to roll up the taquitos. I had Shaun redo the rolling part if it wasn’t tight enough or if the filling came out. Moving them from the counter to the baking tray needed a gentle hand, one he doesn’t have. By the 5th one he understood to take it slow.

They got a brush of olive oil, went into a 425° oven and baked for 15 minutes. They were surprisingly very very good. I didn’t even complaints about the red pepper.

Making Taquitos #kidsinthekitchen

We’ll be making these again with a whole array of ingredients. Next time we’ll make pizza taquitos.

Come join me and my co-hosts, Sarah of Play to Learn with Sarah, Paula at Frosted Fingers and Sara at Sensibly Sara, each week linking up a post, new or old, that feature the theme Kids in the Kitchen. It doesn’t matter what you are doing as long as you are doing it together, enjoying it and learning something along the way.

You’ll find so many more ideas on the #KidsintheKitchen Pinterest Board.
Follow Melinda Babiak’s board #KidsintheKitchen on Pinterest.

#KidsintheKitchen Weekly Linky


Join #ZylietheBear Twitter Party 11/18 8pmEST

One of the hottest toys of the season is #ZylietheBear, a plush teddy bear doll who is on an adventure and taking over NYC and Real Mom Media’s own Joey Fortman is hosting a twitter party.

Zylie the Bear

Zylie is not your average teddy bear. She and her friends are headed to FAO Schwartz in NYC to shoot their music video on November 20th-23rd.

Zylie the Bear

Zylie’s last stop on her NYC tour will be at FAO Schwarz (5th Avenue and 59th Street) in NYC on Saturday, November 23rd from 2-5! If you can make it there you have the chance to win one of the many plush Zylies up for grabs, books, accessories and $100 gift cards to FAO Schwarz.

Best of all you can meet a LIFE SIZE Zylie and snap some pictures to share with your family & friends.

Zylie the Bear

In the meantime come to the #ZylietheBear Twitter Party

RT @joeyfortman Go on an adventure with @ZylieTheBear during the #ZylietheBear Twitter party 11/18 (8-9 ET)! http://bit.ly/18ayzVC PLS RT

Party Details 

  • What: #ZylietheBear Twitter party
  • When: Monday, November 18th  from 8-9 p.m. EST
  • Hashtag#ZylietheBear
  • Who@ZylietheBear@joeyfortman,@TheStephGlover
  • Prizes: 3 lucky winners will be receive their own Zylie the Bear to take on an adventure!
  • To be eligible to win the prizes, you must RSVP  using this Rafflecopter Form so the party hosts can keep of the party goers.

Can’t wait to see you all there!