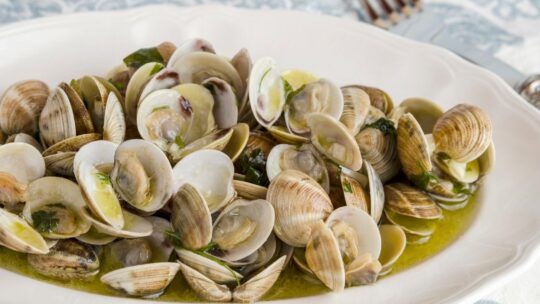
In the winter months, when it’s cold outside and you’re craving a little comfort food, steamed clams are a go-to option. They’re easy to prepare, don’t require a lot of cooking time, and are low in calories. But they don’t have to be boring. Here are a few ideas for eating clams in a way that will satisfy your palate and leave you feeling warm and satisfied. For the average person, steam clams might seem like a no brainer. The food is delicious, and it can be enjoyed year round and in all sorts of ways. You can find steamed clams in any Italian restaurant, as well as at the many clam shacks across the country. There are so many ways to enjoy this delectable dish, whether you’re having them for dinner, for lunch, or as a casual snack.
Steamed clams. Steamed clams are delicious. I think part of the reason they’re so delicious is that you can eat them in a variety of ways. For example, steamed clams are typically served with butter and lemon, which are both good, but for a change of pace, I sometimes like to serve them with a little bit of red wine, thyme, and bay leaf. I don’t think anyone can argue that these are bad combinations.
This recipe for steamed mussels with garlic butter is simple and very tasty. This dish is also very low in calories.
In the winter months, when it’s cold outside and you’re craving a little comfort food, steamed clams are a go-to option. They’re easy to prepare, don’t require a lot of cooking time, and are low in calories. But they don’t have to be boring.
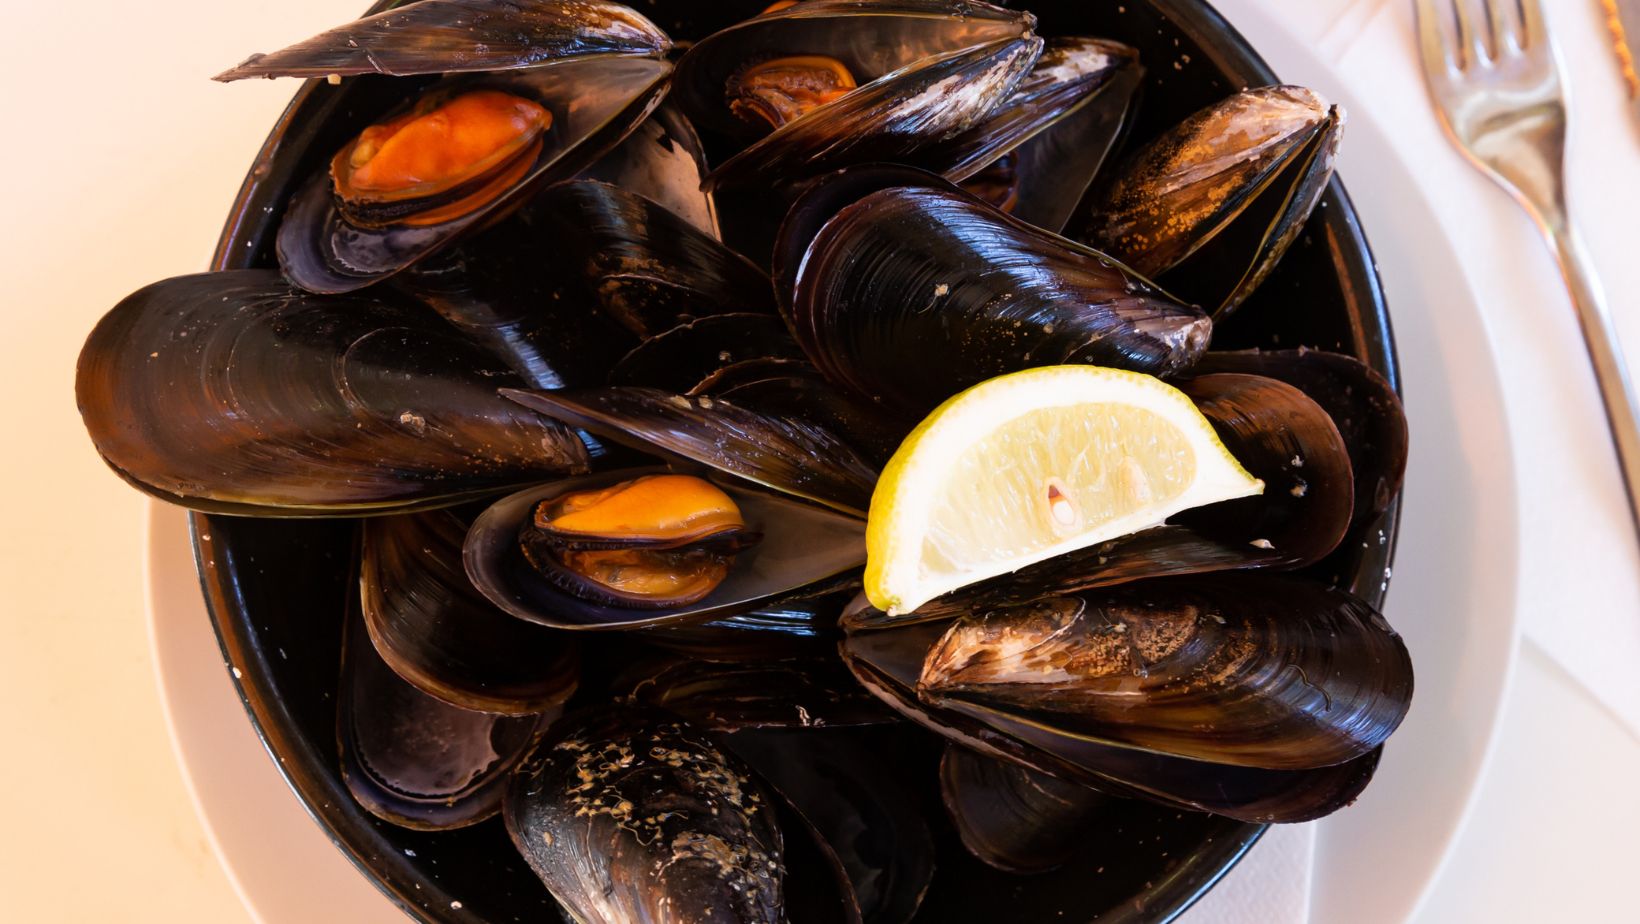
Steamed Mussels
Living in the Northwest, where mussels are abundant on the coast, I have often indulged in this delicious dish. Each restaurant served a slightly different version, and the taste was different at each. But my favorite restaurant was Georgie’s Beachside Grill in Newport, Oregon. This chef really knew how to cook. He knew that only Mirapoix could make excellent mussel soup. This combination of celery, carrots and onions is an old culinary technique in French cuisine that always gives the perfect taste to any soup or sauce. Most importantly, the vegetables are cooked until tender, which gives the dish a certain sweetness. After ordering these delicious mussels at Georgie’s at least half a dozen times, I finally asked the chef for the recipe and he was kind enough to send it to me. His name is Chef Alfredo Cacho, and this is his original recipe for steamed clams. My version is a little different than his, but the taste is still absolutely fantastic.
Ingredients for Steamed Crustaceans
- Steamed mussels: Star of the show
- Oil: For assets
- Garlic: What is better for the soul than garlic butter?
- Celery: The first ingredient for preparing Mirapua… to taste
- Onion: The second ingredient for the preparation of Mirapua…. for a deeper taste
- Carrots: Last ingredient to make Mirapua…. for sweetness
- Chicken broth: Adds a richer aroma
- White wine: To give a nice flavor. There is no substitute for wine in this dish
- Peppers: For an easy push
Preparation of Steamed Mussels
First, put a little butter in the pan with the soup over medium heat. When it starts to bubble, add the garlic, carrots, onions and celery and cook for about 3 minutes. To make a good mirapua, it should soften, but not brown. When roasted, they begin to caramelize, which gives them a very different flavor. Then just add the mussels, chicken broth, wine and pepper. Immediately cover the pan and let the mussels steam for about 7-8 minutes. Then if you see unopened shells, throw them away. Finally, spoon the nicely uncovered mussels, broth and vegetables into serving bowls and sprinkle with chopped basil.
The most important thing is to clean and wash the mussels. I once ordered steamed clams in Hawaii that were completely full of sand. If you’ve never tried steamed mussels, you’ll never order them again because you think they usually taste like that.
Don’t forget to serve this dish with French bread to soak up the delicious broth. Georgie’s serves them with slices of warm baguette smeared with garlic butter. Perfection. And the only way to top that is to eat this amazing dish while looking out the window at the beautiful Pacific Ocean. And if you’re lucky, you may see a whale or two, which happened to us a few times.
Remarks
The most important thing is to clean and wash the mussels. I once ordered steamed clams in Hawaii that were completely full of sand. If you’ve never tried steamed mussels, you’ll never order them again because you think they usually taste like that. Hard and gruesome. And the thing is, it’s so easy to clean. If you just soak them in water with a little cornmeal for an hour, they will clean themselves. All you have to do is use a brush or do what I did and wipe it off with a paper towel under running water. It’s that simple. Print Recipe
Steamed mussels
This recipe for steamed mussels with garlic butter is simple and very tasty. As a bonus, this dish is very low in calories. Cooking time 10 minutes Cooking time11 minutes Curing time 1 hour Total time21 min Course: The main course Kitchen: American Keywords: Steamed mussels Servings : 2 servings Calories: 194 kcal Author: Pam – Two cups of health
Ingredients
- 20 cherryton mussels About 1 1/4 pounds.
- 2 tablespoons butter
- 2 garlic cloves
- 1/4 cup diced curry
- 1/4 cup diced onions
- 1/4 cup diced cellophane
- 1/2 cup chicken broth Prefer Manischewitz low-sodium chicken broth.
- 1/2 cup white wine
- 1/4 teaspoon pepper
- 2 to 3 tablespoons basil ha ha
Instructions
- Shells must first be cleaned to remove sand. The easiest way to clean the shells is to put them in a bowl and cover them with at least 1 cm of water. Then add about 3 tablespoons of cornmeal to the bowl and let it soak for about an hour. In essence, they clean themselves. When the time is up, clean each sink under running water to remove any excess sand that has not yet been removed.
- Put butter in a soup pot over medium heat. Then add the garlic, carrot, onion and celery and cook for 3 minutes until softened slightly.
- Put the mussels in the pan with the chicken stock, wine and pepper. Cover the pan and let the mussels steam for 7-8 minutes. Discard all unopened shells.
- Place the mussels and broth in serving dishes with the vegetables and sprinkle each with chopped basil.
Power
Calories: 194 kcal | Carbohydrates: 7g | Protein: 4g | Fat: 11g | Saturated fat: 7g | Cholesterol: 36mg | Sodium: 468mg | Potassium: 202mg | Sugars: 2g | Vitamin A: 3285IU | Vitamin C: 7,9 mg | Calcium: 29 mg | Iron: 0,6 mg If you liked this recipe, leave a comment below and don’t forget to pin it to Pinterest!
Similar recipes:
Simple shrimp scampi Scallops with lemon butter sauce Jambalaya with prawns The most important thing an individual can do to prevent one’s health from declining is to stay as healthy as possible. There are many things that can be done to help keep a person healthy, one of which is eating seafood.. Read more about what to serve with steamed clams and let us know what you think.
Frequently Asked Questions
How do you steam clams?
Are you a fan of seafood? If yes, you are probably familiar with the popular food: steamed clams. As per the traditional way of preparing the food, the process calls for deep-frying the clams, which can allow harmful substances to enter the food, thereby increasing your chances of getting type 2 diabetes, heart disease, and other serious diseases. Steaming clams is a delightful and very easy way to cook them! After you’ve harvested them, clean them and remove as much of the sand and grit as possible. Then cut the clams in half through the shell, and remove the claws. Place the clams in a large steamer pot, cover with cold water, add more water if it’s low and steam for about 20 to 25 minutes. Take the clams off the steamer and leave to cool for a few minutes. Then use a sharp knife to remove the “lips” or “foot” of the clam.
How many minutes do you steam clams?
To find out how you can cook the perfect steamed clams, we consulted a highly reliable source: the US Department of Agriculture. (For those who don’t recognize the name, the US Department of Agriculture is the same agency responsible for determining the nutritional value of foods.) According to the USDA, “the amount of time needed to cook clams is related to the temperature of the water in which they are steamed and the temperature of the heat source being used.” While steamed clams are available in most grocery stores, you can also buy them online. You can either buy them from a delivery service, or even have them delivered to your door by an online clam delivery service. The delivery service will include a link and instructions for cooking the clams on your own. The recipe for these clams is simple and they can be prepared in less than 10 minutes.
What to Steam clams in?
Steam clams are a classic New England dish that is very easy to prepare and can be enjoyed by all. In fact, you can make them much faster than boiling them on the stove; instead, just place them in a steamer basket. Steam them for 10 minutes and you’ve got yourself a delicious clam dinner in no time at all. Of course, there are some health benefits to eating steam clams, too. They are a low calorie, low fat and cholesterol friendly food item. Steam clams are also a good source of vitamins, particularly the B vitamins, potassium and iron. Ever tasted some of the best steamed clams around? You’ll have to check out this recipe for some of the tastiest steamed clams ever, and your kitchen will be filled with the most heavenly aromas!
Related Tags:
simple steamed clamssteamed clams recipe with winesteamed clams without winesteamed clams near mesteamed clams simpsonsbeer steamed clams,People also search for,Feedback,Privacy settings,How Search works,simple steamed clams,steamed clams recipe with wine,beer steamed clams,what to serve with steamed clams,steamed clams recipe without butter,sauteed clams recipe,steamed clams in oven,steamed clams near me


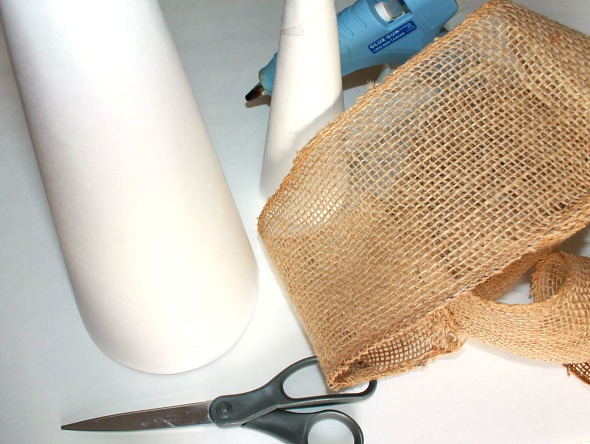
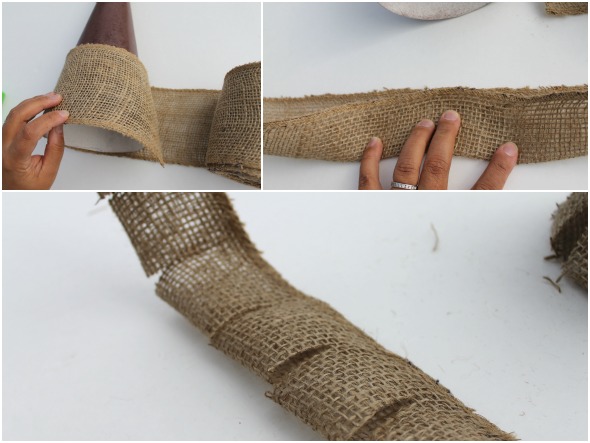
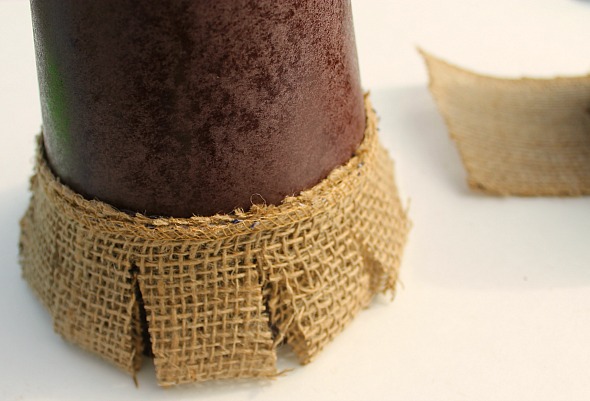
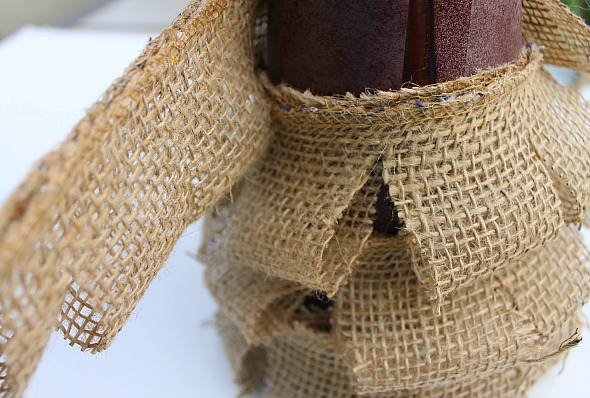
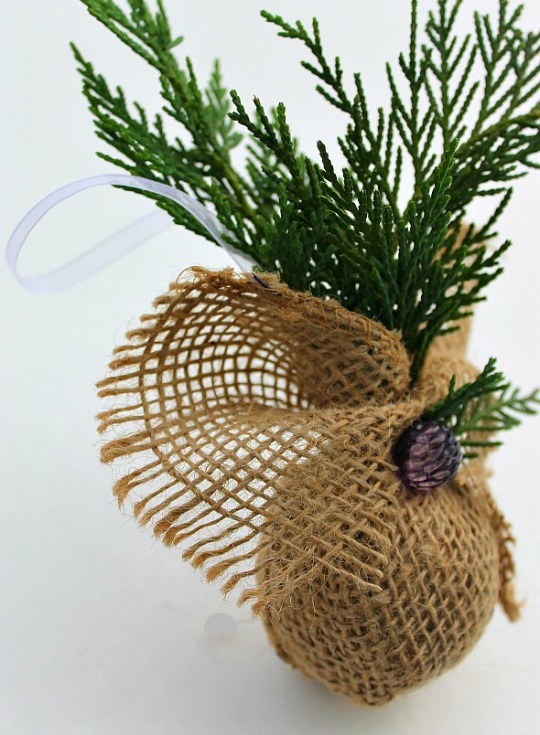
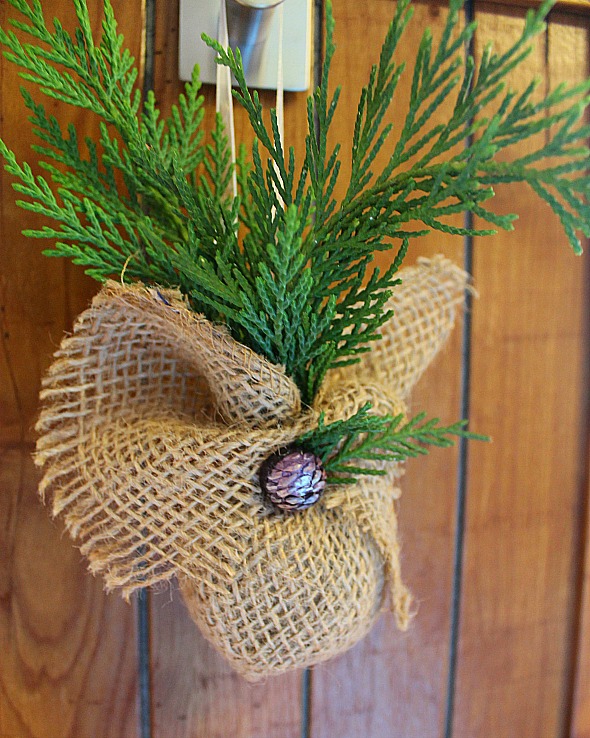
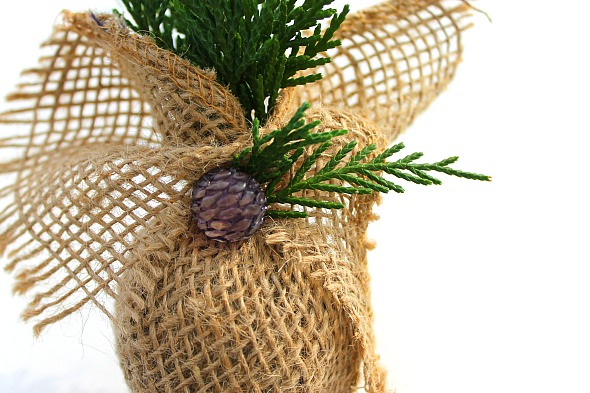
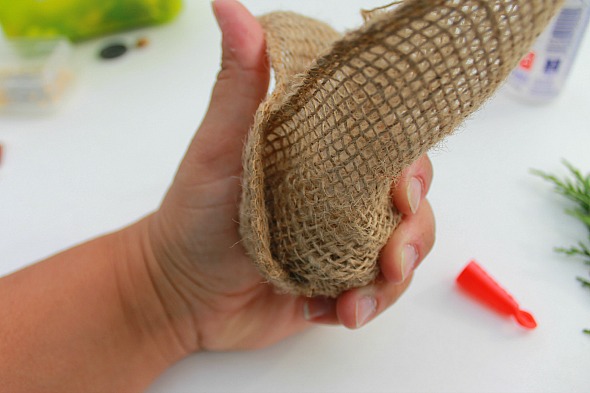
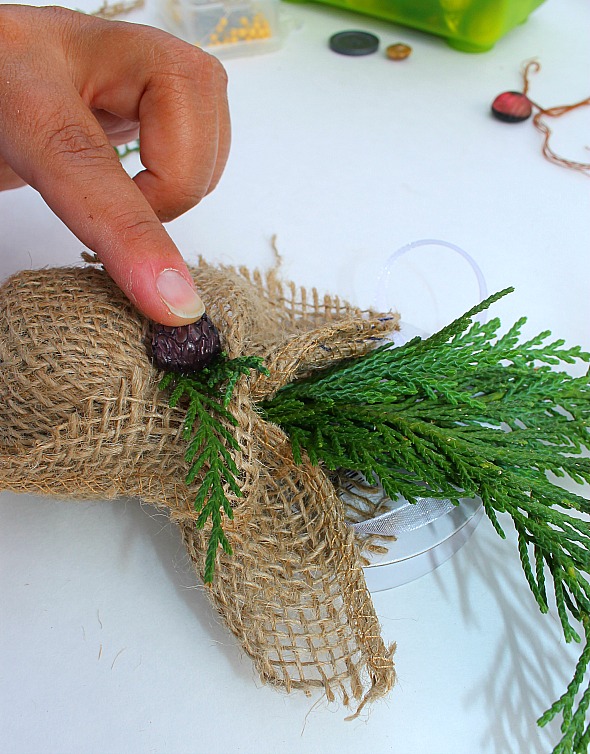
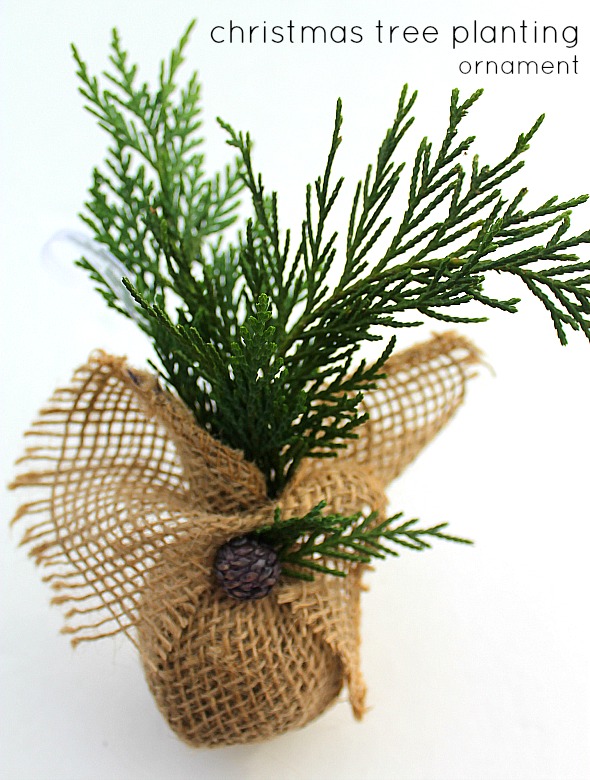
 I had everything I needed to make this; card stock or , felt, hot glue, burlap roll, evergreen clippings from the yard and scissors.