RSS Email

Skeleton Key Shadow Box Craft

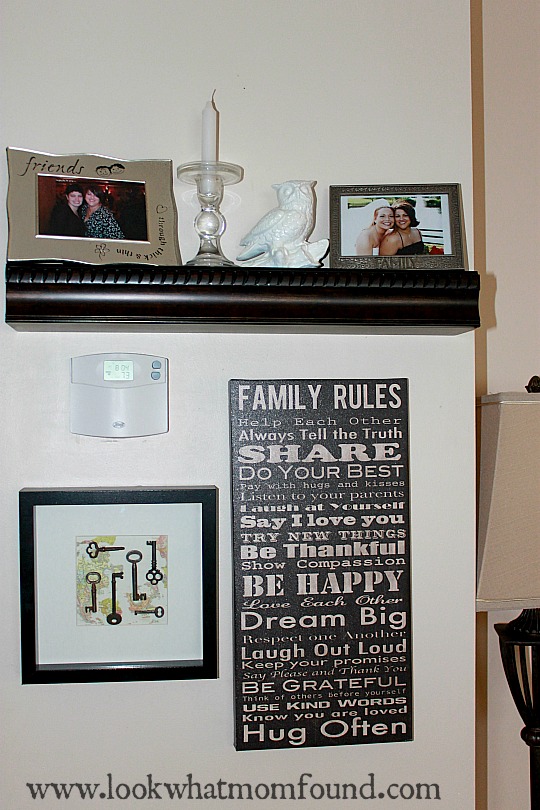
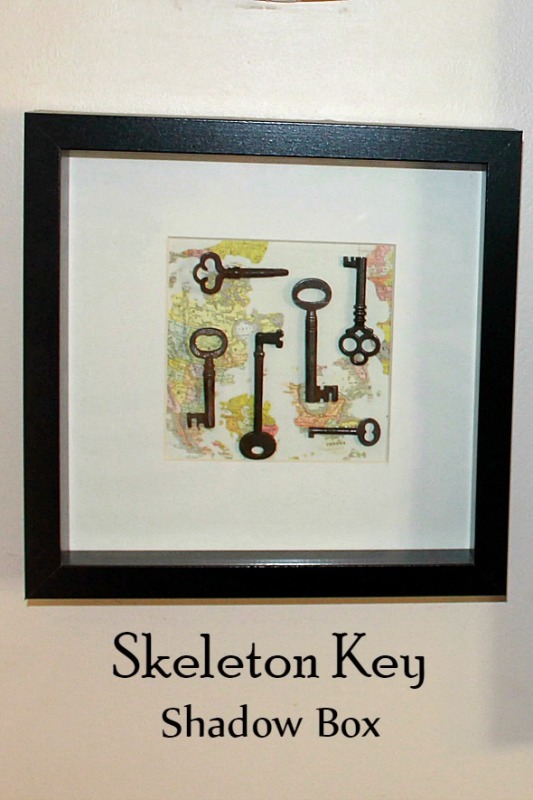
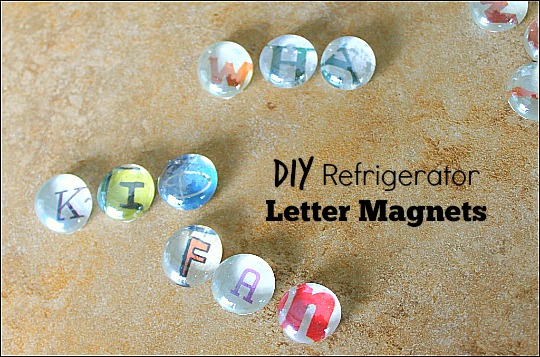
There was a time recently that I had a little obsession with skeleton keys. Rob got me a really pretty necklace a couple years ago through Etsy and I started collecting them from vintage shops and flea markets. So I had a collection of keys. Now what. I wanted to display them, show them off, admire their tarnished and rusty appearance.  So this Skeleton Key Shadow Box was made.Skeleton Key Shadow Box #craft #upcycle

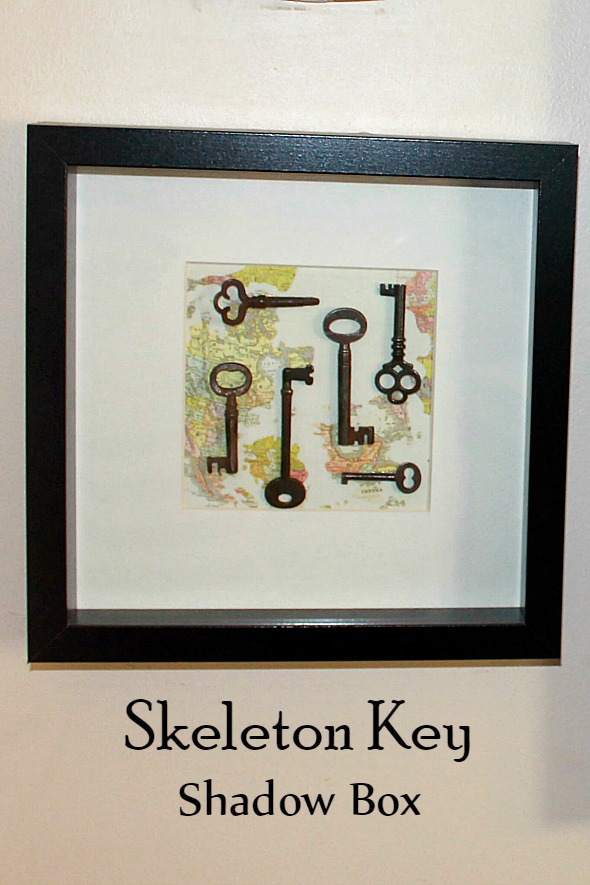
I bought the shadow box frame for a few dollars from Ikea I believe. Everything there is so cheap it definitely wasn’t a wallet buster. The keys were bought over many shopping trips but I would estimate I spent $15 on the all of the keys. The scrapbook paper came as part of a gift from ACMoore so that was free.

I spent more time arranging the keys in than anything else. The shadowbox came together quickly.
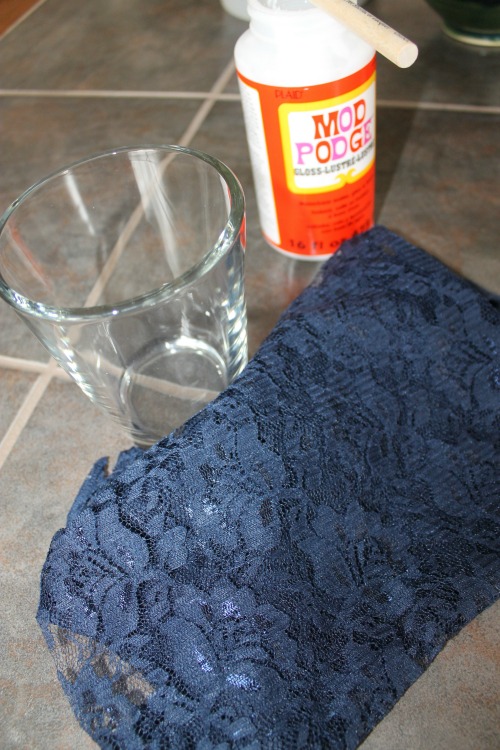
Supplies

Shadow Box or Frame without glass

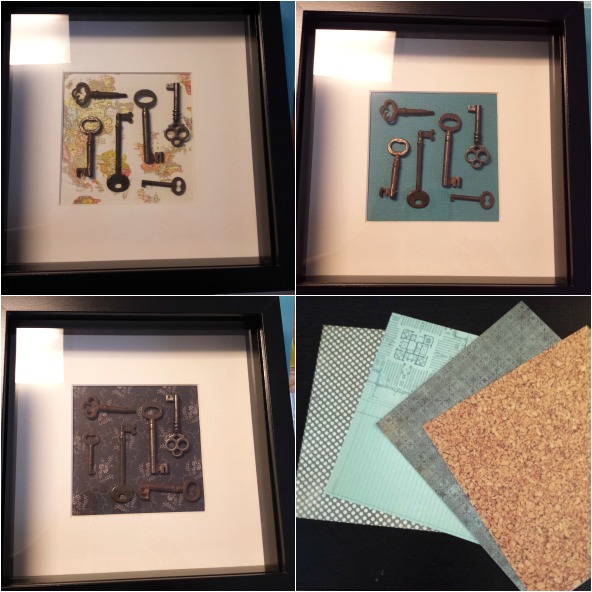
Scrapbook paper, old map or music paper

Skeleton keys

Adhesive ( I used E-6000)

Directions

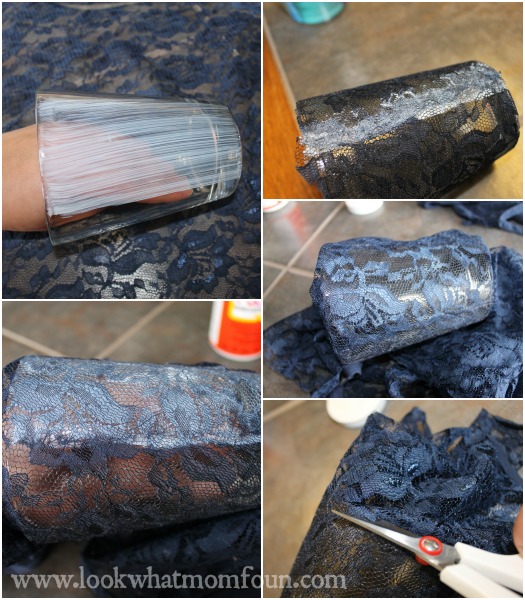
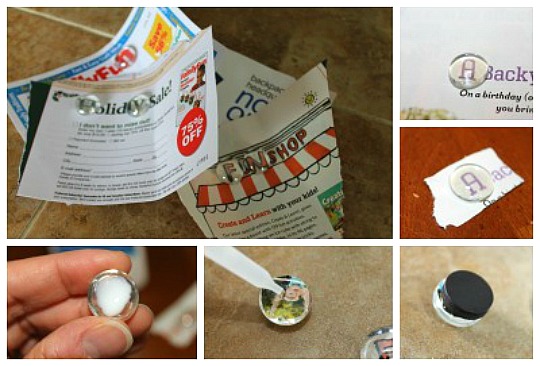
Start playing with the placement of your keys.  I had way to many to fit in the shadowbox but was able to fit a good amount in the small space. Play with sizes and direction to get something that is pleasing to the eye.  Then play with different backgrounds. Arranging your keys on the glass and sliding different papers underneath makes this step super simple.

I went with a 6X6 map with a vintage feel. It fit the area that I planned on hanging this and to me felt like the best fit. Wedding music or a favorite poem would be great choices too.

Skeleton Key Shadow Box #craft #upcycle

Skeleton Key Shadow Box #craft #upcycleTake a picture of your arrangement then using a quick drying glue start placing your keys in their spot on the paper. Let the keys set for 1 hour then put your frame back together and hang.

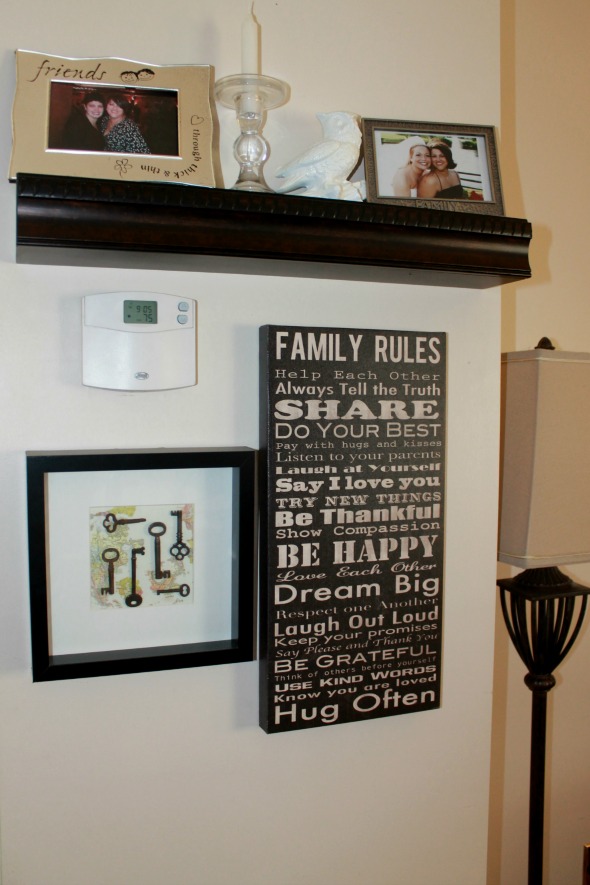
I love old thing but I have to find ways to incorporate them into my cookie cutter home. This shadow box can be done with anything you’re collecting.


DIY Refrigerator Letter Magnets #kidsinthekitchen

My kids are older so we’ve passed the stage of singing letter magnets on the fridge. We still have lots of magnets but we’ve upgraded to ones that have memories, are handmade, and do double duty (like powerful rare earth magnets that hold everything from the school menu to a half-open bag of rice! Those “classic” primary color letters don’t really fit our style anymore. What does a crafty mom and crafty kid too then, they DIY Refrigerator Letter Magnets.DIY Refrigerator Letter Magnets

We wanted to make them so it would allow us to leave little notes to each other. Making  them small allowed us to make many of them, a couple alphabets worth.

Refrigerator Letter Magnets

  • 1/2″-3/4″ clear glass, flat gems (found in floral arranging section)
  • old magazines, junk mail, brochures
  • clear drying school glue
  • super glue or hot glue
  • scissors
  • disc magnets 1/2″-3/4″

Leaf through old magazine, seek out bright and fun headlines and titles. Determine if they’ll fit behind your marble by simply placing the gem on top and making sure you can see the letter, number or symbol clearly.

Apply clear drying school glue to the back of the marble, press firmly to the letter/page. Let completely dry for up to 1-2 hours.

When the glue has completely dried carefully cut/trim paper away from glass gem so paper does not stick out from behind gem. Using hot glue/super glue attach the magnet and to glass gem, pressing firmly.

Magnets will be ready to use in 10 minutes.

*****Keep careful watch using hot glue or super glue around children.DIY Refrigerator Letter Magnets DIY Refrigerator Letter Magnets

DIY Refrigerator Letter Magnets
Come join me and my co-hosts, Paula at Frosted Fingers, Sara at Sensibly Sara, Kate of Busy Bee Kate & Jeannette of Eco Incognito each week linking up a post, new or old, that feature the theme Kids in the Kitchen. It doesn’t matter what you are doing as long as you are doing it together, enjoying it and learning something along the way.

You’ll find these and many more ideas for healthful and unique food fun on the #KidsintheKitchen Pinterest Board.

Follow Melinda Babiak’s board #KidsintheKitchen on Pinterest.

Linky Rules, #kidsinthekitchen

#KidsintheKitchen Weekly Linky


Sugar Skull Pencil Toppers #halloween #craft

When particular holidays and seasons creep up it gets my creative mind going. Halloween is one of them. I love everything about things that are fun scary not gruesome scary. Sugar skulls are part of the Day of the Dead celebration in the Latin American and Mexican culture where family and friends show remembrance for those that have passed away. Day of the Dead (dias de los muertos) is a joyous festivity with music, parades, flowers and even gifts left on burial plots starting on November 1st. In honor of this day I created these Sugar Skull Pencil Toppers.

Sugar Skull Pencil Toppers #halloween #craft

Sugar Skull Pencil Toppers #halloween #craft

While we don’t celebrate Dia de los Muertos I’m in love with the creativity, color and vibrancy of the sugar skull. Sugar Skulls are nothing to be feared. They are part of the celebration, a gift for both the living and the dead.

These sugar skulls are just as colorful but on a much small scale. These pencil toppers were made to give to Shae’s class for their fall party along with some more neutral pumpkins and ghosts. Making them was a bit tedious. The first one alone tool almost 2 hours as it was my guinea pig. The rest of them took less than an hour each and I see it going faster and faster as I make more.

Sugar Skull Pencil Toppers #halloween #craft

Sugar Skull Pencil Toppers #halloween #craft

Sugar Skull Pencil Toppers #halloween #craft

Sugar Skull Pencil Toppers #halloween #craft

Sugar Skull Pencil Toppers #halloween #craft

Sugar Skull Pencil Toppers #halloween #craft

Sugar Skull Pencil Toppers #halloween #craft

Sugar Skull Pencil Toppers #halloween #craft

Supplies

Felt, various colors
needle
thread, various colors
buttons, sequins, beads
fabric glue
cotton balls
pencils
scissors, I suggest small sharp fabric scissors
cardstock cutout of skull shapes if your free hand isn’t up to par (mine isn’t)

Directions

Using your skull cut outs trace a front and back of your skull shape.
Determine the shapes and embellishments you want on it’s face. Place them to make sure everything fits.
Using a tiny touch of fabric glue tack on your features where you want them. This keeps them from sliding or falling while you sew.
With a basic needle and thread (color of choice) stitch your pieces on your skull face. Skip stitching on some or all of your pieces and just use glue if you prefer.
When your sugar skull face is complete add the back to your topper and stitch the pieces together leaving a small opening on the bottom. I like the look of the whipstitch but it would be find to use a running stitch too.
Stuff a fluffy 1/2 cotton ball into the skull with a touch of glue then slide in the pencil with another touch of glue.
Set aside to dry.

Sugar Skull Pencil Toppers #halloween #craft
A jar full of these is an adorable centerpiece for a party or even on a desk for the Halloween season. Watch them disappear as their happy smiling faces quickly draw people in.
This isn’t necessarily a child’s crafts but can be modified to include children by precutting shapes and using glue instead of a needle and thread.
Sugar Skull Pencil Toppers #halloween #craft

Sugar Skull Pencil Toppers #halloween #craftm


DIY Animal Ring Holder Craft

Deep down I’m really a #craftymom. I scour Pinterest, crafting sites and magazines all the time for new ideas for ways to make projects my own. My struggle is with time. I have ideas and supplies but have a hard time putting aside the hour or so needed to devote to something fun. I found this latest project and knew I could have it completely done in a day. The Animal Ring Dish was very simple but like usual real life got in the way.

Animal Ring Holder #DIY
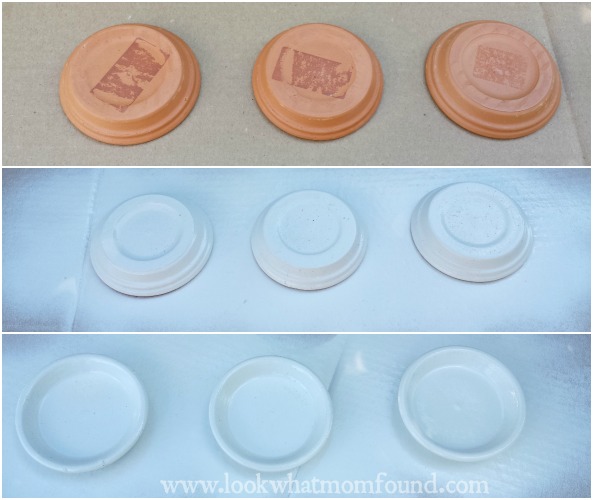
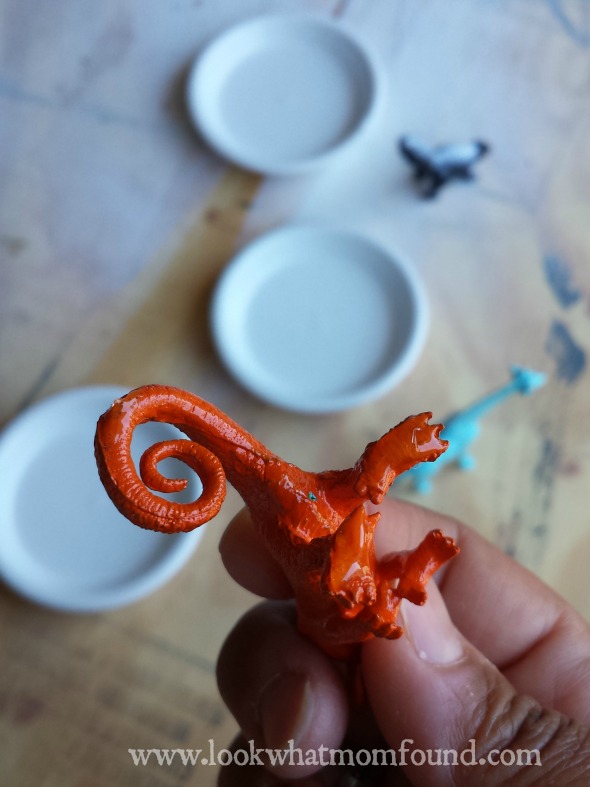
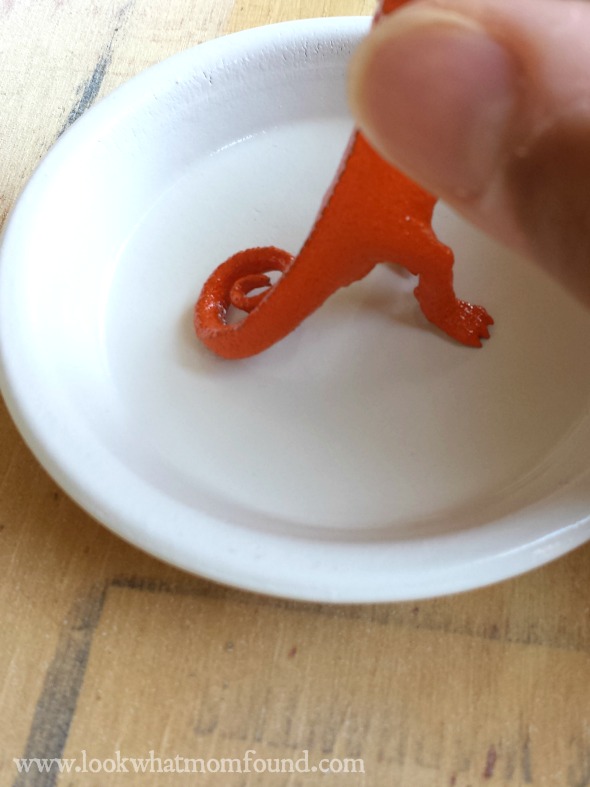
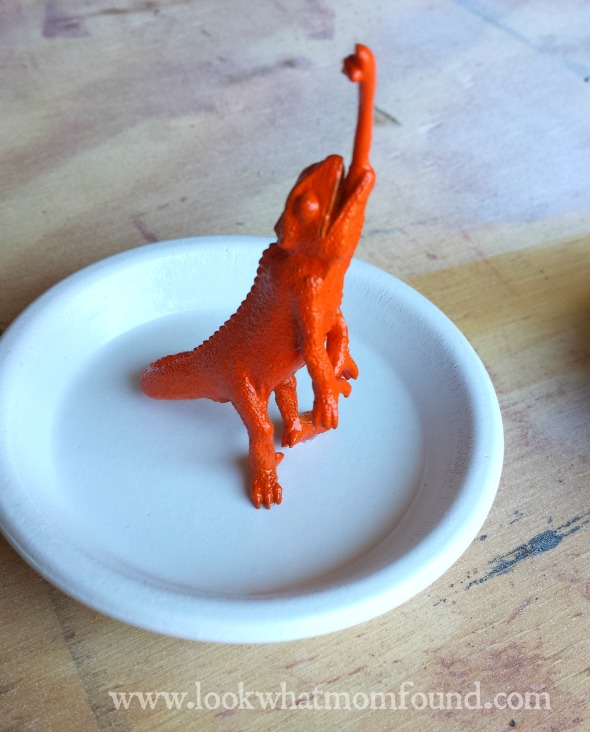
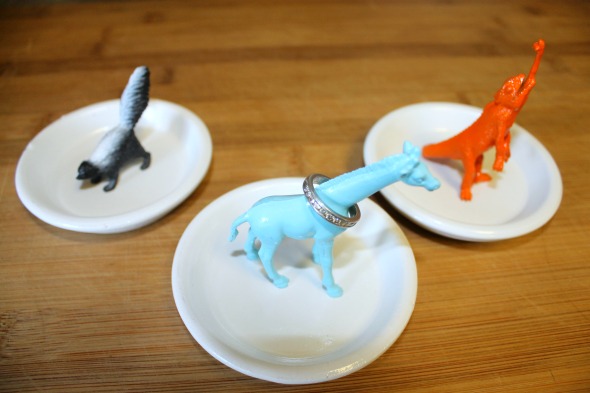
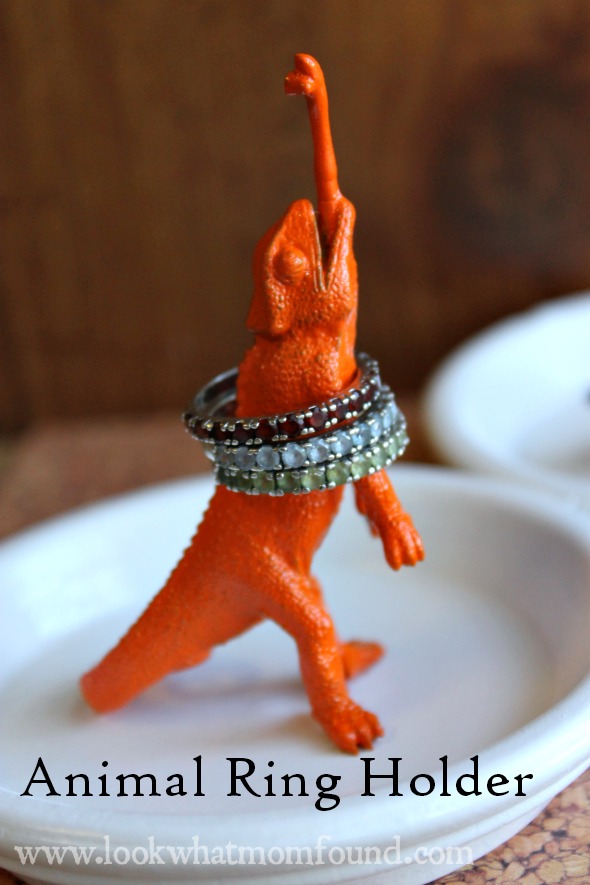
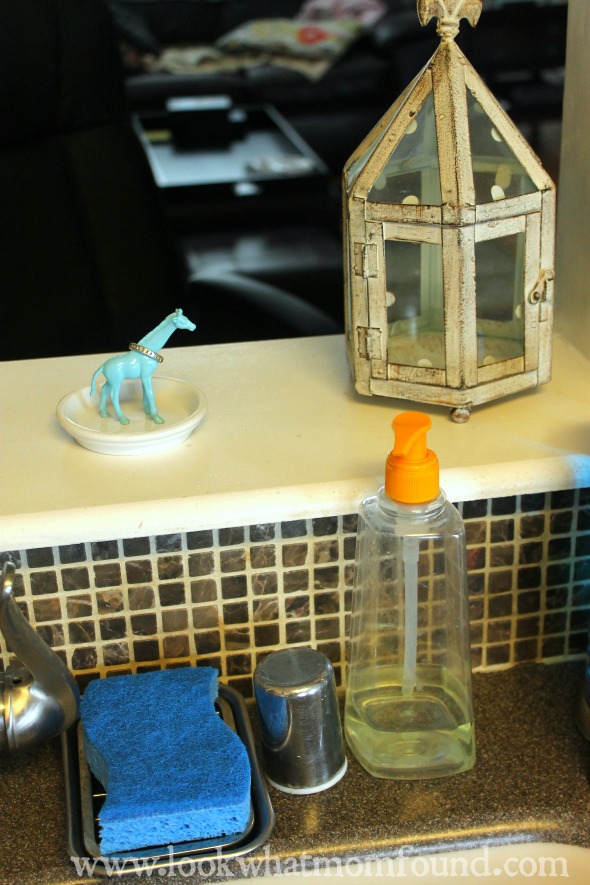
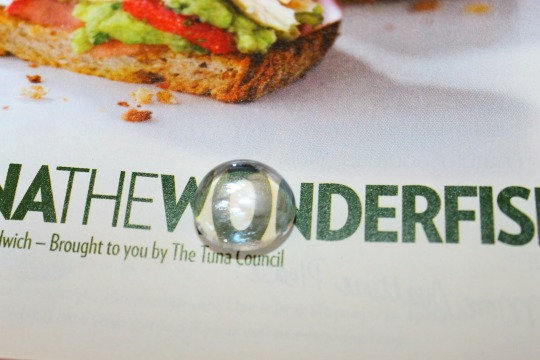
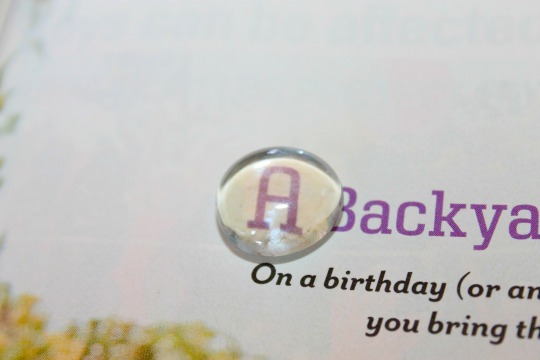
I found this on a new mail order craft site. The site is done well, the projects are gorgeous but they are way out of my price range for craft projects and supplies. I knew I could do it cheaper and just as well. For these animal ring dishes I only needed to purchase 1 thing, the dishes. I walked the craft store for 30 minutes and I found flower pot dishes that were a perfect size. I spent approximately $1.50 for 3 of them. For years we’ve been collecting these Safari Ltd Animal Toobs so I had no shortage of those. I also have a collection of spray paint and paint pens and a bin full of glues.Animal Ring Holder #DIY #craftymom

First I spray-painted the animals. I stuck a large saftey pin in them and gave them a quick coat from all angles. Animal Ring Holder #DIY #craftymom 
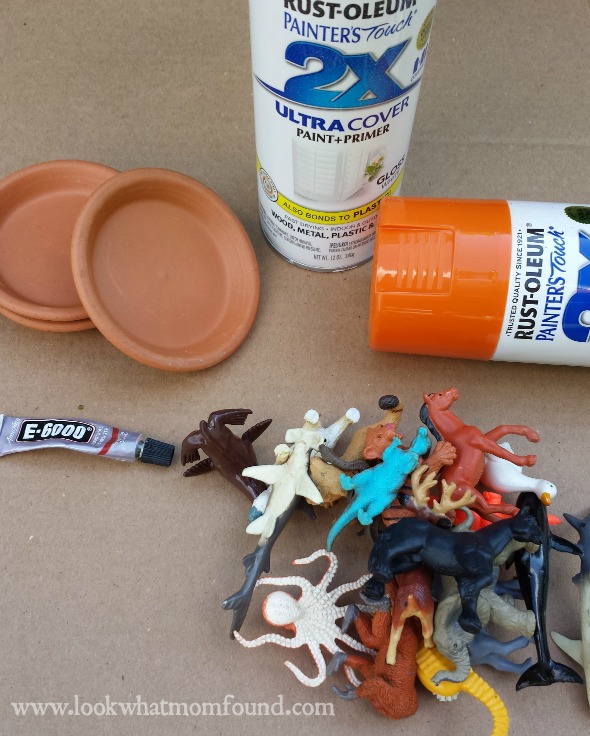
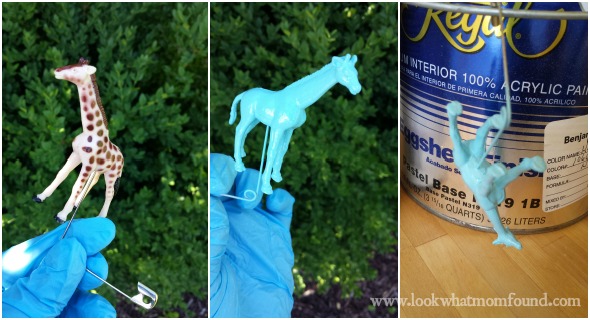
Then came the dishes. I started with the bottoms, 2 coats then gave the tops 3-4 even coats. This is what took the most time. I started late in a day and it carried over into the next day to get all the coats of spray paint on.Animal Ring Holder #DIY #craftymom

Then the weather was bad and we started a new project that lasted 2 weeks so the dishes sat on a shelf waiting for the next step.

It ended up working out. Painted items work best when they’ve had time to cure; set up. 2 weeks isn’t necessary but that’s what happened here.

Then with a toothpick and some E-6000 glue I attached the animals to the dishes.Animal Ring Holder #DIY #craftymom Animal Ring Holder #DIY #craftymom Animal Ring Holder #DIY #craftymom

I choose animals that stood tall or had a long neck or tail. This batch included a lizard with its tongue sticking out, a giraffe and a skunk who I didn’t paint because I was afraid he’s just end up looking like a cat.
I set them out to dry for 2 hours and it’s done.

This would be an amazing craft night project if you were using paint pens. I would suggest painting all of the dishes ahead of time.

I think i’m going to make some more but add some pattern to the dish or dress it up with beads or rhinestones. Animal Ring Holder #DIY #upcycle #craftymom

The lizard is for my friend Kelly. I thought of her the first time I saw this project. The giraffe is sitting near my kitchen sick to hold rings while I wash dishes or clean.Animal Ring Holder #DIY #upcycle #craftymom

Animal Ring Holder DIY Craft Animal Ring Holder #DIY #upcycle #craftymom


Painted Ceramic Owl #upcycle

I’m always on the hunt for inexpensive decor items for my home. It’s only recently that I realized what a huge difference art and sculptures and glassware can do to make a difference on a boring shelf.  For a long time I decorated with photos. While I still have tons of photos in my house I’ve starting incorporating more trends like this Painted Ceramic Owl #upcycle.
Painted Ceramic Owl #upcycle

I spotted him in a thrift store for $3. I hated the color of him but loved the size the shape. He was small enough to fit anywhere and had a good look. Painted Ceramic Owl #upcycle

I took him home and scrubbed him clean and set him on a shelf for a couple days till I decided what I wanted to do. I went with simple. I gave him 3-4 coats of bright white glossy spray paint.

It took most of the day to get all the coats on with a good amount of drying time in-between then another 2 days of him sitting on a shelf to completely cure and then he went on a small shelf along with some picture frames and a simple candle holder with candle.

Painted Ceramic Owl #upcycle

Painted Ceramic Owl #upcycle


Sometimes he takes up residence on a shelf in the kitchen. He’s adorable with his new coat of paint. Painted Ceramic Owl #upcycle

If I had decided on moving him to our bedroom he would’ve gotten a coat of Tiffany Blue to match our end tables.

This is an easy and expensive way to add a little something you didn’t know that you needed. See more of my crafty projects and upcycle ventures.


End of the School Year Lunch Box Notes #Printable #kidsinthekitchen

There’s a ton going on in our home. The weather is gorgeous so we’ve been spending lots of time outdoors. We’re using the fire pit and smoker to make dinner. Shaun is super involved in sports 3 nights a week. This means less time in the kitchen working on traditional meals. But that means I’m working on different ideas for #kidsinthekitchen like these Lunch Box Notes geared towards the end of the school year.

We occasionally do notes in their lunch. I like it to be an unexpected treat to bring a smile to their face. These notes will hopefully give them a little boost to get through the rest of the day because the end is near. The last day of school is coming up quick.

This is a printable so just click on the image and print. I’d recommend printing on cardstock.

End of the School Year Lunch Box Notes #printable #kidsinthekitchen

Come join me and my co-hosts, Sarah of Play to Learn with Sarah, Paula at Frosted Fingers and Sara at Sensibly Sara, each week linking up a post, new or old, that feature the theme Kids in the Kitchen. It doesn’t matter what you are doing as long as you are doing it together, enjoying it and learning something along the way.

You’ll find so many more ideas on the #KidsintheKitchen Pinterest Board.

Follow Melinda Babiak’s board #KidsintheKitchen on Pinterest.

Linky Rules, #kidsinthekitchen
#KidsintheKitchen Weekly Linky


Lace Covered Candle Holder #upcycle #craft

In honor of Earth Day 2014 (today) I’m sharing an upcycle project I did a couple week back. In a spring cleaning frenzy I cleaned out the kids drawers of outgrown clothing. This gorgeous blue satiny and lace shirt was in the pile. Sabreena picked it up in a thrift store but it never really fit right. It killed me to get rid of it, the lace was so pretty so I figured I could create something pretty with it. This Lace Covered Candle Holder was the perfect fit.Lace Covered Candle Holder #upcycle #craft

I had an empty Yankee Candle jar, a sleeker shape than the traditional jar, cleaned it really well and ran it through the dishwasher. I left the lace intact as I covered it. i didn’t want any cuts or gaps.

Lace Covered Candle Holder #upcycle #craft

Lace Covered Candle Holder #upcycle #craftLace Covered Candle Holder #upcycle #craft

With some glossy mod podge I started to attached the lace.

I worked in small sections so the lace stayed taut and in place. I left each section for 15 minutes so it set up then worked on another section and pulled the lace over the mod podge again.

I covered the entire piece of lace with mod podge again once the jar was covered. This gave it it’s final sheen. Using super sharp scissors I trimmed the lace off the top and bottom of the jar leaving a clean finish. I might go back and trim with wide grosgrain ribbon.

A lit tealight is enough light to shine through to still see the intricate lace pattern.

I have another jar, still have wax in it, but that will be transformed into a Lace Candle Holder too.


Jelly Bean Tree Centerpiece plus Giveaway

For the last few months I’ve been enjoying making some DIY home decor that fits the seasons and holidays. There was the Valentine’s framed Key to My Heart and the Christmas Card Display board. For Easter and spring it’s no different. I created this adorable Jelly Bean Tree Centerpiece for the dining table.jelly bean tree centerpiece

I’m hoping it lasts till June honestly. For the week it’s been up I’ve lost 1 tiny branch holding 1 jelly bean and that’s because I hit it by accident.

Materials
vase, jar, flowerpot, basket
stabilizer for wide mouth container (styrofoam, marbles, dirt)
branches
jellybeans of your choice
glue gun
polyurethane spray (optional)

jelly beans

Directions
Clean off your branches of dead leaves, buds and dirt.

Spray with a clear coat. I did this to get rid of the dusty look but there is nothing wrong with leaving it the way it is.  You might be able to see that I use a paper towel roll to hold the branches but keep  my hands free of over spray.

Jelly Bean Tree Centerpiece #craft #easycraft #EasterCraft
Arrange your branches in their container. I rubber-banded mine together very low so they spread out slightly.

Jelly Bean Tree Centerpiece #craft #easycraft #EasterCraft

I keep these marbles on hand for just these kind of projects. They are strong enough to keep the centerpiece in place but it’s not permanent. A block of floral styrofoam would work well. This can be topped with shredded green paper or Easter grass too.

Using your hot glue gun add small dabs of glue to your branches.

Jelly Bean Tree Centerpiece #craft #easycraft #EasterCraft #jellybeancraft

Then add your jelly beans. Do this one at a time. Hot glue is the best option as it dries FAST and clear. I DO NOT suggest adding the glue to the jelly bean because of the small surface space and the risk of fingertip burns. I speak from experience.

Jelly Bean Tree Centerpiece #craft #easycraft #EasterCraft

I went with jelly beans that had a vibrant color, I actually don’t like the way these taste. Coordinate your home and tablescape with jelly beans of any hue or just one color.

Jelly Bean Tree Centerpiece #craft #easycraft #EasterCraft #jellybeancraft

This was created with a vase I already had on hand, marbles I’ve had for many years and branches off a bush that hasn’t bloomed yet in my side yard. My only expense was a bag of jelly beans and I didn’t even use the whole bag. I though about adding more to the branches but I thought it would start to look more like a child’s craft.

 Jelly Bean Tree Centerpiece #craft #easycraft #EasterCraft

With just 6 days left until Easter, many of us are planning what to serve or bring to the big dinner, as well as how to decorate and add the extra touches that make our holidays memorable.  Colleen of Souffle Bombay and Heather of Real: The Kitchen and Beyond decided to gather 26 bloggers to share some of their Easter Entertaining Ideas with you! From Jelly Bean Trees to a Giant Deviled Egg, we’ve got you covered!  To make this even more memorable we have some amazing giveaways as well from John Boos (crafter of incredible cutting boards, butcher blocks and more) , The Spice House (THE online source for incredible spices), Wilton Armetale (maker of both beautiful & finctional serving ware), Divine Chocolates (a fair trade, farmer-owned chocolate company) & The Tree Hut (natural body products that do what they say) for a few lucky readers!  Follow along via #AllThingsEaster on social media this week and visit our Pinterest Board “All Things Easter” for more ideas.  Now if only we had a magic formula to make all those dishes disappear, Happy Easter!

Ideas for Leftover Easter Eggs

Giant Deviled Egg | Souffle Bombay

Easter Breakfast Recipe Ideas

Easter Breakfast Casserole | How I Pinch A Penny

Baked French Toast | O’Boy! Organic

Dutch Baby | The Naughty Mommy

Easter Dinner Recipe Ideas

Scallion & Brown Butter Mashed Potatoes | Musings of a Housewife

Baked Cheesy Broccoli & Rice Casserole | We’re Parents!?

Cheesy Potato Casserole | Coupon Cutting Mom

Easter Dessert Recipe Ideas

Peanut Butter Eggs | Real: The Kitchen & Beyond

Toasted Angel Food Cake Parfait | What the Heck’s a Bonbon?

Allergy Friendly Cookies | Chockababy

Individual Lemon Meringues | Pandora’s Deals

Peeps in the Pond Trifle | Opera Singer in the Kitchen

Rice Krispie Pops/Chocolate Covered Pretzels | A Grande Life

Easter Cocktail Recipe Ideas

Raspberry Beer Float | Teaspoon of Spice

The Peter Cottontail Cocktail | Can’t Google Everything

Bunnytail-tini | Mommy Snapped 

Easter Decorating Ideas

Easter Printable | Diapered Daze and Knights

Easter Centerpiece | The Vintage Mom

Jellybean Tree Centerpiece | Look What Mom Found

Easter Gift Ideas

Allergy Friendly Non-Toxic Easter Basket | Mom-Blog    

Naturally Dyed Wooden Easter Eggs | Inspired Family

Sugar Free Easter Basket Ideas | philly fun 4 kids

Easter Fun

5 Easter Activities for Kids | Mama Teaches

Pretzel Fun for Family | Homeroom at Home

Taking Great Easter Photos | Life with Kaishon

Frugal Easter Basket Ideas & Menu

Frugal Easter Ideas | Centsible Life

Easter Egg Pass | A Life in Balance

John Boos for the beautiful maple cutting board, The Spice House for their spice and baking gift sets, Divine Chocolate for their luxuriously rich Fair Trade Chocolate gift basket, Wilton Armetale for the elegant egg plate, and Tree Hut for the body scrub and lotion.
#AllThingsEaster Prize Pack

#AllThingsEaster Prize Pack
a Rafflecopter giveaway


No Dye Decorated Easter Eggs

Our family doesn’t put much thought into the characters of holidays and traditions like the Easter Bunny, Tooth Fairy or Elf on the Shelf. BUT I do love the look of decorated Easter eggs, they are just so pretty. Here are some of the cutest No-Dye Decorated Easter Egg designs I’ve found. No -Dye Decorated Easter Eggs

Mom.Me Sharpie Marker Eggs

Kimberley Stoney Glitter  Dot Eggs

Adam & Sons Confetti Dot Eggs

Lovely Indeed Washi Tape Eggs

A Thrifty Mom Melted Crayon Eggs

Landeelu Twine Wrapped Eggs

Pinching Your Pennies Fabric Covered Eggs

There is nothing wrong with dyeing eggs but why not step out of the box and test you creative abilities with options like these.

Some of these crafts can be done with inexpensive plastic or styofoam eggs instead of real eggs so they can be saved and set out each year.


Paper Pinwheels in Mini Flowerpots #craft

Happy Spring! Today marks the day of a new season full of promise and excitement. The green grass and daffodils poking through the snowflakes shows that there are BIG things happening. In our house we looking forward getting outside and enjoying the weather changes and shining sun. In the meantime we’re crafting fun and colorful things like these Paper Pinwheels in Mini Flowerpots.Paper Pinwheels in Flowerpots
This craft is also part of a mini clay pot challenge brought forward by Barb of A Life in Balance.

This is what I came up with.

Supplies

  • mini clay flowerpot
  • beads or marbles
  • Styrofoam ball
  • paper
  • brads
  • skewers
  • glue

Paper Pinwheels Supplies #craft

Directions

I’m a Silhouette Cameo user so my pinwheel shapes are cut out for me but cutting these out yourself is very simple. Using this tutorial is one of the easiest I’ve ever seen and can be modified for any size pinwheel.

Taking your pinwheel shape and pull the ends down and secure with a brad. OR you can follow the directions on the tutorial and use the pin and pencil method to make it spin. My version doesn’t spin in the wind.

Paper Pinwheels in Mini Flowerpots

Paper Pinwheels

My version has you adding a blob of glue to the back of the pinwheel and securing the skewer in place with a scrap of paper on top for a cleaner look.Paper Pinwheels #craft

Paper Pinwheels #craft

Place your styrofoam ball to the clay pot, use glue if wanted. Arrange your pinwheels in your styrofoam ball.styrofoam for pinwheels

Add your beads or marbles to cover the styrofoam. Again using glue if wanted.Adding marbles Pinwheels #craft

Your pinwheel bouquet is ready to display.Paper pinwheels